For a long time, I assumed that classic low-and-slow smoked ribs were the best way to make ribs. But after spending more time cooking with different setups, I realized there’s another approach that deserves much more attention: direct-heat ribs.
There are a million ways to make ribs, but a lot of people compare ribs from a smoker to ribs cooked on a standard gas grill, which just isn’t a fair comparison. But cooking ribs over a direct heat cooker provides a middle ground that combines the benefits of both. When done right, this method gives you the tenderness you expect from traditional smoked ribs, along with the deeper caramelization and light char that barbecue ribs on the grill are known for. The result is a truly unique-tasting rib that I personally prefer over any other style of rib.
In this guide, I’ll walk through the full process for making direct heat BBQ ribs, what makes them different, how to adapt the method for a gas grill, and a few tips to help the cook go smoothly.
Jump to:
Why Direct Heat Grilling Works for Pork Ribs
Traditional barbecue ribs are slow-smoked at 225–275°F, which can take 3–6 hours to cook, depending on the type and size of ribs you’re working with. That method slowly renders fat and breaks down collagen — and it does a great job. But I prefer grilled ribs with direct heat.
But before I talk about why I like this method best, I think it’s important to understand what I mean by "direct-heat ribs." This method isn’t just ribs thrown on a gas grill — direct-heat ribs are cooked directly over an open flame (or a bed of charcoal) at low to moderate temperatures. This is sometimes called hill country BBQ (Bradley Robinson, of Chud’s BBQ, is a great resource for this style of cooking).
For this ribs recipe, I run my grill at 300–325°F. I find that this temperature range is ideal for a few reasons:
- Fat renders faster than traditionally smoked ribs, so you have a shorter cook time.
- Collagen still breaks down efficiently — it begins breaking down around 190°F and fully softens at 195–205°F. Running the grill hotter gets you there faster — without sacrificing tenderness.
- Browning develops much sooner and, overall, provides a significantly better texture than classic ribs, especially those smoked at 225-250 degrees.
The flavor that you get from cooking ribs this way is utterly unbeatable. Besides the benefits I already listed, you get the flavorful smoke from fat dripping on coals that you can’t get from a lot of other classic methods of grilling or smoking. Plus, using this method gives you ribs that finish cooking in significantly less time, often after only 2-3 hours of cooking. That’s significantly faster than traditionally smoked ribs.
What Type of Grill is Ideal for Direct Heat Cooking?
There are lots of products that you can use this cooking method on, most notably for home cooks, such as a kamado-style grill like a Big Green Egg or Weber. You're ideally just looking to make these in a cooker with at least a foot of space between the grates and the heat source. Personally, I love using my 1904 Pitts Trolley for this, but other similar competitors’ models include a Chudbox, Smokeslinger, or TMG Dumpster.
What’s great about these options is that the grates are all 2 feet above the coal bed, giving you much more flexibility than a traditional grill or smoker to increase grill temperatures without burning the food. I will note that these latter options are custom builds and more costly, so a Weber kamado-style grill or even a barrel smoker is a great option if you’re looking to use this method on a grill at a lower price point.
Ingredients

For this recipe, you’ll need:
- 1 rack pork spare ribs (3–4 lbs)
- Salt and black pepper (1:1 ratio) or dry rub - just stay away from sugary rubs. They will burn.
- Worcestershire sauce
- 2 cups mop sauce — You can grab my recipe for a mop sauce here!
I prefer spare ribs here because they are thicker and hold up better to direct-heat grilling than baby back ribs (though the latter can still be used). Just be careful with baby back ribs because they are leaner and can dry out. If you’ve already trimmed your spare ribs into a clean St. Louis style rack, even better — uniform thickness cooks more predictably.
How to Cook Direct Heat Barbecue Ribs on the Grill
Here’s the full step-by-step method.
Step 1: Preheat the Grill
Bring your grill to 300–325°F. This temperature range gives you the best of both worlds: extremely tender ribs and great bark char.
Gas Grill Setup: Two-Zone Strategy
I’ve talked a lot about direct heat cookers, but if you’re using a gas grill —not to worry—here’s how to set it up for this method:
- Preheat all burners on the lowest setting (still target 300–325°F). If your grill can maintain this temperature range, you're good to go.
- If not, use a two-zone strategy by turning off one to two burners (whichever is needed to reach the desired cooking temperature range, depending on your grill) to create a cooler zone. You’ll still cook the ribs over the hotter burner, but I’ve found that this trick not only helps lower the grill temperature to the desired range but also gives you space to move the ribs if you face any flare-ups.
Step 2: Trim and Prep the Ribs
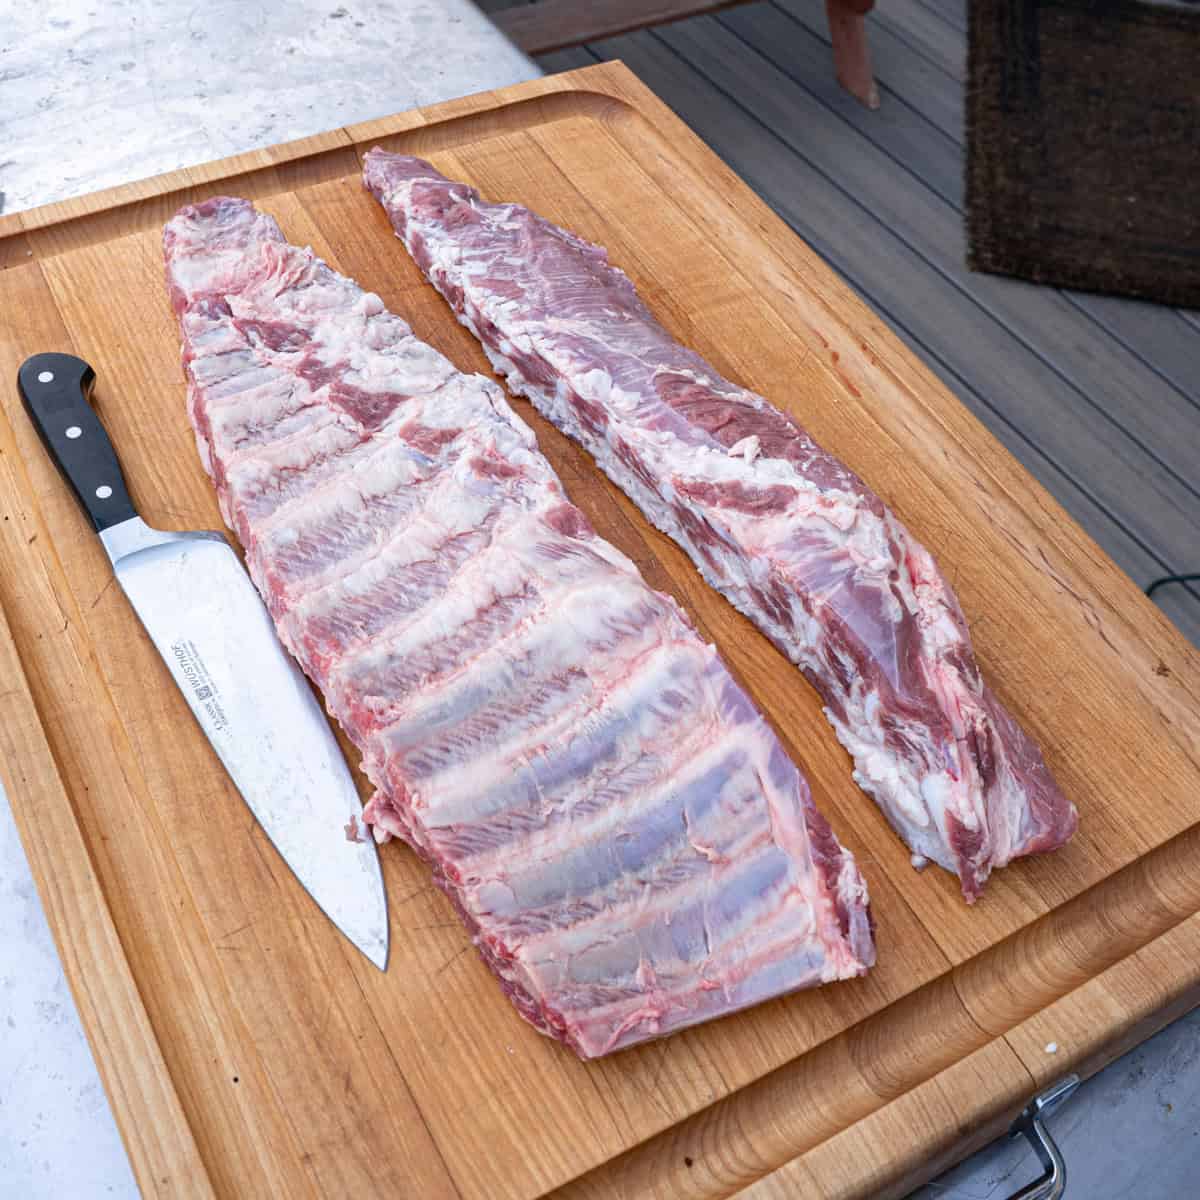
While the grill is coming up to temperature, take out your ribs and trim them up. You can check out my guide here if you’re interested in how to do this, but the main points in trimming spare ribs are to remove any excess fat and cut off the thin bones on either side of the ribs. A lot of people like to remove the membrane, too, but I find it unnecessary when cooking ribs at these temperatures.
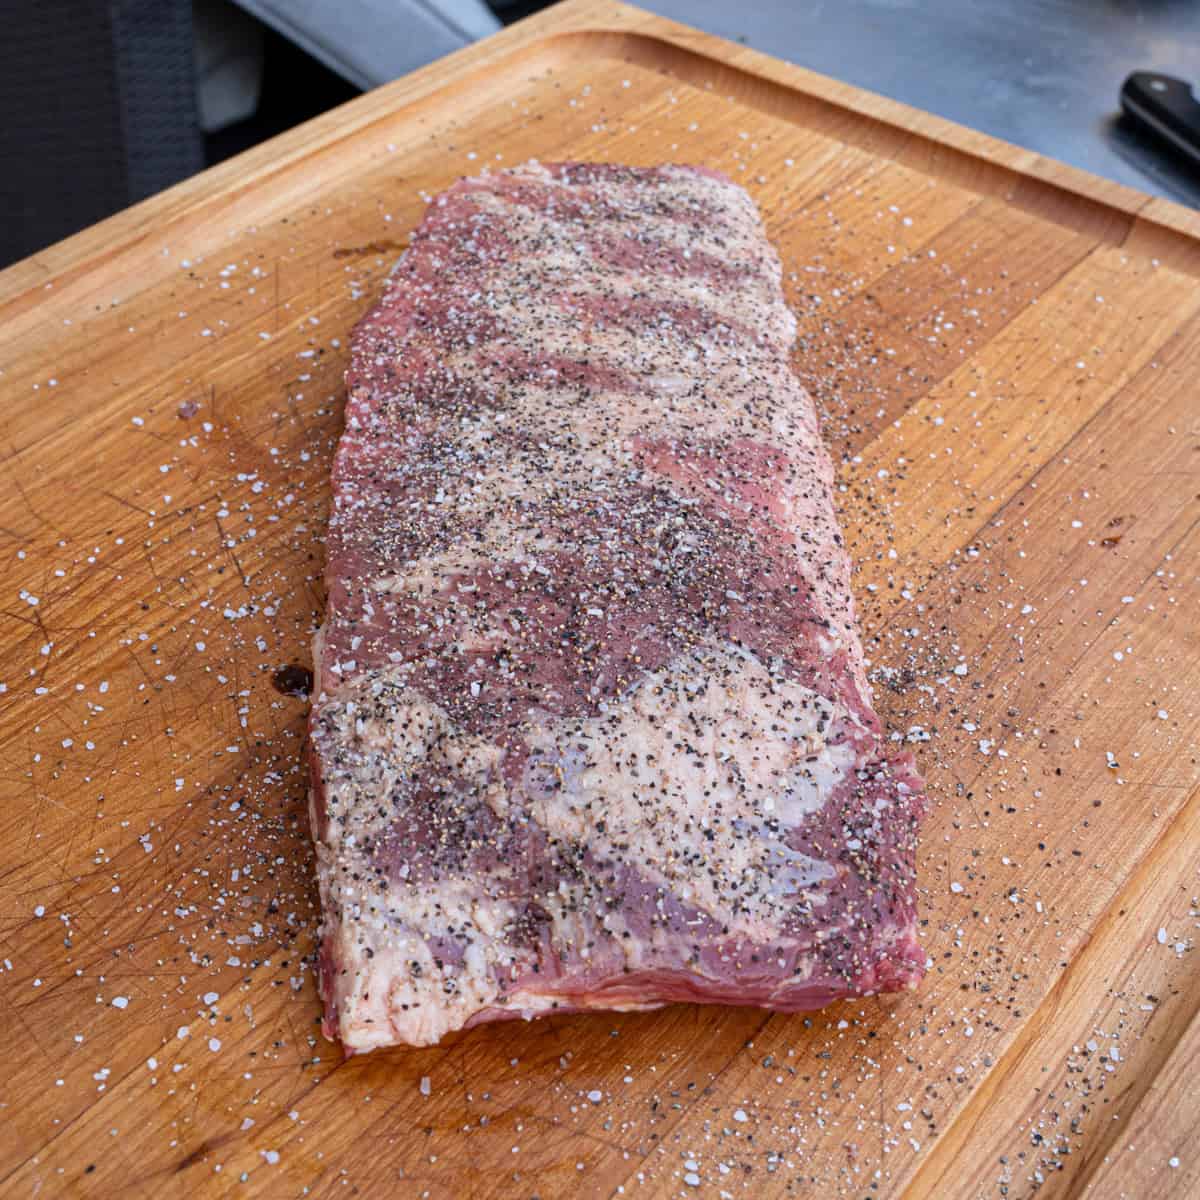
After that, apply Worcestershire sauce as a binder and season generously with salt and pepper or your favorite rub.
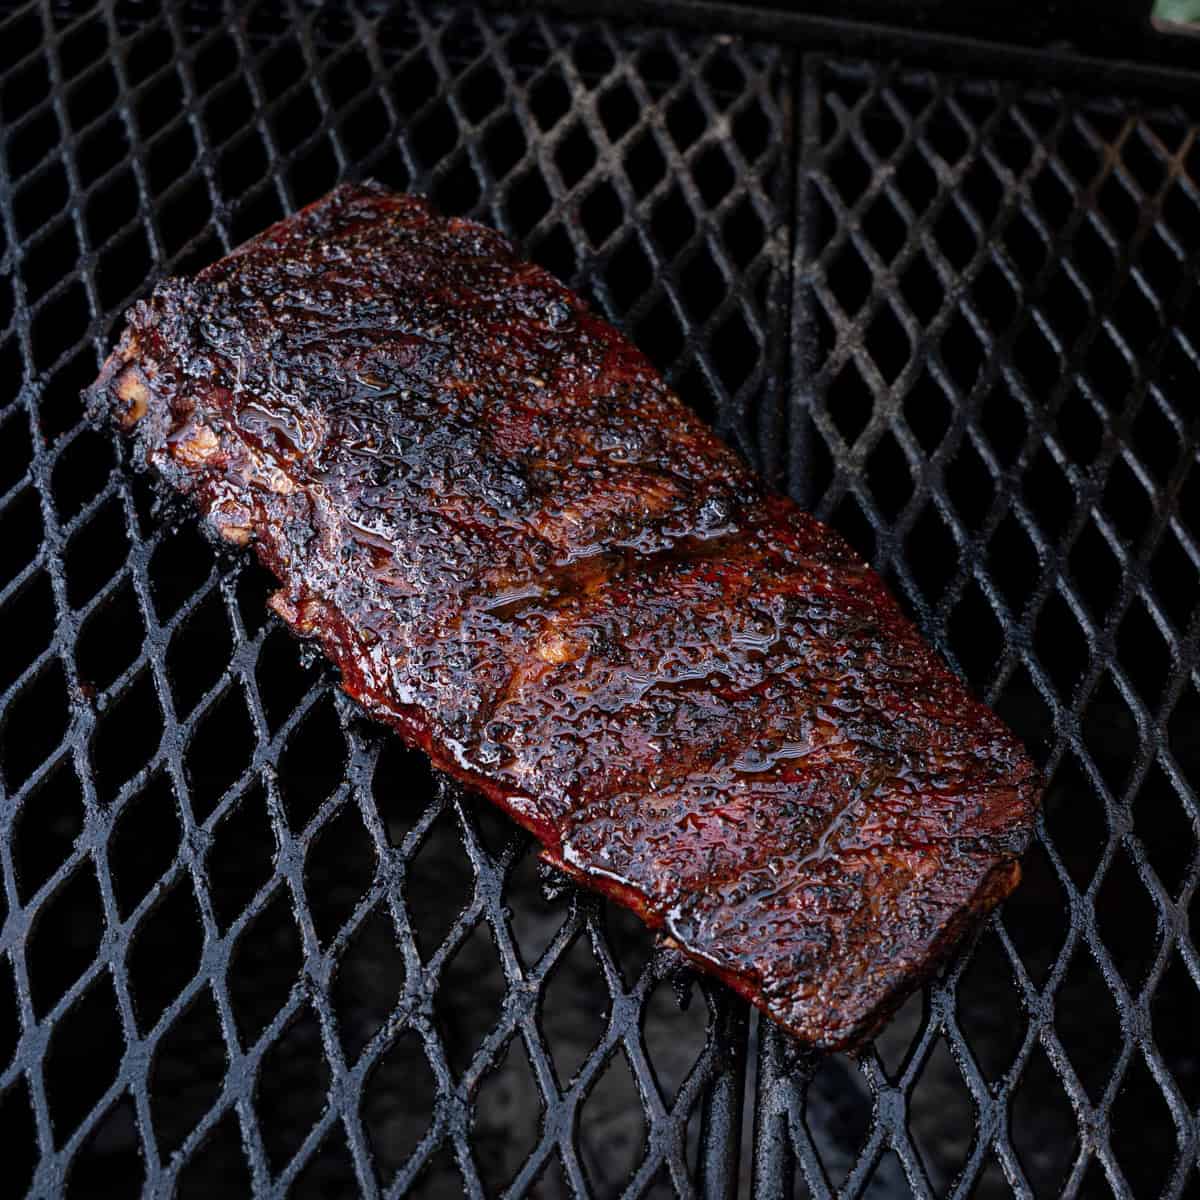
Step 3: Grill Bone Side Down
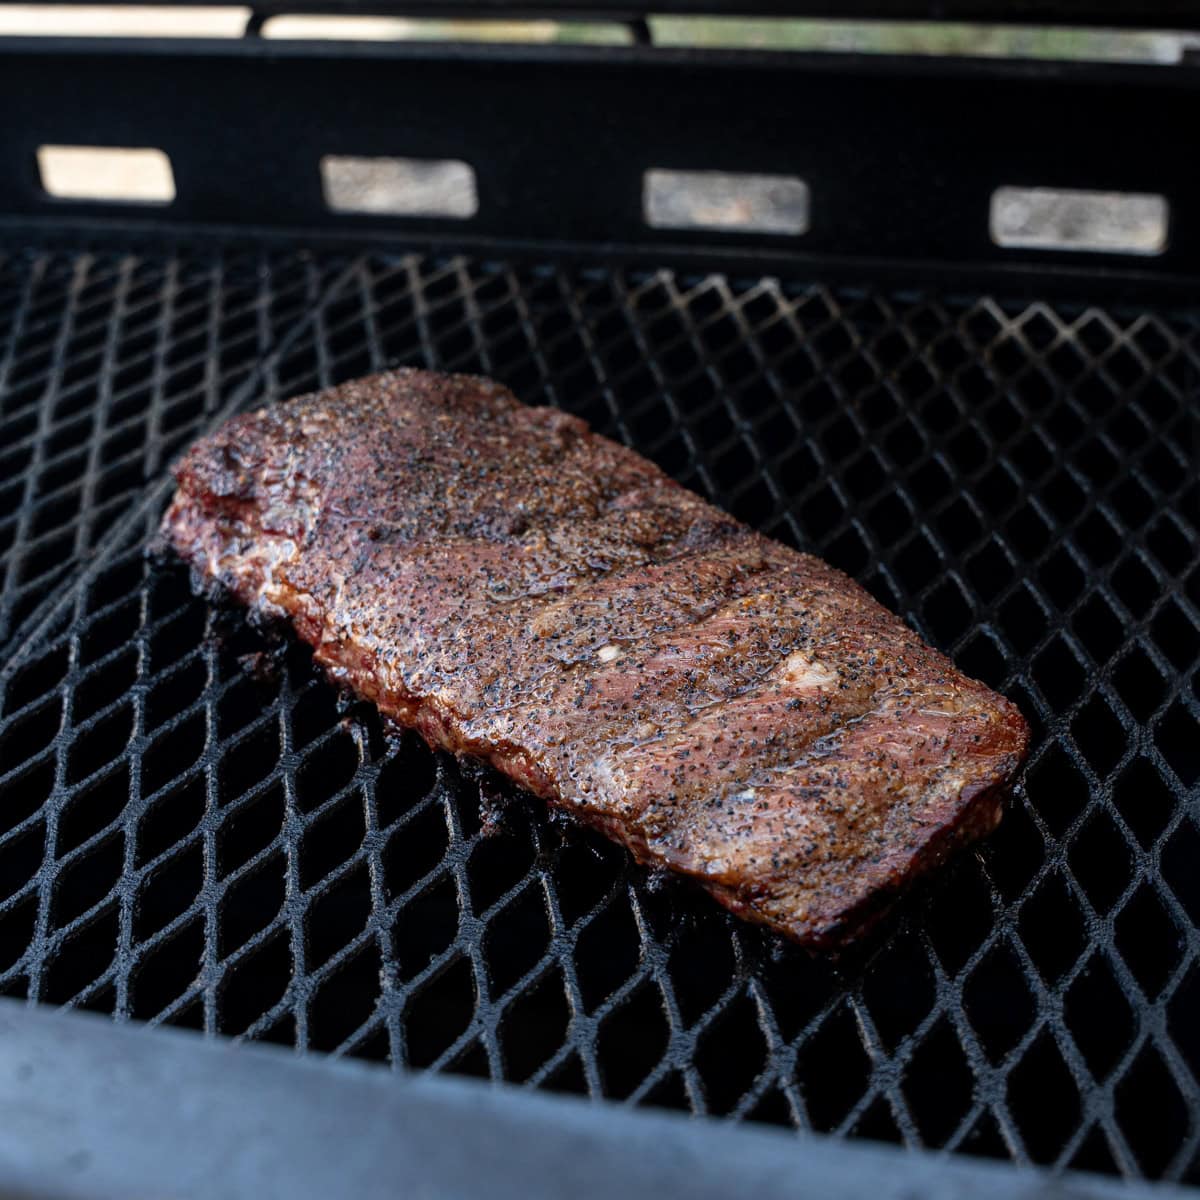
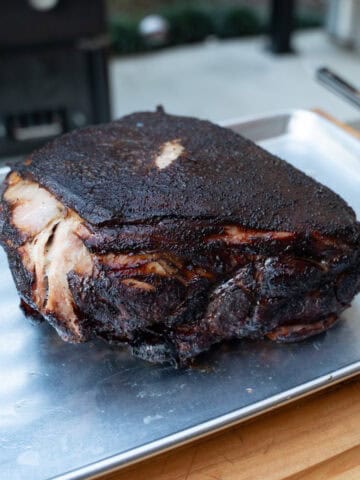
Place the ribs bone side down directly on the grill surface and Cook for 1 to 1½ hours without flipping. Just close the lid and let the grill do its magic. Bone-side down protects the meat from direct flame and allows the fat to begin rendering. After an hour or so, you’ll start to notice the surface darken and firm up.
Step 4: Flip Meat Side Down
Next, flip the ribs so the meat side faces the grates. I like to do this step for ~45–60 minutes, so a bit shorter than the other side. I primarily do this until I can see the following signs:
- Light charring
- Surface caramelization
- Deepening color
Watch closely during this stage — especially if you are using a gas grill. You want to make sure the meatside doesn’t burn.
Managing Flare-Ups (Especially for Gas Grills)
If the flames suddenly jump up and you get a flare-up, don’t panic — this is a normal part of cooking ribs over flames. As the fat renders, it will drip onto the fire, and occasional flare-ups can happen — especially if cooking on a gas grill, Weber, or kamado-style grill.
If the flames spike, move the ribs to your cooler zone and let the fire settle down. If you’re using a kamado-style grill, you can use a deflector plate on one side to accomplish this same goal. Either way, briefly closing the lid can also help by limiting oxygen and reducing flame intensity. Just avoid spraying water on the grill, as this can spread grease and actually make the situation worse. Once the flames die down and the grill temperature stabilizes again, you can move the ribs back to where you were initially cooking them.
Just remember flare-ups aren’t always a problem — they’re part of cooking over live fire and what sets these ribs apart. Properly managing them is what makes direct-heat grilling work.
Step 5: Mop and Finish
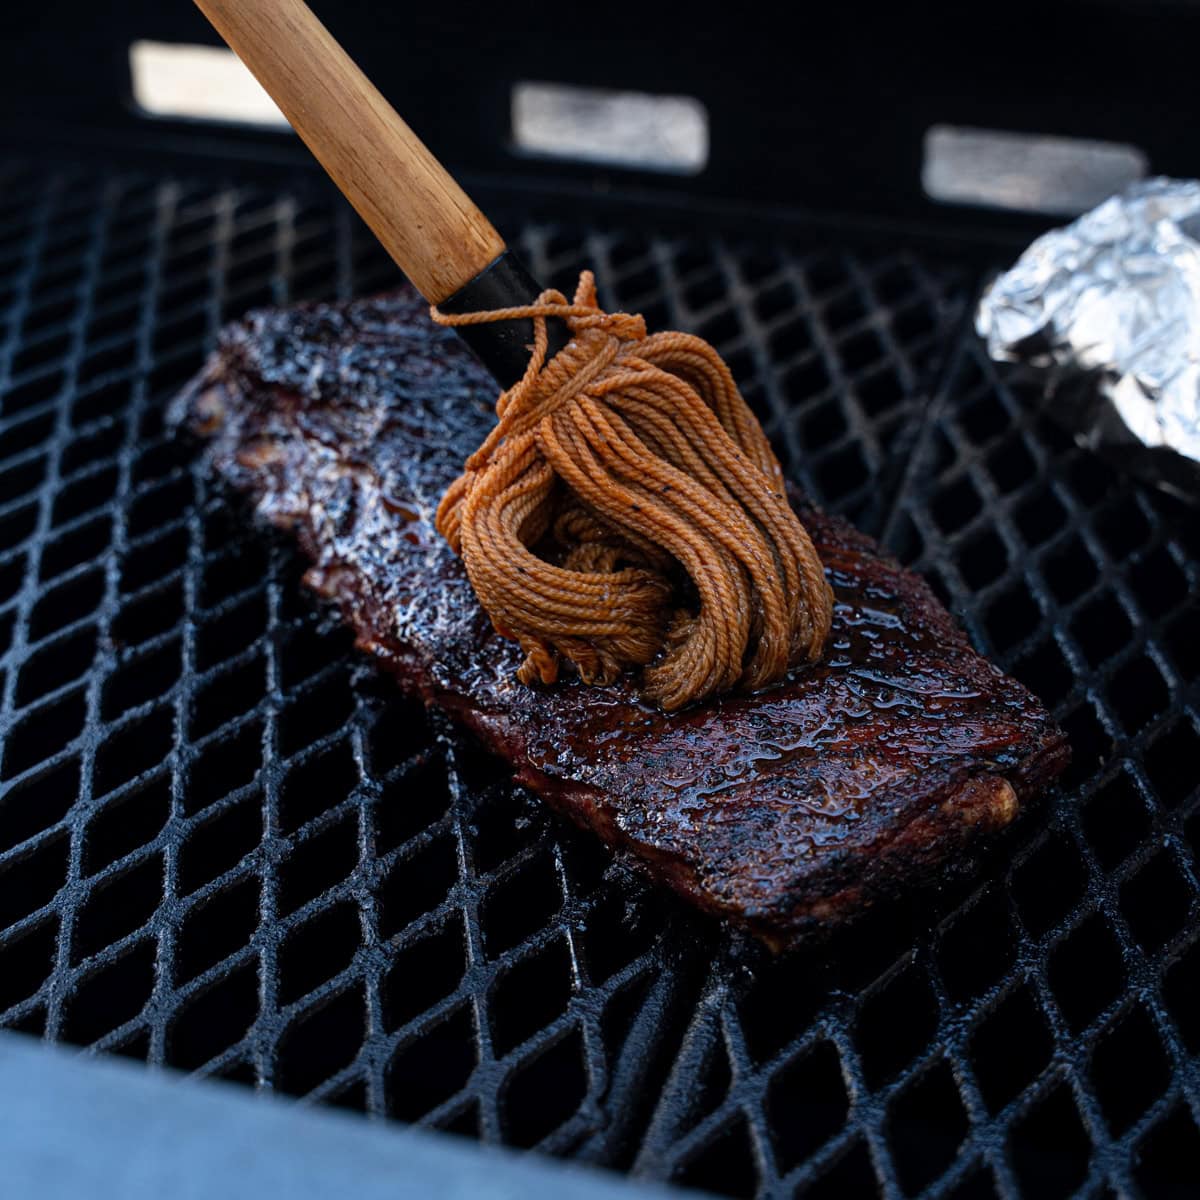
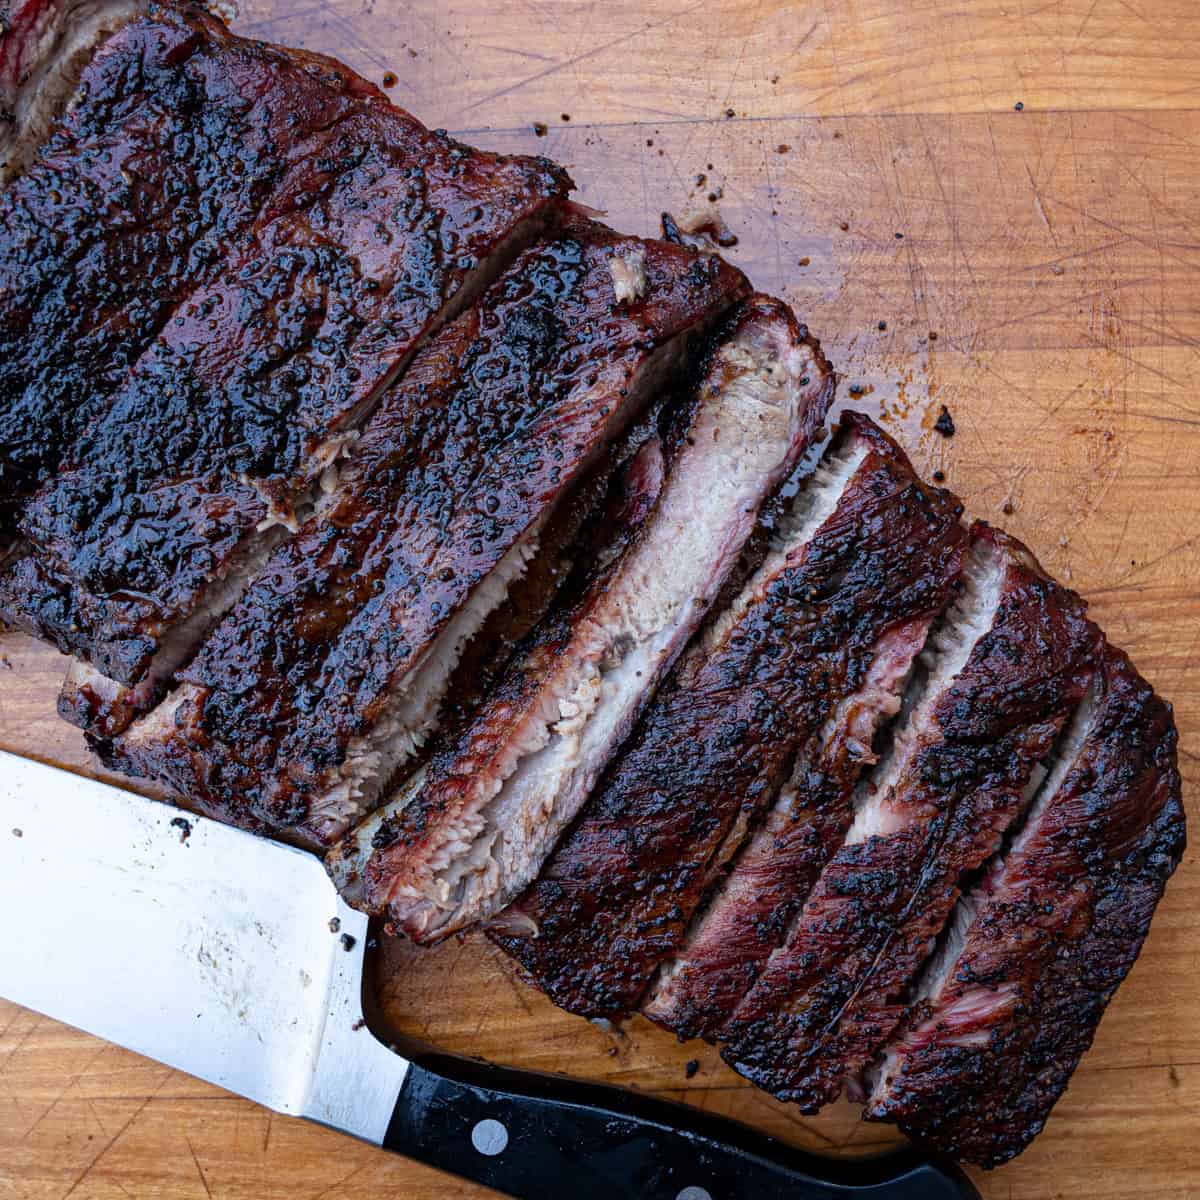
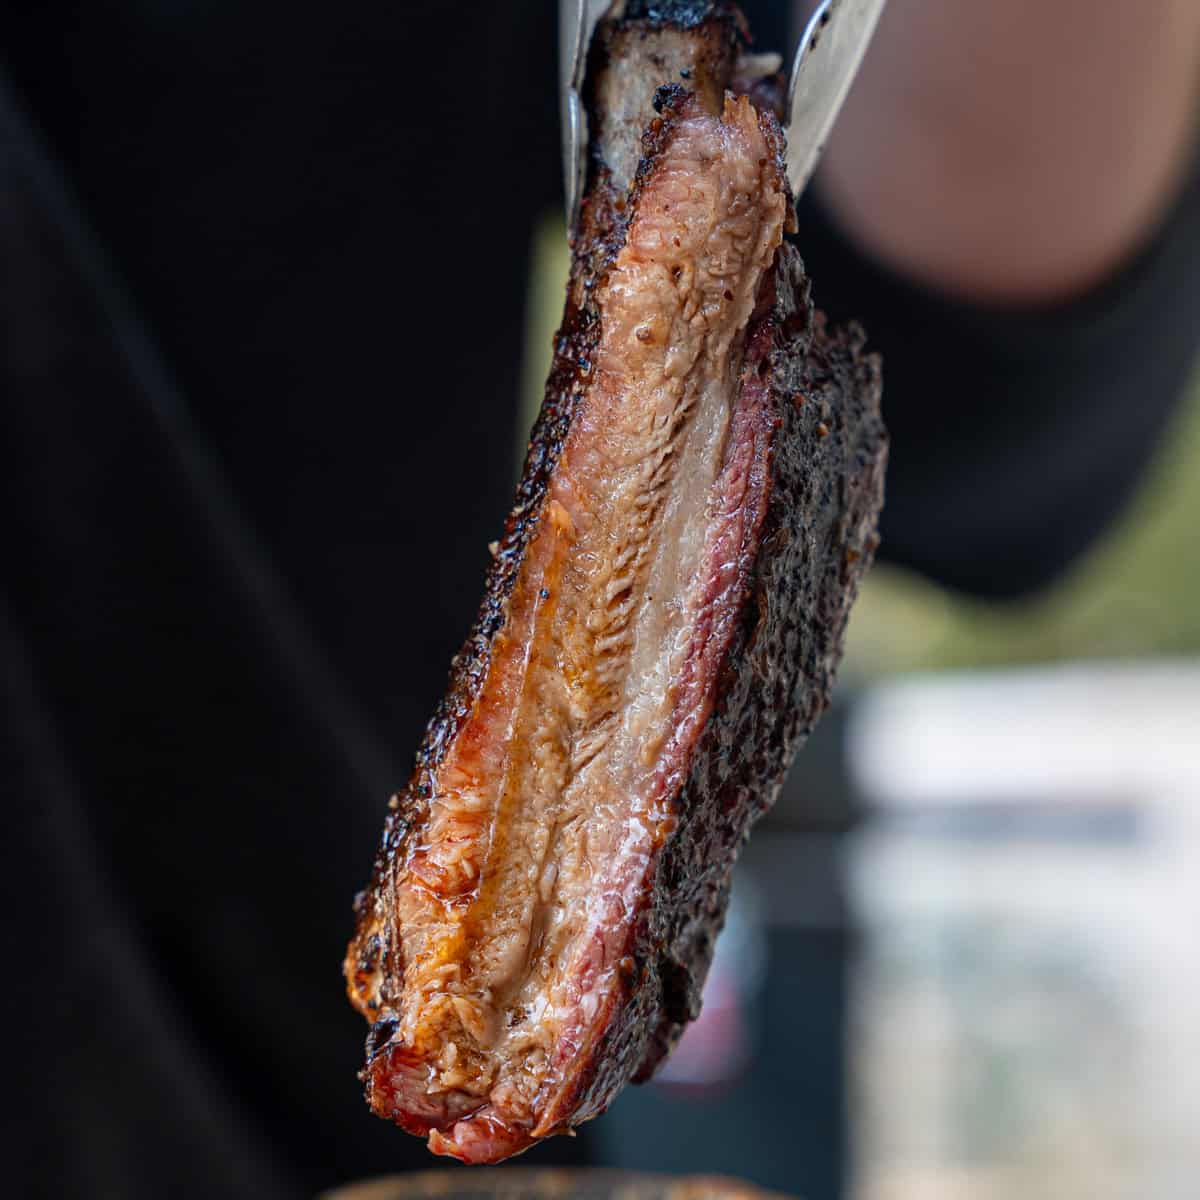
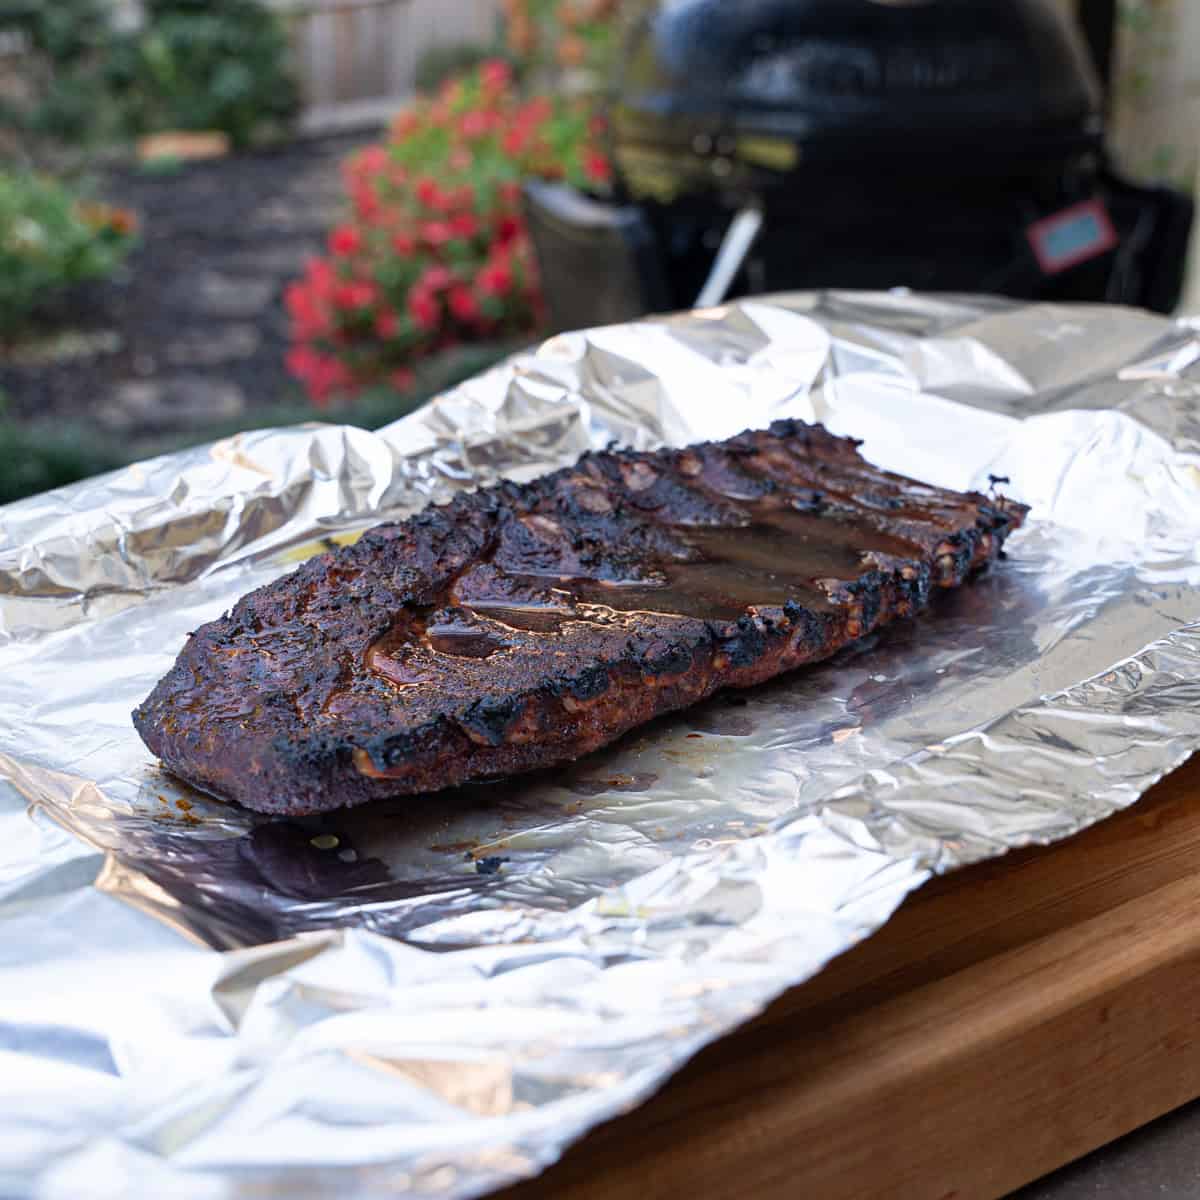
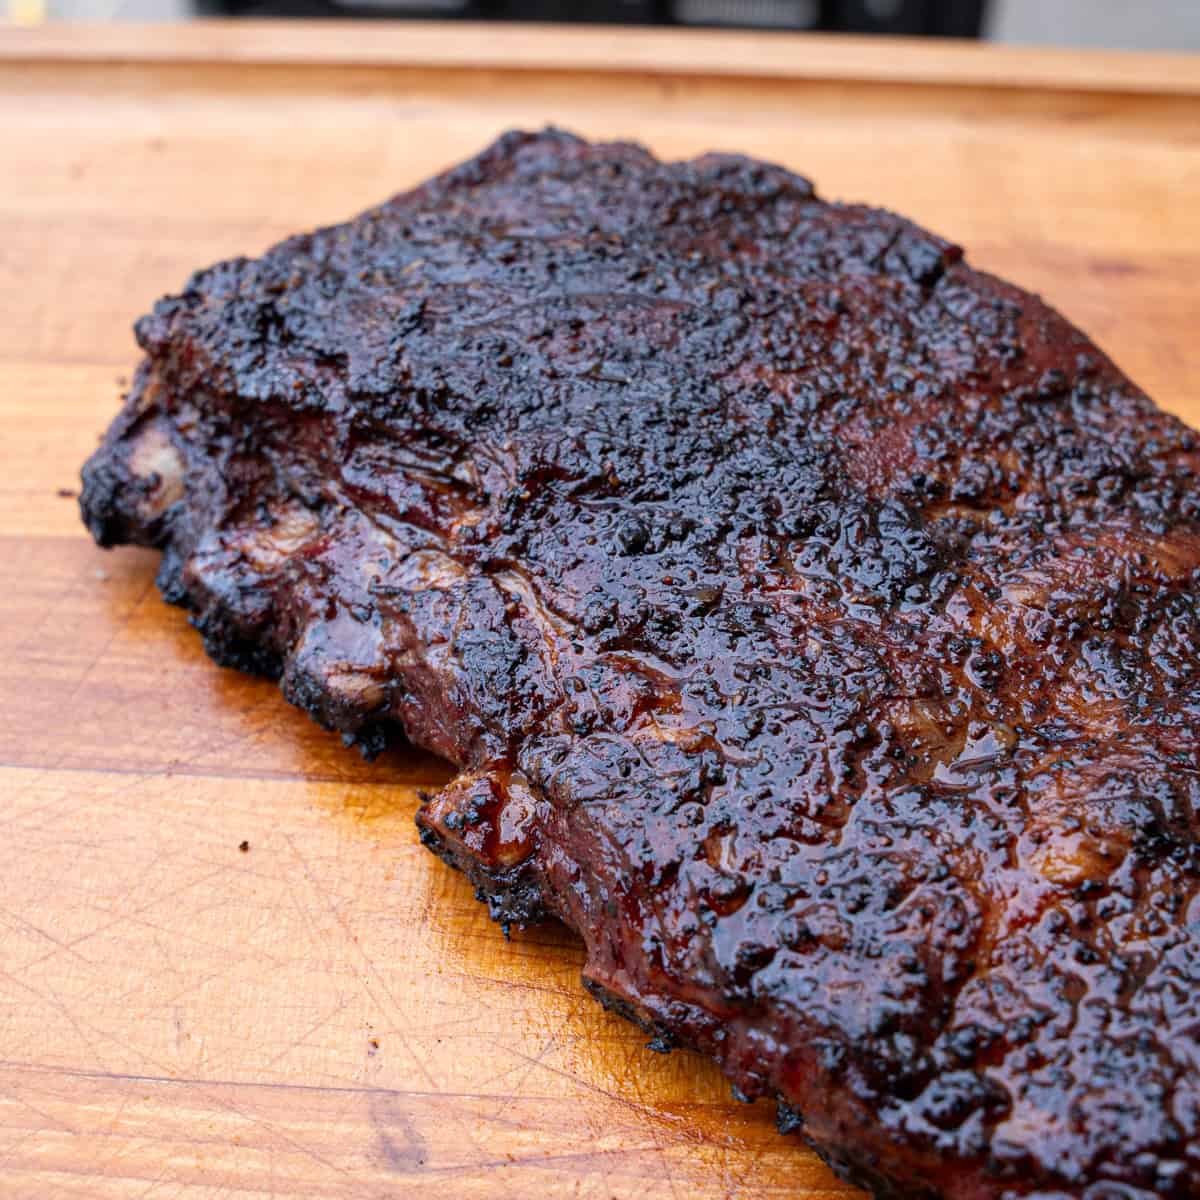
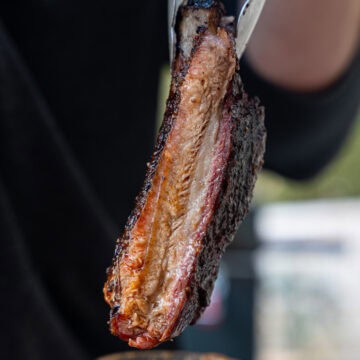
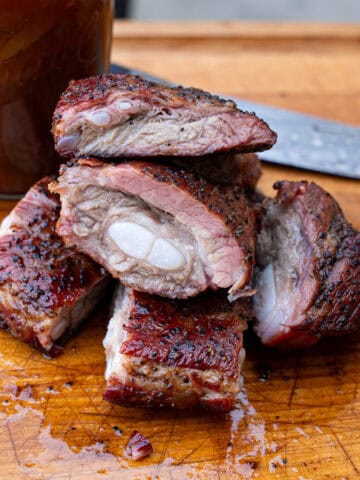
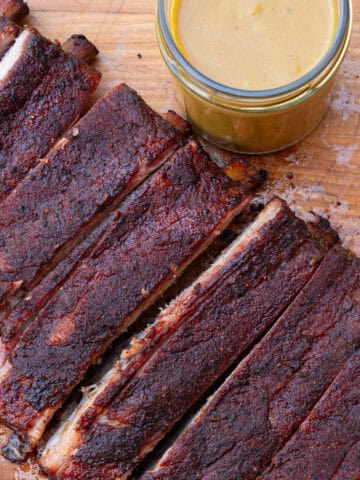
Once the meat side of the ribs achieves those physical cues with a light char and mahogany color, flip them over. Now start mopping the ribs every 20 minutes or so until the ribs reach ~205 degrees and are probe tender. You can test this by picking up the ribs with tongs, too. If they have a nice floppy bend, they are good to go. If they are still stiff, they need to cook longer.
Once the ribs are off the grill, give them one more round with the mop sauce and wrap them in foil. Let them rest for at least 30 minutes, then remove them from the foil, slice them up, and serve. Enjoy!
Why mop sauce instead of thick barbecue sauce?
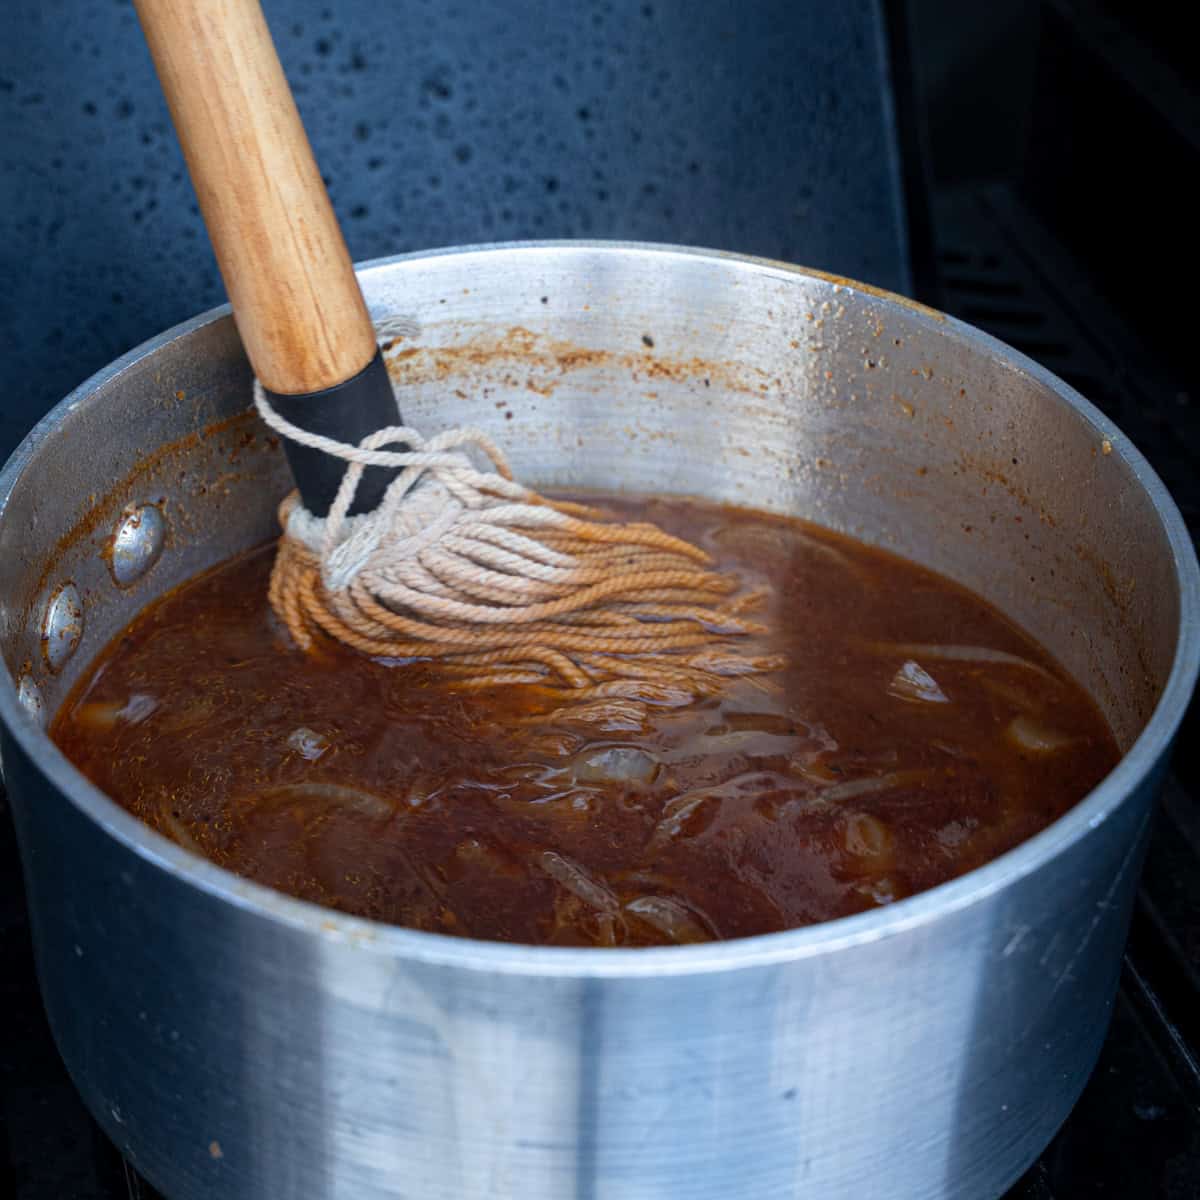
I highly recommend using a vinegar-based mop sauce rather than a thick, sugary barbecue sauce for this recipe. When cooking over direct heat, sugar can be problematic — most traditional BBQ sauces contain a fair amount of it, and sugar begins to caramelize around 320°F and can burn above 350°F. Those temperatures are easy to hit on a hot grill, which can lead to bitter or blackened spots. A mop sauce is thinner and typically contains little to no sugar, allowing you to build layers of flavor and keep the ribs moist without the risk of scorching.
If you prefer that classic glossy, caramelized BBQ finish (check out my cherry molasses BBQ sauce if so -- I love it!), the most effective way is to apply your barbecue sauce during the last 15-20 minutes of the cook, just long enough for it to set without burning. When you wait and brush on sauce at the end, you get that lacquered sheen and deep caramelization without the risk of scorched sugar.
Should You Wrap Your Ribs?
There is a lot of debate over whether ribs need to be wrapped. In my opinion, it depends on the outcome you’re going for, which is why, for this style of rib, I do not wrap them while they are on the grill. Going this route gives a better bark, and they cook plenty of fast at these higher temperatures. If I’m smoking ribs indirectly, I do tend to wrap them to speed up the cooking process. At the end of the day, though, it all comes down to preference.
Equipment Needed
- Ideally, a direct heat cooker (although a gas grill, kamado-style grill, or traditional charcoal grill can be substituted if needed)
- Tongs
- Boning Knife
- Chef’s knife
- Aluminum foil
- Saucepan
- Basting Mop
- Wooden Spoon
- Instant-read thermometer
- Measuring cups & prep bowls
Storage and Reheating
Leftover barbecue ribs off the grill keep well in the refrigerator for up to 4 days when stored in an airtight container. I like to keep them wrapped tightly or stored with a little extra sauce to help retain moisture.
How to Reheat Ribs
My favorite way to reheat individual ribs is in the air fryer at 350 degrees until warmed through, about 6-8 minutes. If I have a whole rack that has not yet been sliced, I use the same process in the oven. I’ve found that this does the best job of keeping the meat warm and moist without drying it out, as you can with a microwave.
How to Freeze Ribs
If you want to store them longer, wrap the ribs tightly in plastic wrap, place them in a freezer-safe bag (or vacuum-seal them), and freeze for up to 3 months. Thaw them overnight in the refrigerator when you’re ready to pull them out to eat for the best (and safest) way to go.
Interested in More Rib Recipes?
If you want to explore different styles of cooking ribs:
- 3-2-1 Ribs for Beginners
- How to Smoke Ribs in 4 Hours or Less
- Smoked Baby Back Ribs
- Party Style Ribs with Maple Bourbon Glaze
- How Long to Smoke Pork Ribs at 250°F
Direct heat grilling is just one approach. Master this, and you’ll understand ribs at a deeper level.
Recipe
Direct Heat Smoked Ribs
Equipment
- Direct heat cooker (although a gas grill, kamado-style grill, or traditional charcoal grill can be substituted)
- tongs
- Boning Knife
- Chef's Knife
- Aluminum Foil
- saucepan
- Basting Mop
- Wooden Spoon
- instant read thermometer
- Measuring cups & prep bowls
Ingredients
- 3-4 lbs. (1 package) Whole Spare Ribs
- ¼ C salt & pepper mix 1:1 ration and use as needed
- Worcestershire sauce as needed
- 2 C Prepared Mop Sauce
Instructions
- Preheat your grill or smoker to 300-325°F. While it comes up to temp, trim any excess fat from the ribs. Then, using a sharp, heavy knife, cut off the lower portion of the ribs—the strip of cartilage and small bones along the top edge. This section is known as the rib tips. If you're going for a more uniform, St. Louis-style rack, this step will square up the slab and help it cook more evenly.
- Once that section has been removed, peel off the membrane from the bone side of the ribs, apply a thin coat of Worcestershire sauce as a binder, and season both sides generously with salt and pepper or your BBQ rub of choice. Once the smoker is preheated, add the ribs bone side down and smoke them untouched for 1 – 1 ½ hours. At this point, flip the ribs and cook for another hour.
- Once each side begins to get a nice, charred exterior, flip the ribs back over so the meat side is facing upwards and begin to baste the ribs with the mop sauce (grab my recipe here), reapplying the sauce every 20 minutes or so.
- Allow the ribs to continue cooking until the skin has turned a deep mahogany color, the teeth begin to show, and the ribs have a nice bend to them when picked up (we call this passing the flop test). You can also look for an internal temperature of ~205 degrees. Once these cues occur, remove the ribs from the grill.
- Apply the mop sauce one more time and wrap the ribs in aluminum foil. Allow them to rest for 30 minutes, then remove them from the wrap, slice them up, and serve. Enjoy!
Notes
- Sauce Strategy: If you aren't using the mop sauce and opting for a more traditional sauce, make sure not to add it too early in the cook. Sauce during the final 15–20 minutes to prevent burning.
- Doneness Check: Ribs are done when they bend easily and show slight cracking on the surface, but do not fall apart completely.
Leave a Reply