Ribs were always the one cut of BBQ that gave me the most trouble when I first started cooking. No matter how many times I tried, they just never turned out quite right.
The First Rack of Ribs I Ever Smoked
The first time I made smoked ribs was almost ten years ago, back when my wife and I were living in an apartment in downtown Atlanta. I had this little electric smoker—one of the only things allowed in our complex—but I was fired up about it. That first rack wasn't great (in hindsight, pretty rough), but the friends we had over were kind enough to smile through it and say they loved them. That was the beginning of a long, humbling learning curve.
Why Ribs are So Tricky to Get Right
Part of the challenge is that ribs are one of the few cuts where internal temperature doesn't tell the whole story. The meat is thin, wrapped around bones, and cooks differently than something like brisket or pork shoulder. I used to overthink every rib cook—constantly poking, checking, second-guessing myself.
And to make it even more confusing, there are a ton of ways to cook ribs. I went down every rabbit hole—watched all the videos, read the forums, and tried to find the "right" technique. But like most things in BBQ (and in life), I've learned there's no single correct answer. It's about understanding the process—knowing how to tell when your bark is set, how long to wrap (if at all), and when the ribs are actually done.
What Finally Worked: The 3 2 1 Method
After years of trial, error, and more test runs than I can count, I've landed on a system that works—and one that you can adapt no matter how you like to cook ribs. Today, I'm walking you through how to use that system for one of the most talked-about rib techniques out there: the 3 2 1 method.
The 3 2 1 method is almost BBQ folklore at this point. It's the one you hear about most when people talk smoked ribs—especially if you're just getting started. And for good reason: when it's done right, 3 2 1 ribs come out smoky, tender, and flavorful. But they're not always the best fit for every rib variety, smoker setup, or cooking situation.
In this post, I will explain how the 321 method works, when to use it, when to modify it, and what to keep in mind. I'll cover everything from cooking temperatures and types of ribs to timing and the small details that will make sure your next rib cook goes smoothly.
Jump to:
What Is the 3 2 1 Ribs Method?
The 3 2 1 method is a time-tested way to smoke ribs, where you are breaking down the cook into three simple phases: 3 hours smoked uncovered, 2 hours wrapped in foil (typically with butter and/or liquid), and one final hour unwrapped with sauce to finish before serving. As you might've noticed, this method takes a long time to cook ribs (roughly six hours), so you need to make sure you're setting yourself up for success if you're going to use it. I'll dive into what you need to know to master the 3 2 1 method below.
Ingredients You'll Need
Here's what you'll need to pull off this recipe:
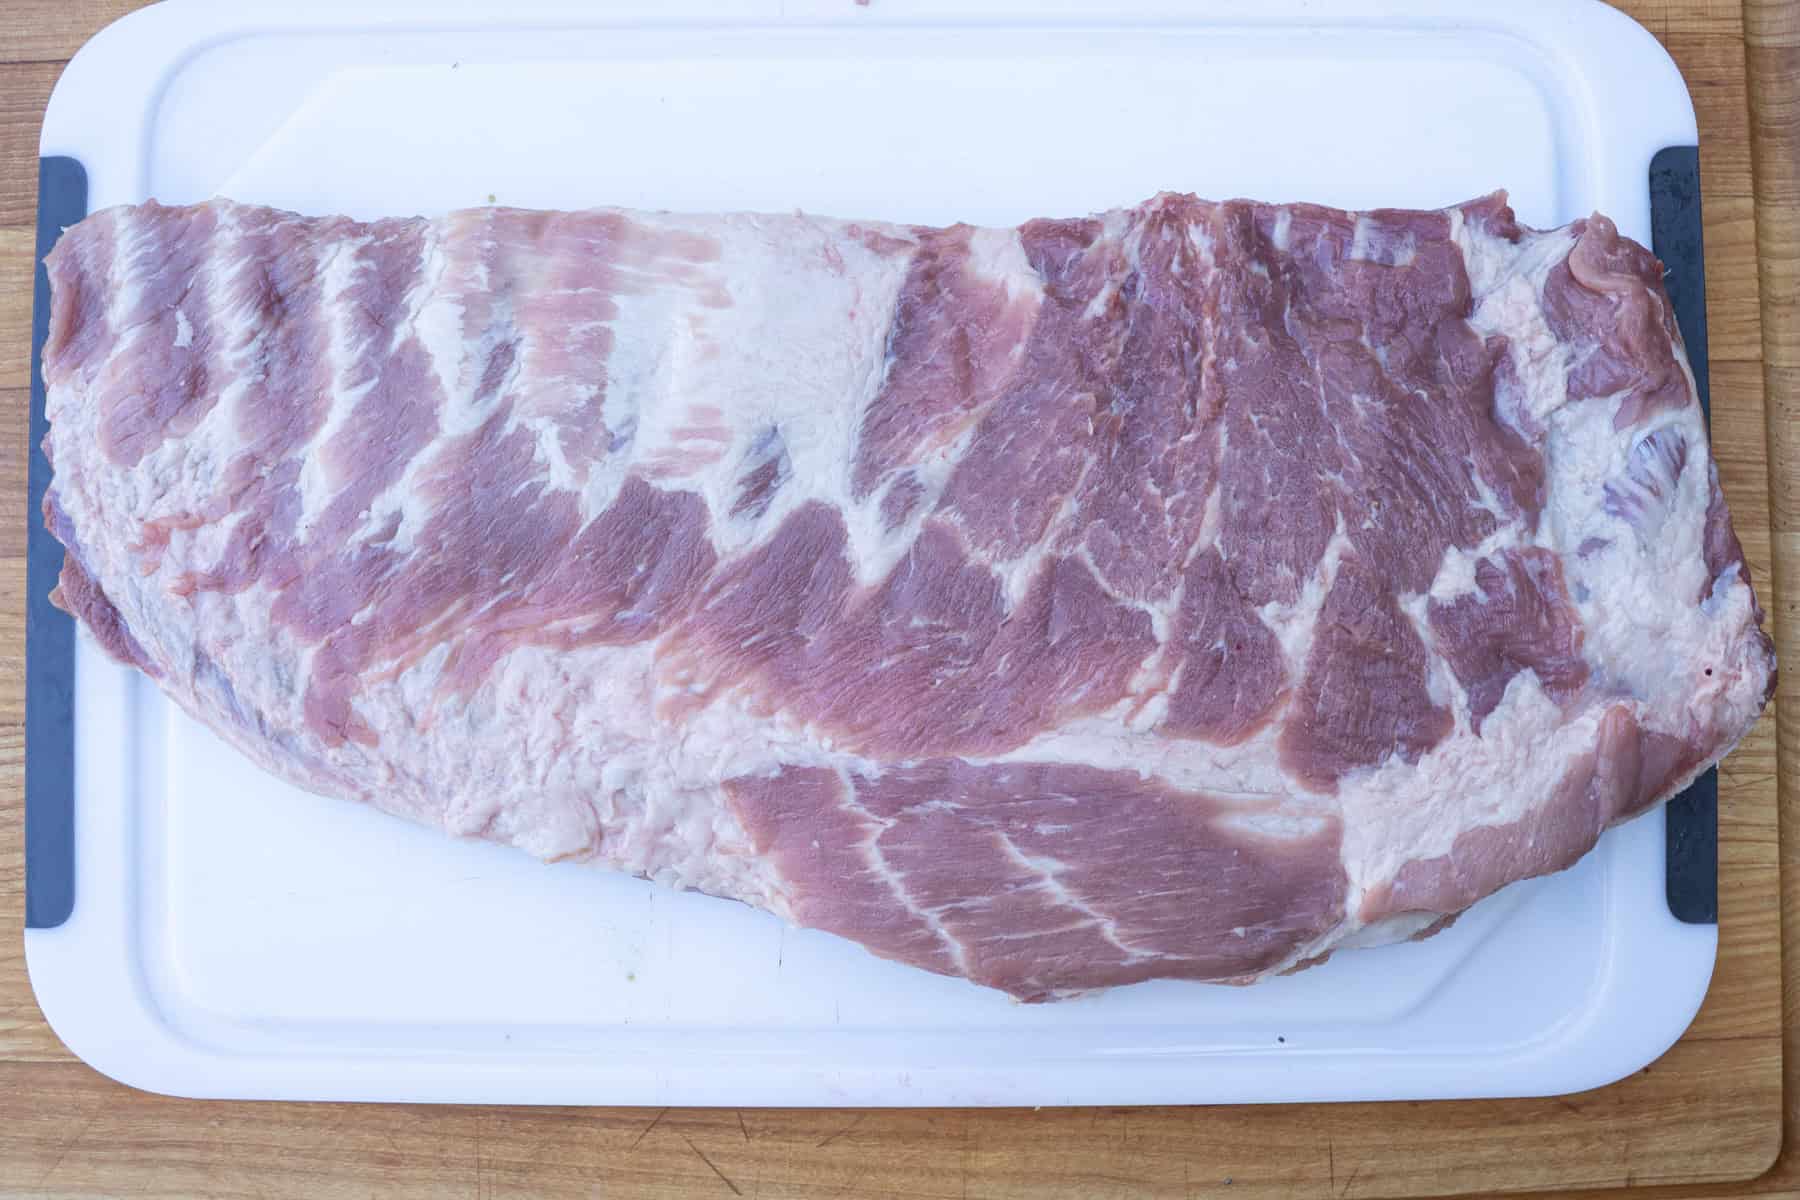
Spare Ribs
Personally, I think spare ribs are the best choice if you're using the 3 2 1 method. Spare ribs are basically untrimmed St. Louis-style ribs. Because they're larger and contain more connective tissue, they generally require longer cook times, which lines up perfectly with this low-and-slow method.
When shopping, look for meaty spare ribs, not thin or overly bony racks. Thicker ribs benefit most from the extended cook time of the 3 2 1 method, giving you that tender texture without drying out. St. Louis-style ribs, since they're already trimmed, will cook a little faster. And baby backs are leaner and smaller overall, so they don't need as much time on the smoker—making the whole 3 2 1 timeline too long for those cuts. If you're working with either of those, consider adjusting your times or using a different method altogether. I'll list two that I've written in the variations section.
Apple Cider
Using a liquid at the wrap phase really helps to both steam and tenderize the meat. I've used several varieties of liquids for this, but went seasonal with apple cider this go around. Any fruit juice (or even water if you want to) will work great.
Worcestershire sauce
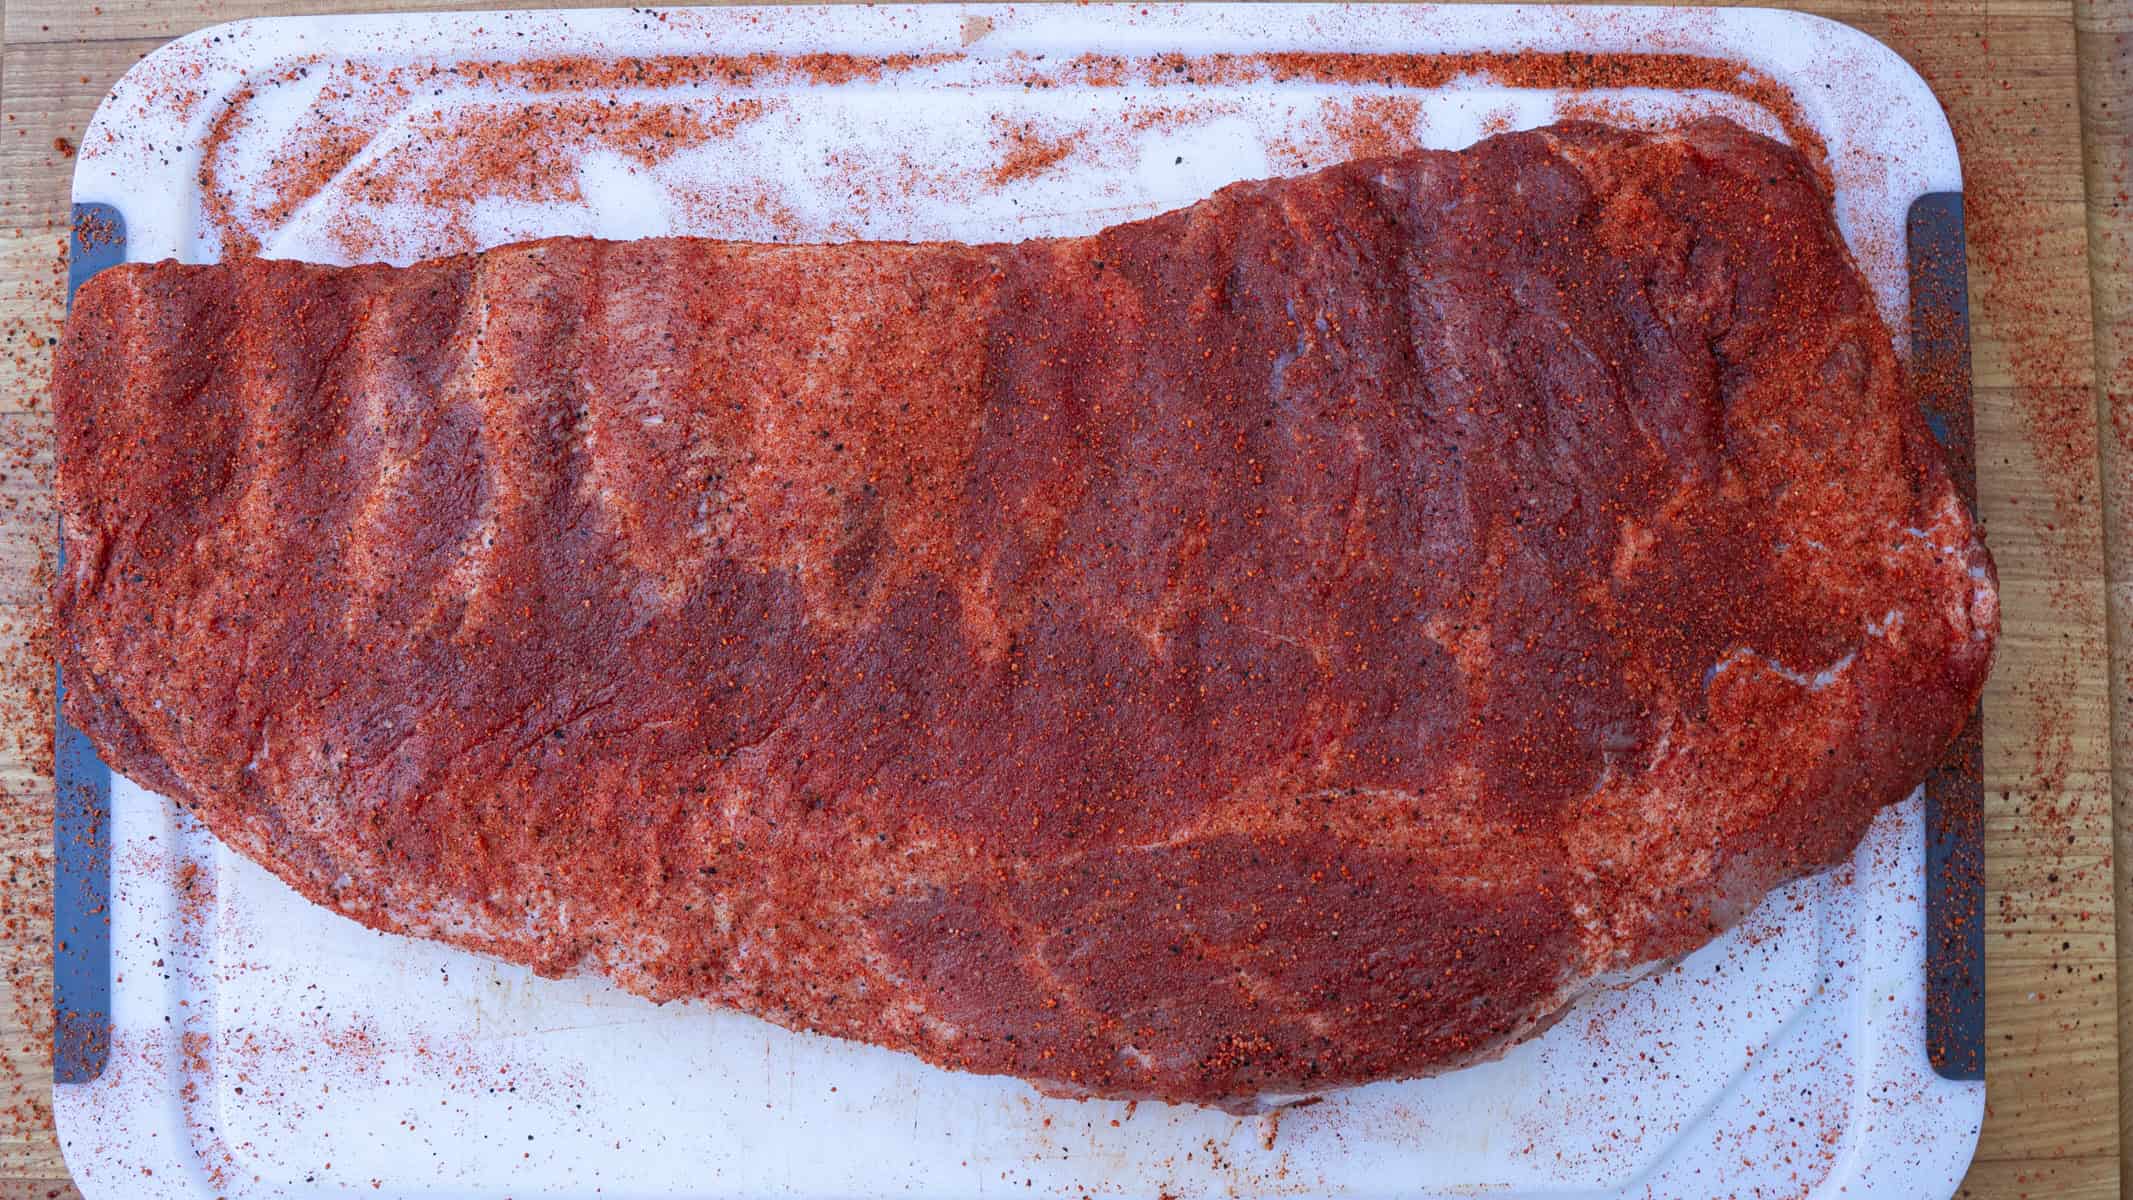
I use it as a binder before applying the rub because it helps the smoke stick to the ribs, giving more of that classic smoky flavor. Contrary to popular belief, it doesn't add any flavor to the ribs; it's purely a functional addition. It's not required to use a binder, but I do find it helpful. I've heard of people using mustard or even hot sauce, but Worcestershire has always been my go-to.
BBQ Rub
You can literally go with anything here: a homemade rub, storebought, or even just plain old salt and pepper for more of a traditional approach. Since we will be cooking at low temperatures, you're never at risk of burning the rub. I lean towards either Heath Riles or Malcolm Reed's lines of products because I've enjoyed the flavor of their rubs, and both offer great options that really enhance the visual appearance of ribs.
BBQ Sauce
I could ditto this section with the BBQ rub. The world is truly your oyster here. I've gone several different ways from St. Louis style, to a more vinegar-based Carolina-style sauce, to even more unorthodox options like this spicy blueberry BBQ sauce. Typically, what I choose depends on who I'm cooking for. If I'm cooking for a group, I tend to lean towards a sweeter sauce to play it safe; whereas if I'm making ribs for me, a vinegar-based sauce is more in line with what I'll pick.
How to Make 3 2 1 Ribs
Before we get into the three core phases—the smoke, the wrap, and the sauce—you've got to prep your ribs. Trim off any excess fat—though with spare ribs, you usually won't have to do much. Focus on removing any thick fat pockets on the meat side and that loose flap of meat on the bone side.
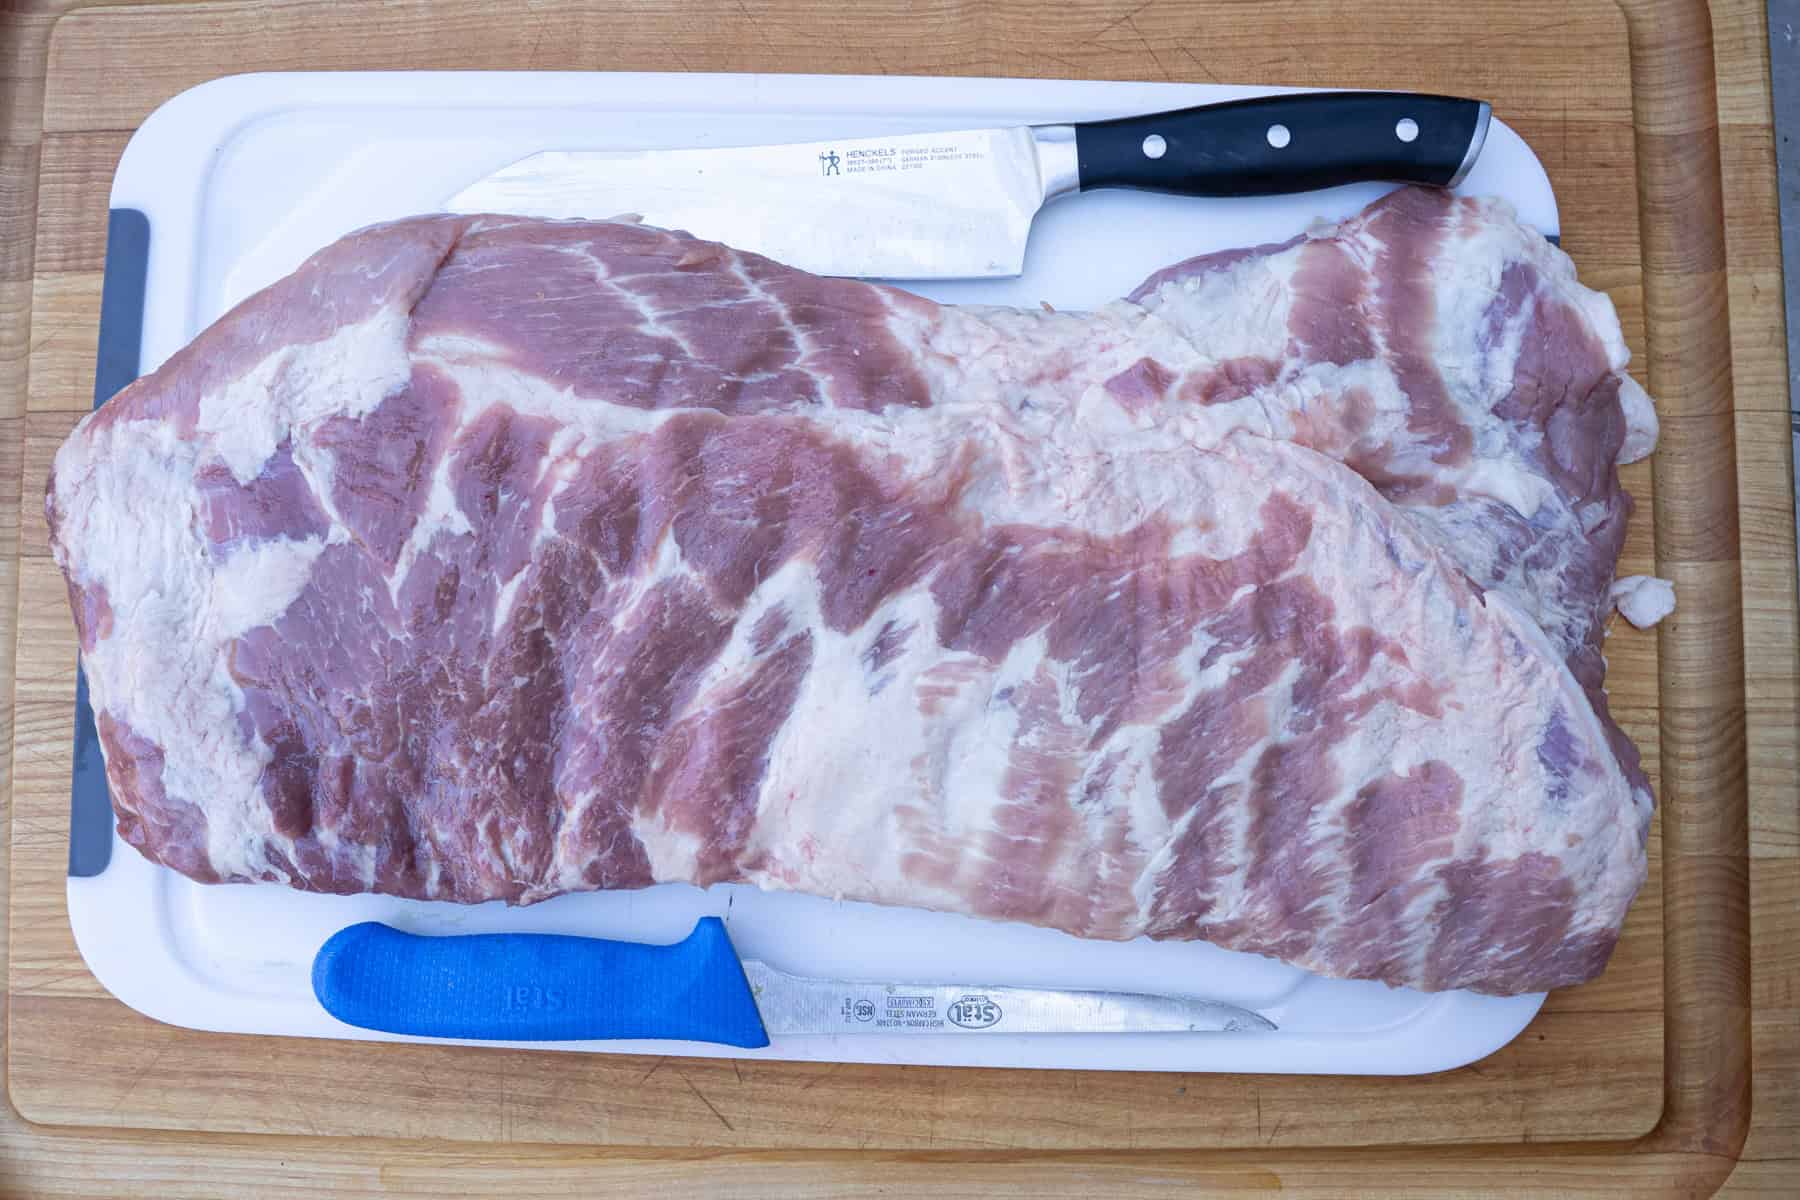
One step I always recommend is removing the membrane from the back of the ribs. Technically, you can leave it on, but at this lower cooking temperature, I prefer to take it off. It lets the rub and smoke penetrate deeper into the meat.
Once trimmed, coat both sides of the ribs lightly with Worcestershire sauce. Then season generously with your BBQ rub, making sure to hit all the edges and get into the grooves between the bones. Let the ribs rest at room temperature while the smoker finishes heating up.
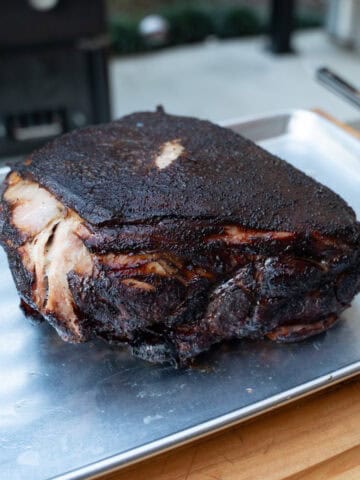
Phase 1: 3 Hours of Smoke
The first three hours are where you build that deep, smoky flavor and form the all-important bark on the outside. Run your smoker or grill—whether it's a pellet, stick burner, ceramic, or whatever setup you like—at a steady 225°F for the entire cook.
It's important not to go much hotter if you're following this method. At higher temps, the ribs cook too quickly, and you'll throw the timing off. That's not to say 275°F is wrong—I actually smoke ribs at that temp pretty often—but at 275, the 3-2-1 timeline doesn't really work. The ribs would either finish too early or dry out if you tried to keep them on for the full six hours.
Where Should You Place the Ribs on Your Smoker?
For this cook, I used my custom-built gravity-fed smoker, which I love because it holds temperature extremely well and keeps the meat far from the heat source (the company I bought mine from went under, but if you'd like to look into a commercial model, Masterbuilt and Oklahoma Joe's make well-known products). That distance helps keep the cook even and prevents the ribs from cooking too fast on the hot side. No matter what smoker you're using, try to keep the ribs away from any direct heat zones or "hot spots"—it'll make a big difference (i.e., using heat deflector plates in a ceramic grill or moving the meat away from the hot box in a stick burner).
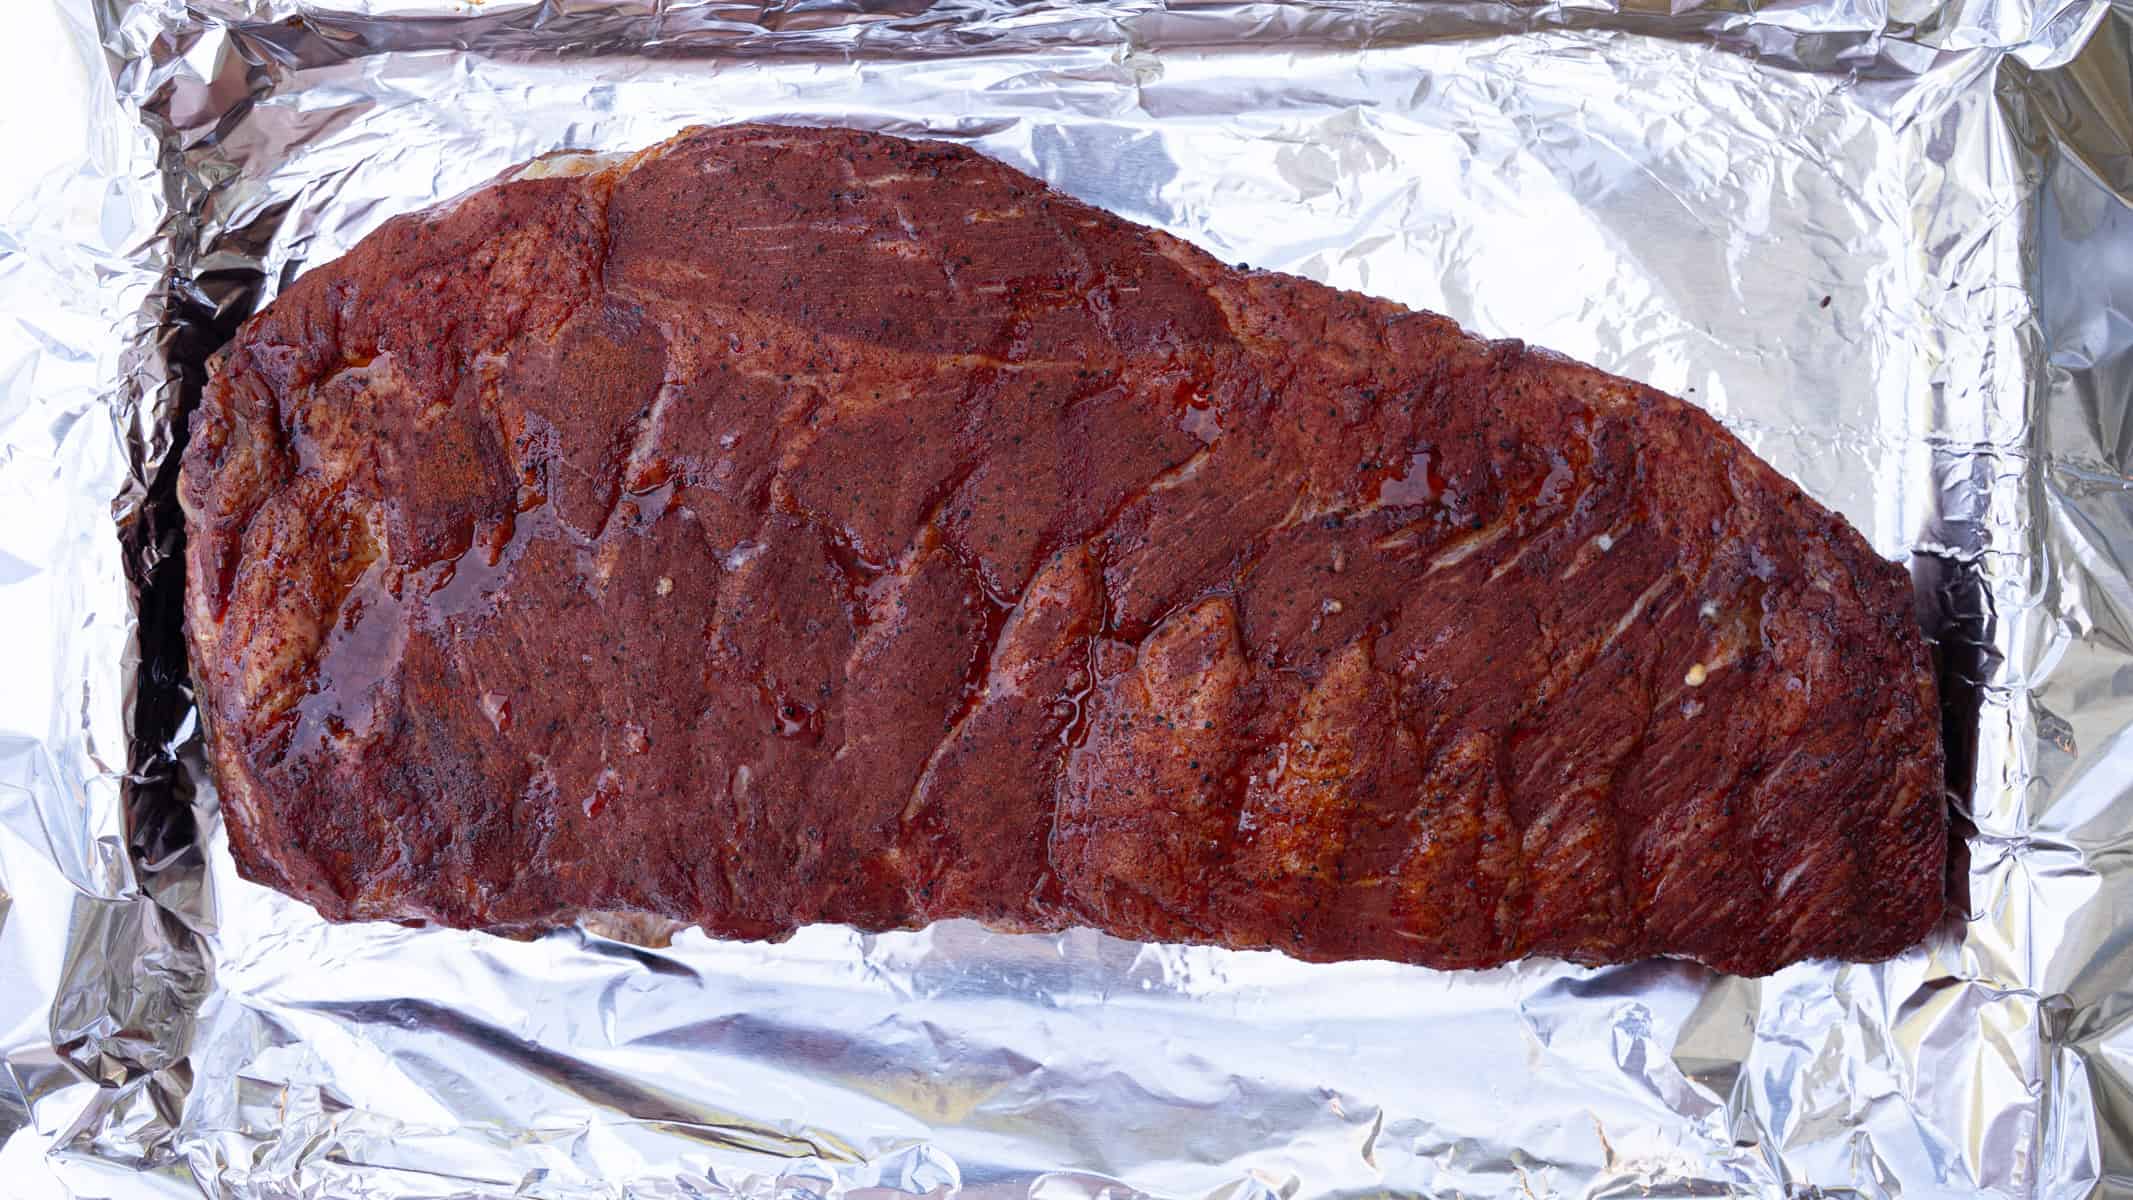
During this phase, you don't need to touch the ribs at all—unless you want to give them a light spritz for moisture or a deeper bark (more on that in the next section). At the three-hour mark, you can check the ribs to make sure the rub has "set". To do this, run your finger along the meat side of the ribs. If the rub sticks to the ribs when you run your fingers across it, it's good to go to the wrap phase. If the rub still comes off easily, the ribs will need a little more time (in complete transparency, though, this shouldn't be an issue at the three-hour mark using this method).
Do You Spritz 3-2-1 Ribs?
Spritzing is optional during the first phase. If you want extra moisture and a more developed bark, use a spray bottle with apple juice, cider, or a 50/50 mix of cider vinegar and water. Spritz lightly every 45 minutes, but avoid overdoing it—you don't want to wash off your rub or the smoke that's been sticking to your ribs with the help of the binder.
Phase 2: 2 Hours Wrapped
Once the bark has set, it's time to wrap. You'll wrap the ribs tightly in heavy-duty aluminum foil with about a ¼ cup of liquid—I used apple cider for this recipe, but you can use another liquid or fruit juice of choice based on preference—and place them meat-side down. Sometimes I'll add butter and brown sugar as well, but for this method (and with my cherry molasses BBQ sauce I use for this cook), I skip it. I don't think those additions are necessary for cooking ribs this way, but you can certainly try it. Either way, the purpose of this phase is to trap steam, break down connective tissue, and render the intramuscular fat, making the ribs tender and juicy.
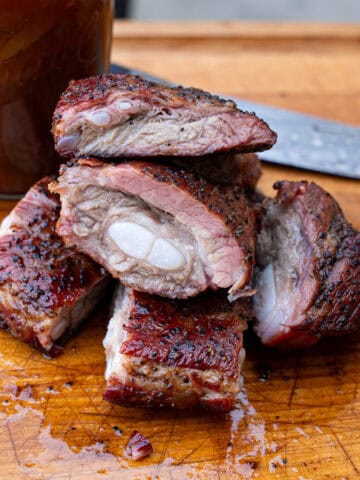
Pay Attention to The Teeth
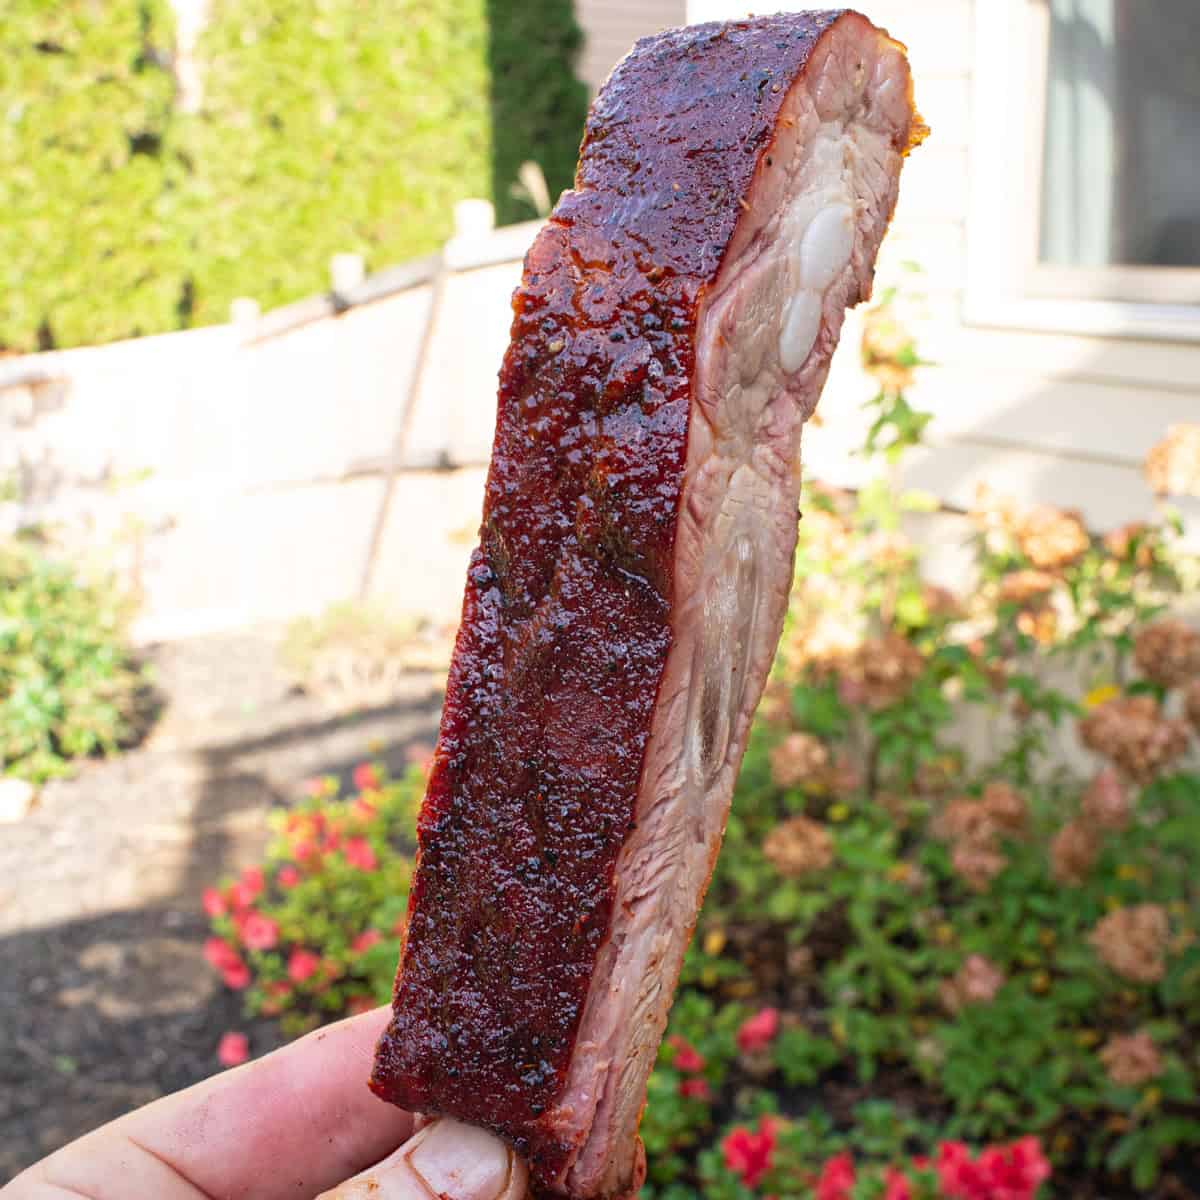
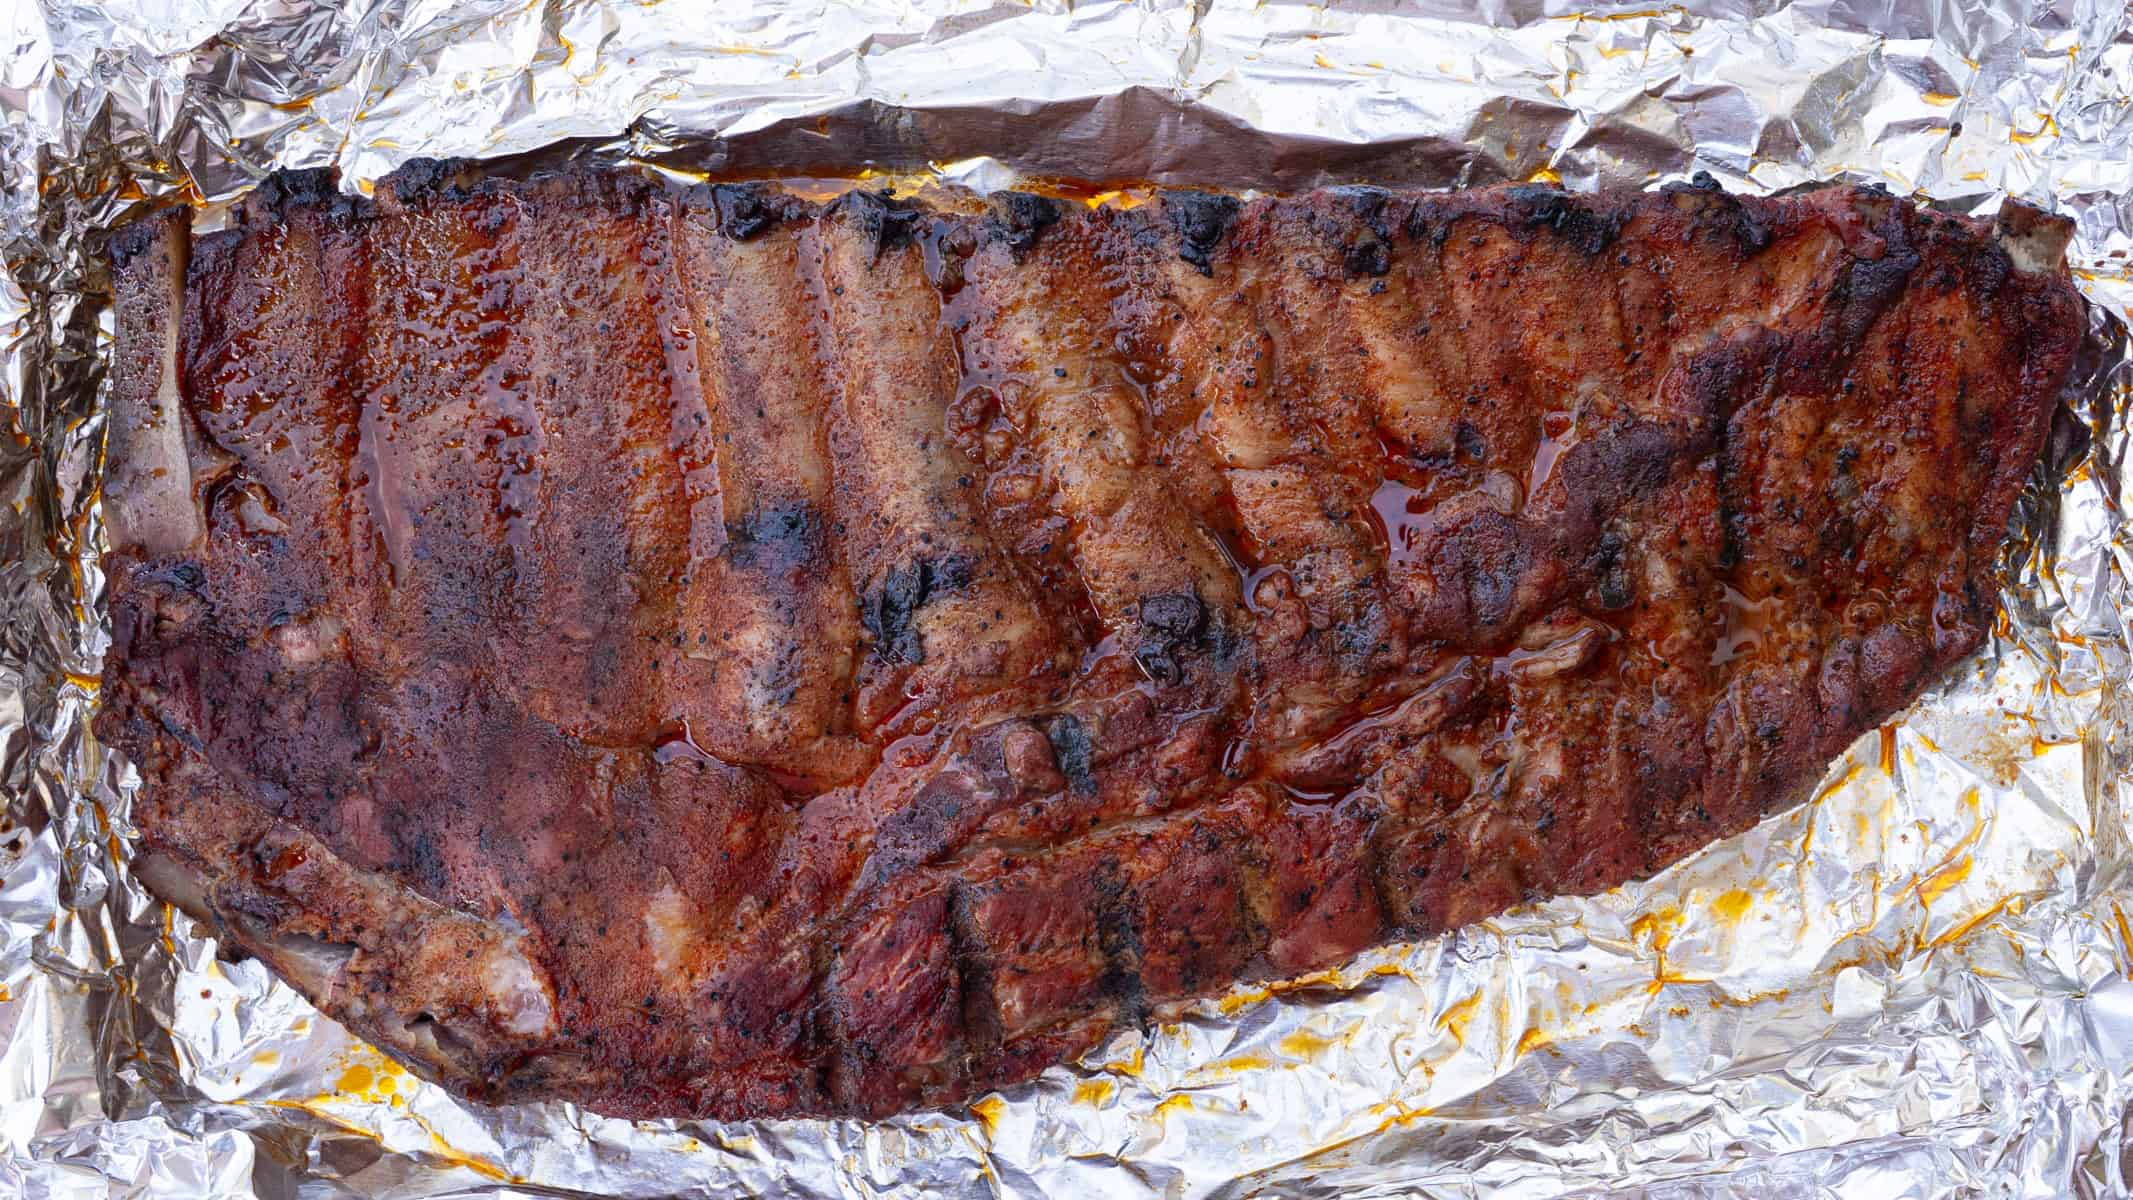
The important sign to watch for at this phase is when the "teeth" start to show (I like to start checking every 30 minutes at the 1-hour mark of the ribs being wrapped). This is when the bones begin to peek out about half an inch from the meat. By the time this happens, your ribs will actually be cooked through, and you should easily be able to lift the rack with tongs—the rack should be floppy (almost to the point of breaking but still staying intact) and bend easily. If the rack of ribs is still "stiff", meaning it doesn't have a lot of give to it, it needs to keep cooking (check back every 20-30 minutes if that's the case.
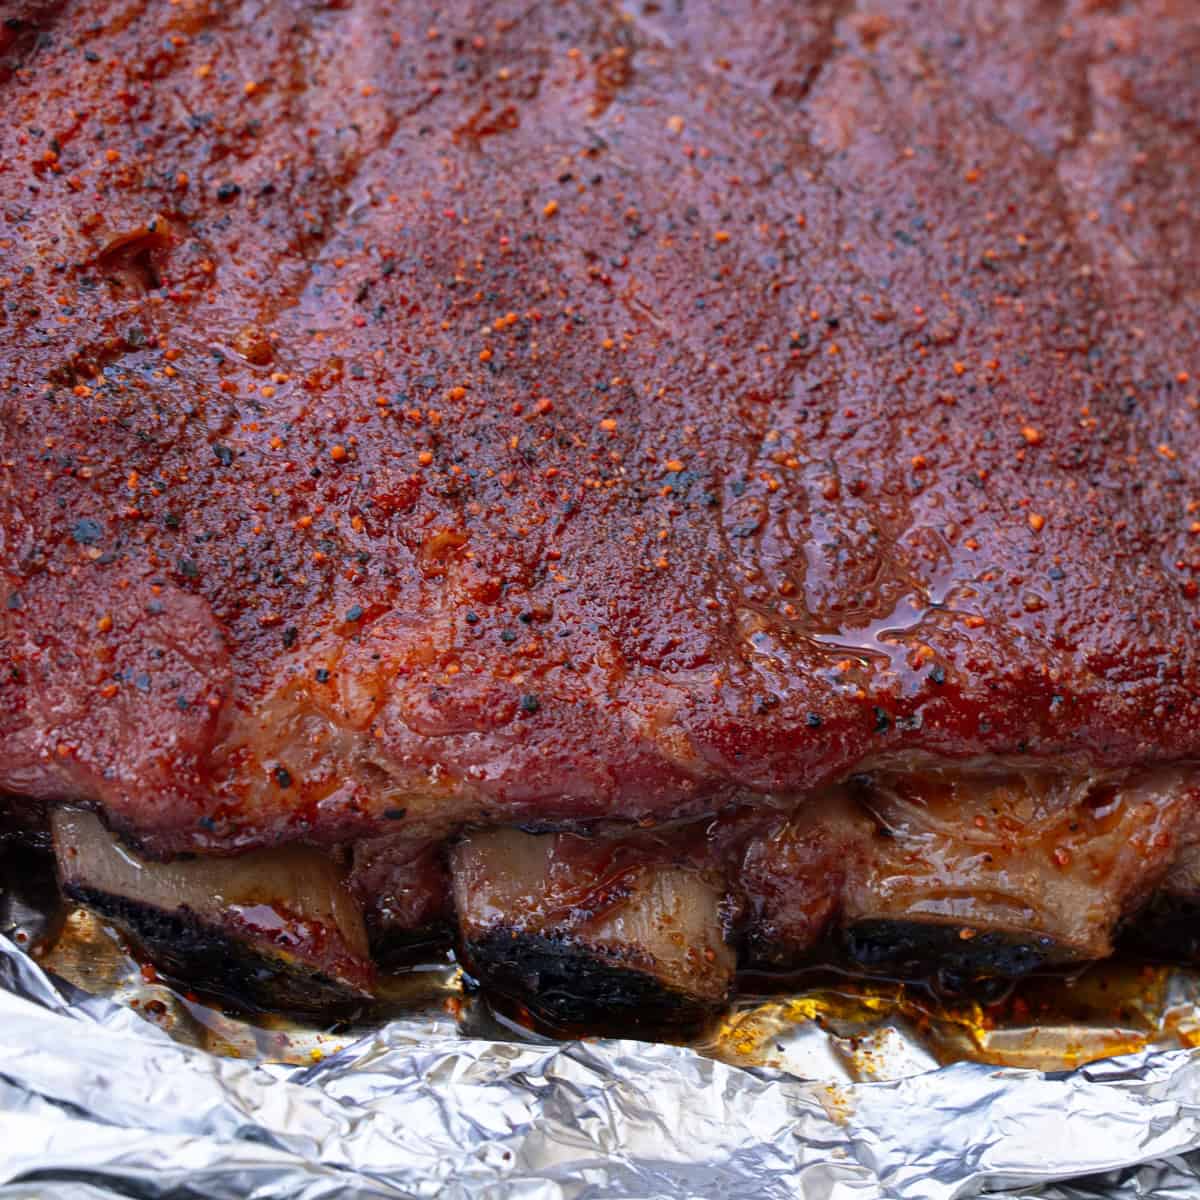
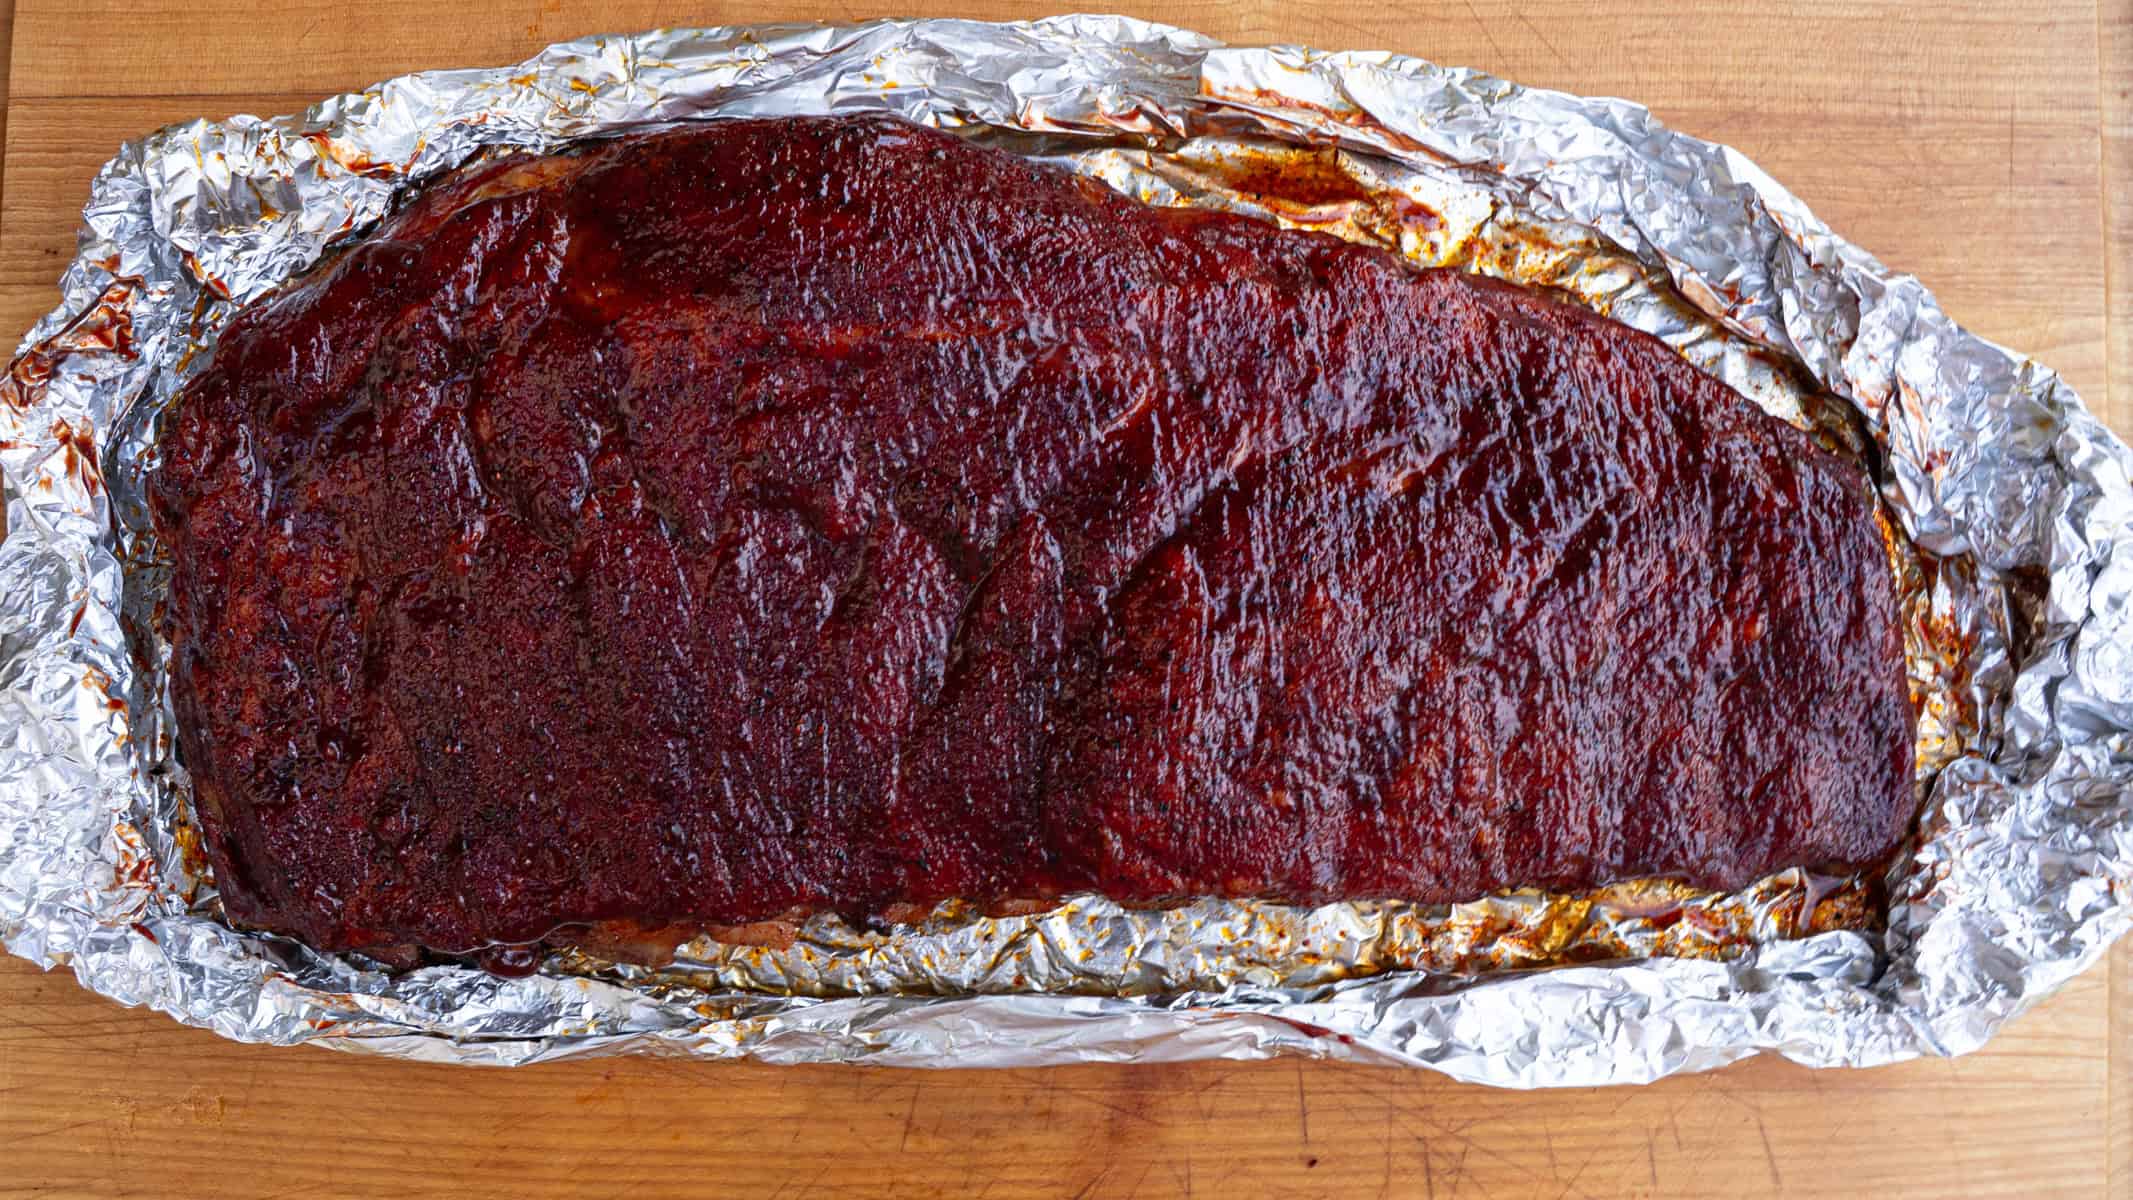
Personally, though, I've found that it really takes roughly 1 hour and 45 minutes with spare ribs to get to this point, so two hours may be a bit of a stretch depending on what type of ribs you use and how thick they are (more on that in a second). To round out that two-hour mark, I like to unwrap the ribs and season both sides with the rub to "reset" the bark, as it will need to firm back up after steaming in foil. After those last 15 minutes, you'll be ready to move on to phase three.

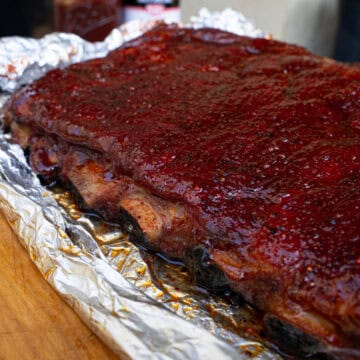
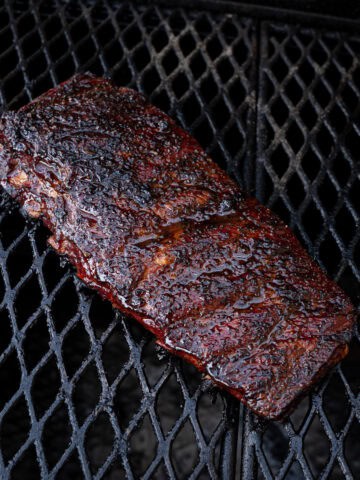
Phase 3: 1 Hour to Glaze and Finish
The last hour is just as important as the first five—and if you go into the cook with that in mind, it'll take your ribs over the top. After unwrapping the ribs, let them rest for about 20 minutes. Like I mentioned in Phase Two, by this point, your ribs are already fully cooked—you're just putting the finishing touches on them.
This rest allows the meat to reabsorb some of the juices that have been pushed out during the wrap stage, which helps keep the ribs moist and tender. I actually picked up this tip from Heath Riles, and it's been a big help to my rib cooks—whether I'm using the 3 2 1 method or not.
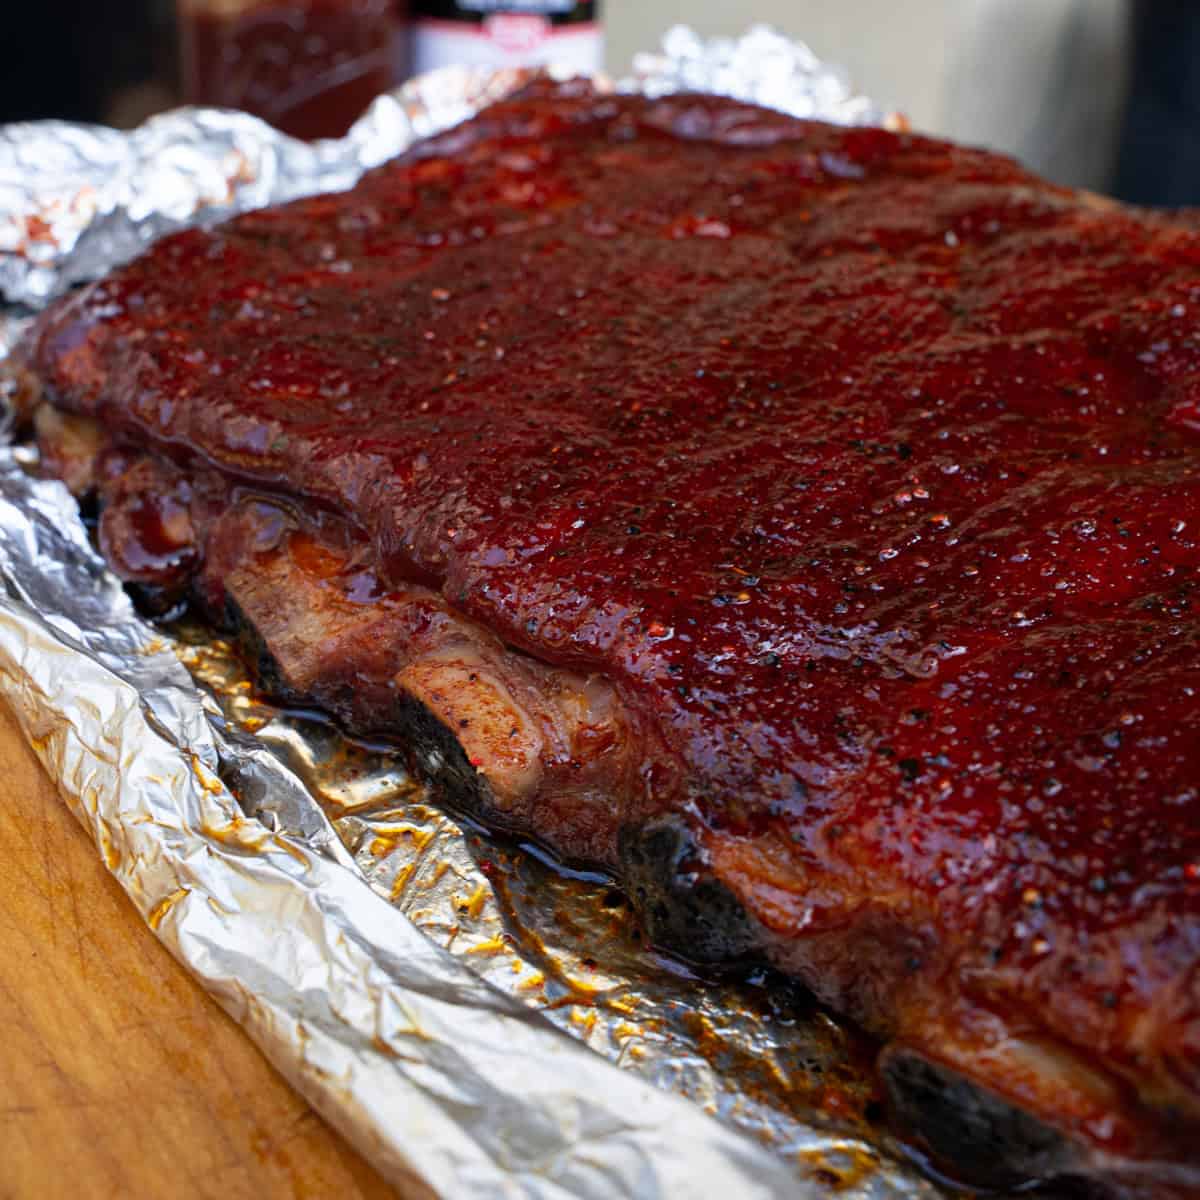
After the rest, brush on your sauce—like my Cherry Molasses BBQ Sauce
—and return the ribs to the smoker for about 20 to 30 minutes so the sauce can tack up. At 225°F, this takes a bit longer than it would at higher temps, so be patient and give it time to glaze properly.
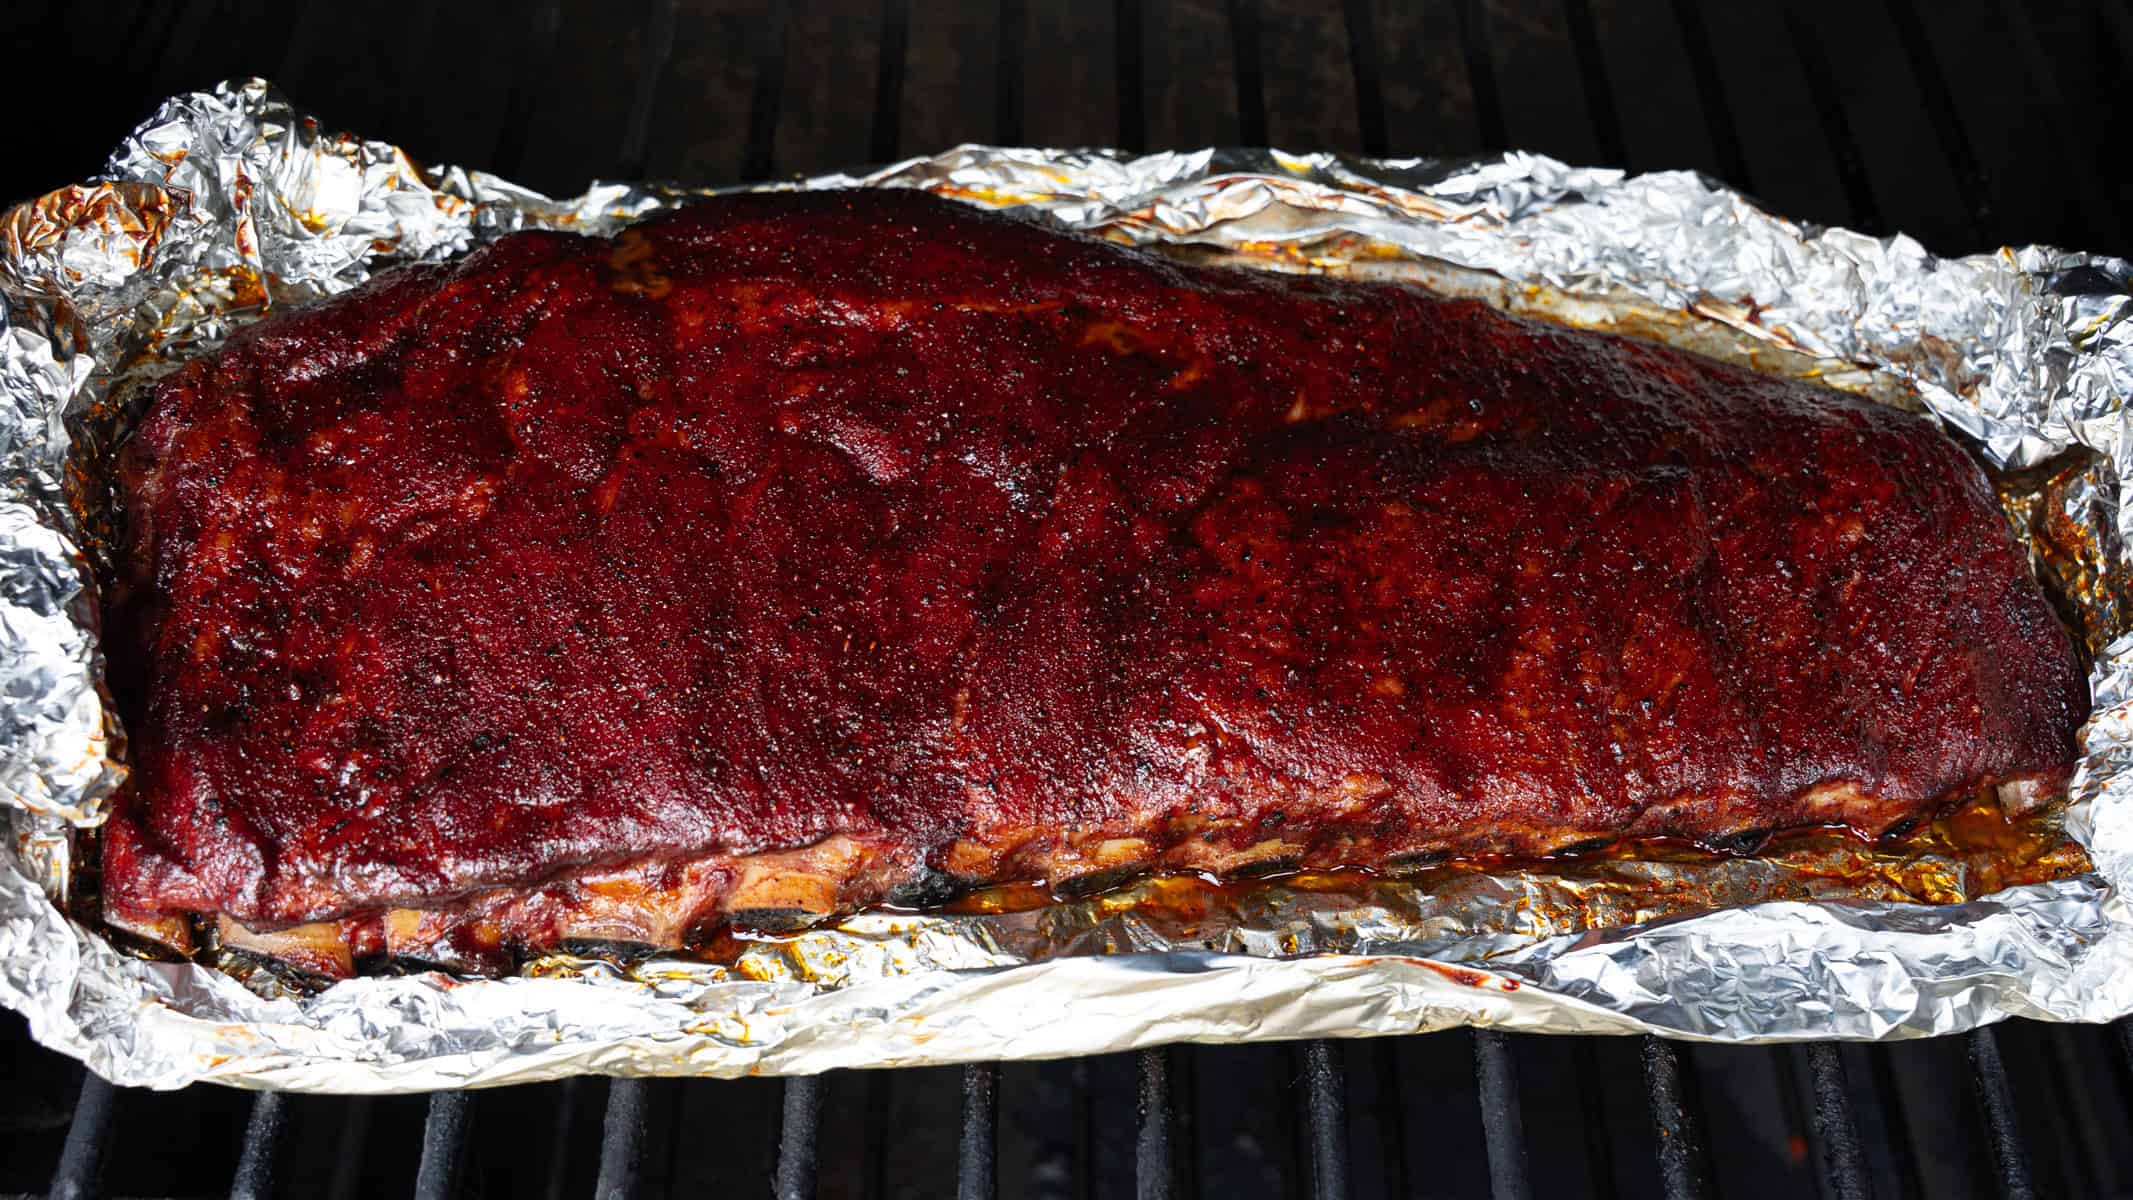
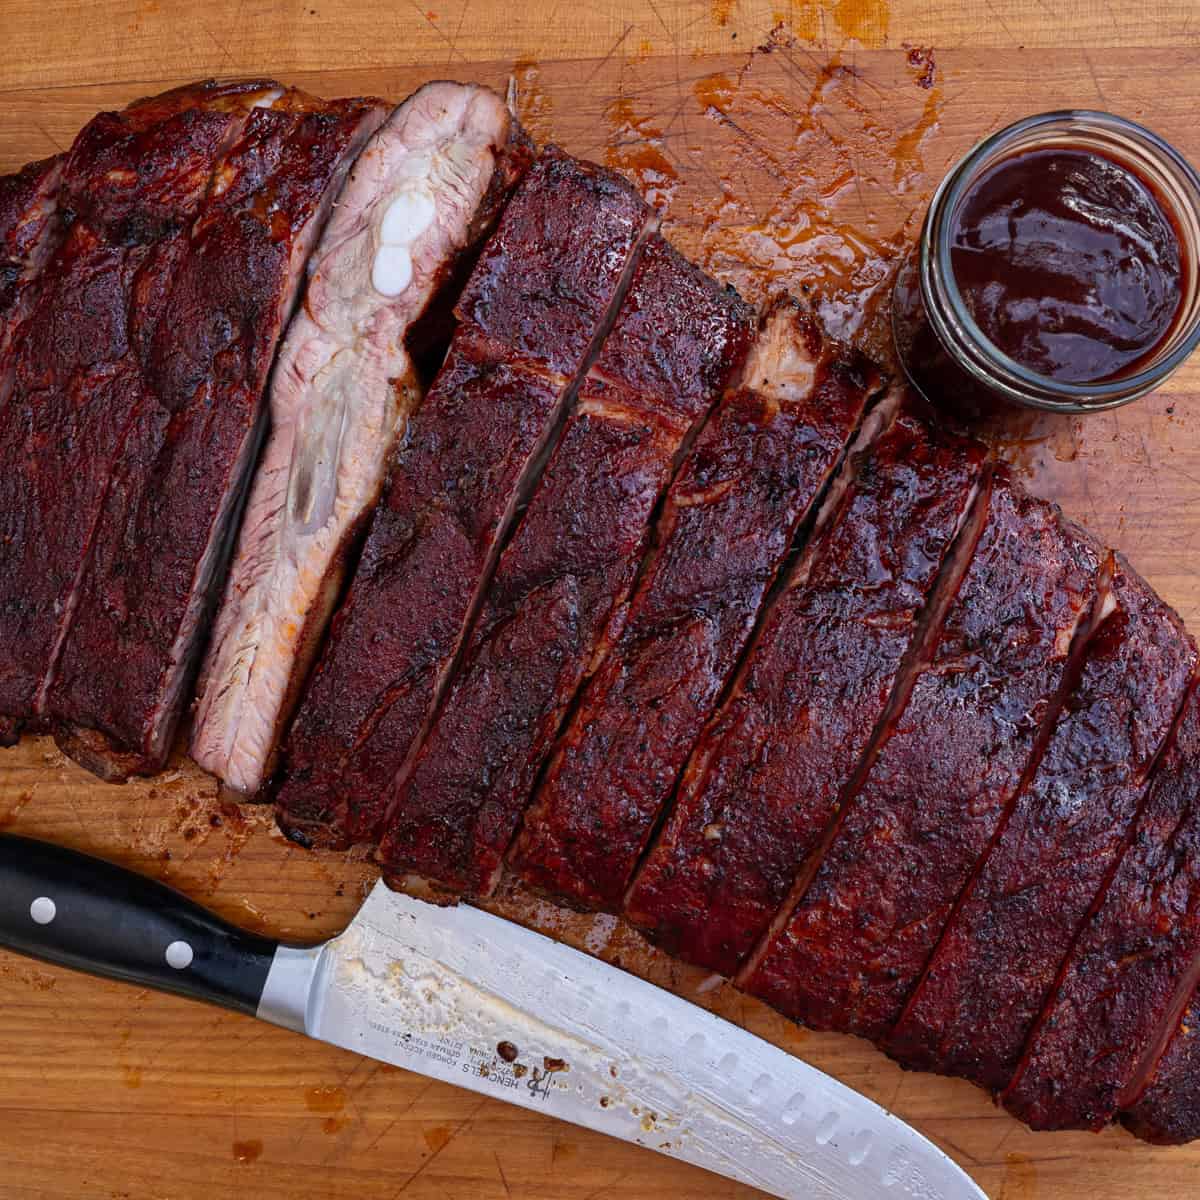
Once that glaze sets, pull the ribs off the smoker and let them rest again for another 20 minutes before slicing. Technically, the ribs are only back on the smoker for about half of this final hour—but the resting and glazing stages combined are what give you that rich, sticky, caramelized finish that really makes these ribs shine.
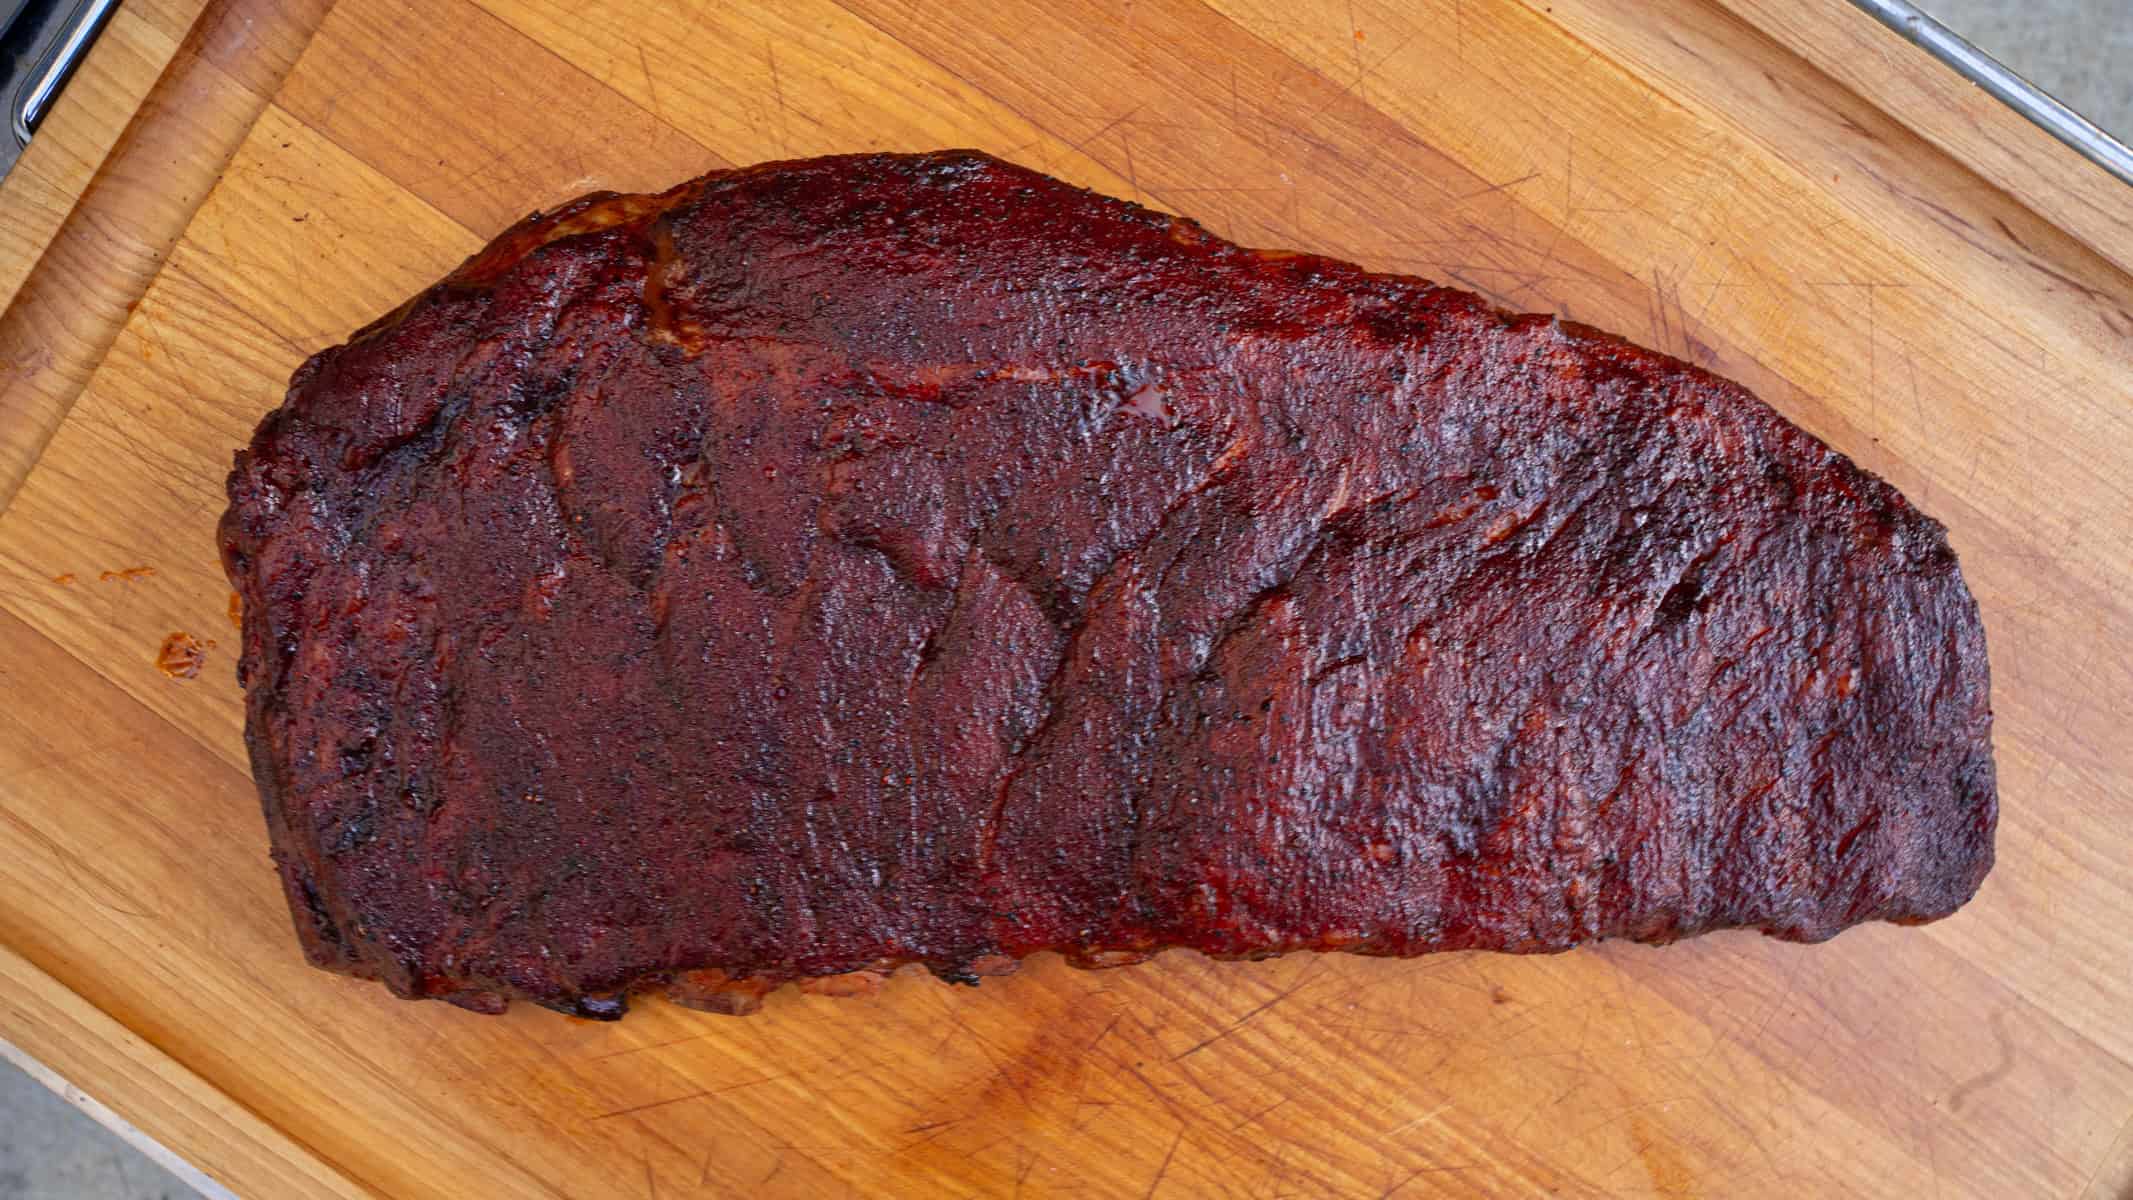
The Key Takeaway
If you follow the steps above, you'll be well on your way to some seriously delicious ribs. But there's one thing you have to remember: the 3 2 1 method is a guide, not gospel.
It's a solid framework—especially if you're new to smoking ribs—but the exact timing will always depend on your ribs and your smoker. Some cooks will line up perfectly with that six-hour window, but often you'll need to adjust slightly at each stage based on how your ribs are looking and feeling.
So don't just rely on the clock—use your eyes, your hands, and your instincts. That's what will separate having a good rib cook from a great one. As a reminder, here are a few tips to help you stay on track for those visual cues:
- Bones should peek out about ½ inch.
- Rack should bend but not break.
- Internal temp (if using a thermometer) should be around 200–210°F.
Texture Tips & Common Mistakes
If your ribs turn out dry, you may have cooked them too hot or skipped the rest. If they're mushy, you may have wrapped them too long or used too much liquid.
For ribs with a bit more bite—like competition-style ribs—consider a 2-2-1 method or wrapping for only 60-90 minutes instead of 2 hours.
Variations on the 3 2 1 Method
Like I mentioned, the 3 2 1 method is not the end-all, be-all of how to cook ribs the right way. In fact, it's far from it. Here are three very different cooking approaches that I've used to make ribs, all of which I've really enjoyed the outcome:
- How to smoke St. Louis Style Ribs at 250 degrees
- Smoked Baby Back Ribs at 275 degrees
- Smoked St. Louis Style Ribs (Unwrapped the whole time)
- Party Style Ribs
Equipment
- Smoker
- Heavy-duty aluminum foil
- Sheet Pan
- Large Spatula
- BBQ brush or mop
- Thermometer (optional)
- Prep bowls and measuring spoons
Storing & Reheating Leftover Ribs
If you have leftover ribs, wrap them tightly in foil or place them in an airtight container. Store in the fridge for up to 4 days. To reheat, wrap in foil and warm at 275°F in the oven or smoker for 15–20 minutes.
Recipe
How to Make Smoked Ribs with the 3 2 1 Method
Equipment
- Smoker
- Heavy-duty aluminum foil
- Sheet Pan
- Large Spatula
- BBQ brush or mop
- Thermometer optional
- Prep Bowls and Measuring Spoons
Ingredients
- 1 2-3 lbs. rack spare ribs
- ¼ C apple cider
- 1 T Worcestershire sauce
- BBQ seasoning as needed
- BBQ Sauce (I used my Cherry Molasses BBQ Sauce) as needed
Instructions
- Preheat the grill or smoker to 225°F. Meanwhile, trim the ribs of any excess fat. Next, remove the membrane, apply the Worcestershire sauce as a binder, and season both sides liberally.
- Once the smoker is preheated, add the ribs and smoke them untouched for 3 hours. At this point, rub a finger over the ribs. If the rub has set and does not come off, remove the ribs from the grill.
- Place the ribs on a piece of heavy-duty aluminum foil, meat side down, and wrap tightly with the apple cider. Return the ribs to the grill (still meat side down).
- After ~1 hour and 45 minutes, check back in on the ribs. Once the bones start to show, they should be tender enough to continue. You can also pick them up with tongs to check their tenderness. If they have a nice bend to them when you pick them up – they’re good to go. If they’re still stiff, wrap them up and continue cooking for another 20 minutes before checking back in.
- Once the ribs are tender, season both sides liberally with the bbq rub and place them back on the smoker to reset the bark. Once this happens, remove the ribs from the smoker and let them rest for 20 minutes so the juices can reabsorb back into the meat. They will be plenty tender and could be served at this point, but we have one more step to go.
- Apply the sauce (I used my Cherry Molasses BBQ Sauce, but you can choose a sauce that you prefer) to both sides of the ribs liberally, then place the ribs back on the grill for ~20 minutes so that the sauce can tack up. Once this occurs, remove the ribs from the smoker, let them rest for ~20 minutes or until cool, then slice and serve. Enjoy!
Notes
- Use spare ribs for the best results. Baby backs and St. Louis cuts cook faster and may dry out with the full 3 2 1 timeline.
- Stay at 225°F the entire cook. Higher temps will throw off the timing and can dry out the ribs.
- Watch for visual cues like bone pullback and the bend test—not just time.
Leave a Reply