If you're looking for super-tender ribs with a great bite, cooking them at 250°F is a great way to go. While there's a lot of information about cooking ribs floating around, understanding the cooking process and nailing your timing can be the difference between dry ribs and a plate of ribs that disappear faster than you can slice them.
In this guide, I'll walk you through how long to smoke pork ribs at 250 degrees with a focus on spare ribs, though we'll touch on baby backs and St. louis style ribs, too. Whether you're new to ribs or refining your technique, we'll cover preparation, temperature, timing, and tips for achieving good results every time. Additionally, I'll offer you a few sauce recommendations that I particularly enjoy pairing with my spare ribs.
Jump to:
- Rib Types: Know Your Cut Before You Cook
- How Long to Smoke Pork Ribs at 250 (Plus Temps for 225, 275, 300)
- Prep Steps Before You Fire Up the Smoker
- Once the Prep Work is Done, Here's How to Cook The Ribs
- Tips for Good Ribs Every Time
- Sauce or No Sauce?
- Recommended Tools
- Storing & Reheating Leftover Ribs
- Recipe
Rib Types: Know Your Cut Before You Cook
- Spare ribs – Larger, meatier, and with more fat content than baby backs. If you want classic, bare-bones ribs -- these are the best options and are typically the cheapest, too, since no trimming has been done. These are ideal for smoking and staying juicy even during long cooking times.
- St. Louis-style ribs – These are a trimmed version of spare ribs, with a uniform shape, making them easier to handle and slice. These are what I typically grab whenever I'm at the grocery store, as they require less prep work and are still very reasonably priced. They're a go-to for both competition and backyard BBQ enthusiasts alike.
- Baby back ribs – Leaner and a bit shorter; they cook quicker and are perfect if you're more partial to the classic "fall off the bone" style ribs. Although it's a minor point, I like to note that removing the membrane from these ribs tends to be the easiest.
Each style varies slightly in cooking time, which I'll discuss below.
How Long to Smoke Pork Ribs at 250 (Plus Temps for 225, 275, 300)

Smoking at 250°F is a great middle ground, plus a very forgiving temperature for both seasoned pitmasters and those who are cooking ribs for the first time: it's hot enough to build bark and break down connective tissue without drying them out. It's more efficient than 225°F but won't risk overcooking like 300°F might if you're not careful. This grill temperature allows the fat to render slowly, enabling the absorption of plenty of smoke and resulting in tender, juicy ribs with beautiful color and texture.
I've been smoking ribs for years now, and based on my personal experiences (plus expert guidance I've picked up online along the way), here's a revised breakdown of smoking times by rib style and temperature:
Cook Time by Rib Type at 250°F:
- Spare ribs: 4 to 5 hours
- Baby back ribs: 3 to 4 hours
- St. Louis ribs: About 3.5 to 4 hours
The cook times listed here assume you're smoking unwrapped or using a light foil wrap for about an hour during the cook (the latter being my go-to method). These times reflect my preference for ribs with a bit of bite rather than the fall-off-the-bone texture many folks expect. Don't get me wrong—these ribs are still tender and juicy—but in my experience, that ultra-soft, fall-apart rib that people often associate with a 3-2-1 or 2-2-1 method usually means it's been cooked a little past its peak. If that's the texture you love, that's fine—add roughly another hour to the cooking time, depending on the rib style and method you're using now, because you won't always cook at exactly 250°F—whether due to time constraints, grill temperature fluctuations, or personal preference—I've outlined estimated cooking times for a range of temperatures below.
Adjusted Cook Time by Temperature:
- 225°F: 5.5–6.5 hours
- 250°F: 4.5–5.5 hours
- 275°F: 4.0–4.5 hours
- 300°F: 3.5–4.0 hours (firmer bark and quicker cook)
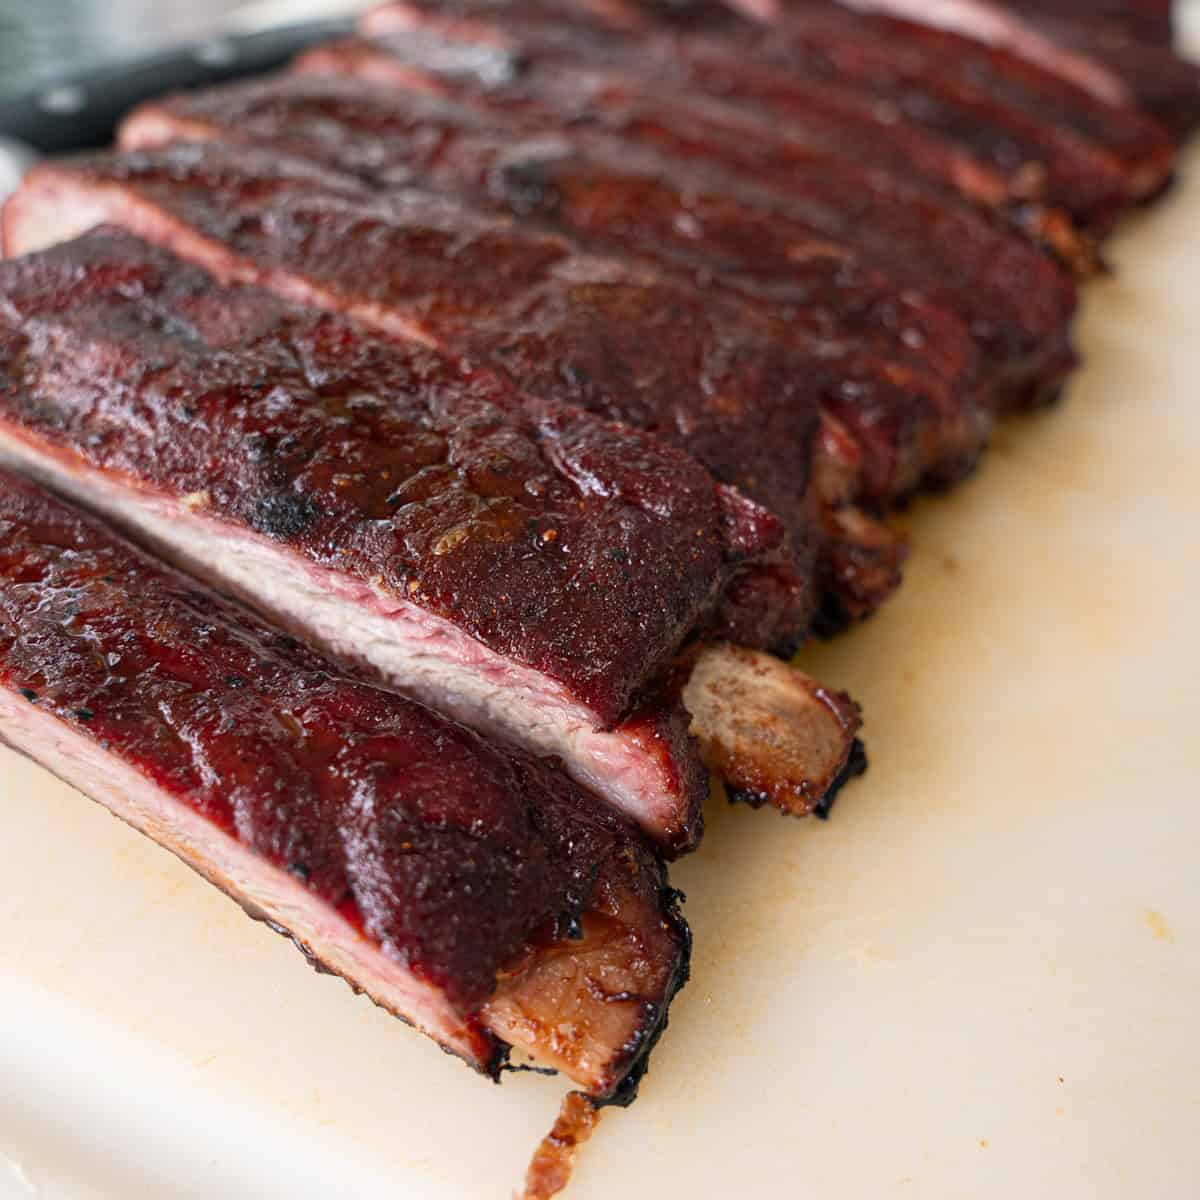
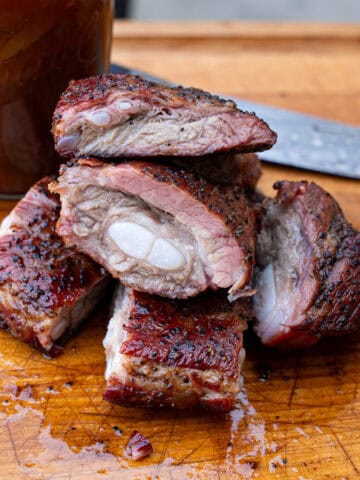
Check for doneness using both internal temperature (200–205°F) and the bend test—your most reliable tool for getting good ribs every time. Please note that these times may still vary depending on the weight and thickness of the ribs.
Prep Steps Before You Fire Up the Smoker
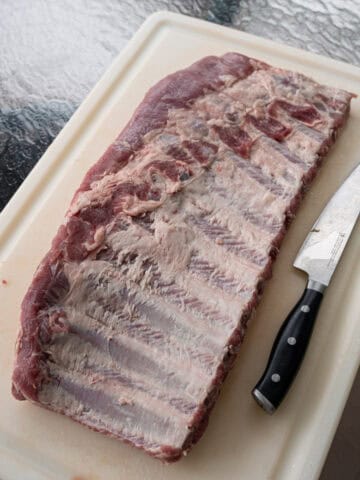
Trim & Tidy Your Ribs
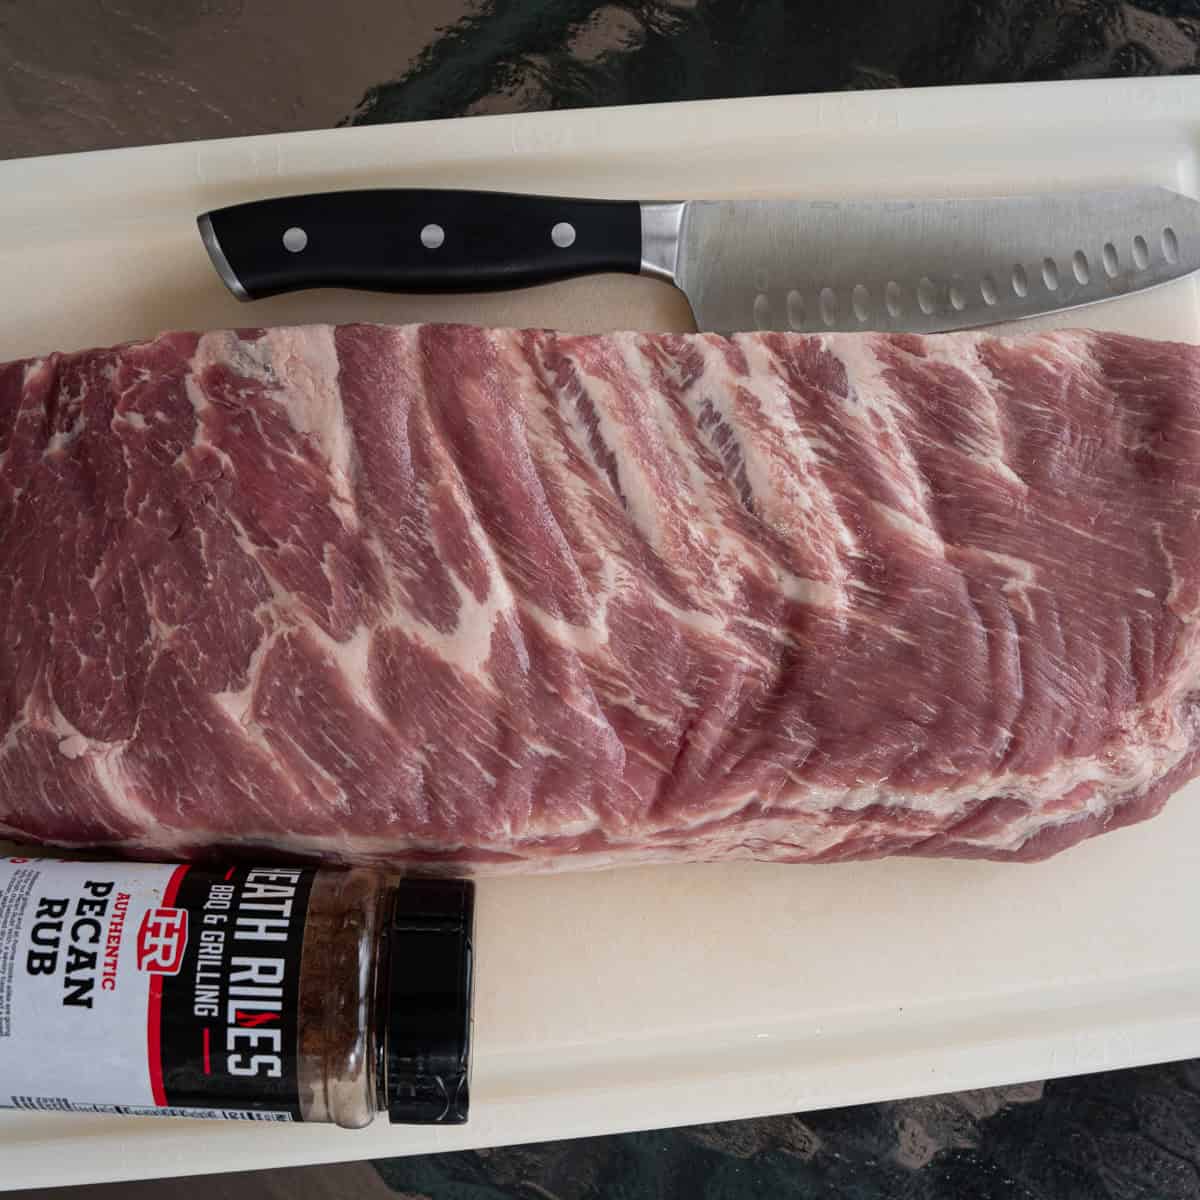
For the first step of any rib cook, start with a rack of ribs on a clean cutting board. Use a sharp knife to remove any hanging pieces of fat, cartilage, or silver skin from both sides of the ribs. This provides more even cooking and prevents uneven bites. It's easiest to do this while the ribs are still chilled, so I prefer to do this after they have been refrigerated for a few hours. Trust me, it'll make your life easier.
Remove the Membrane
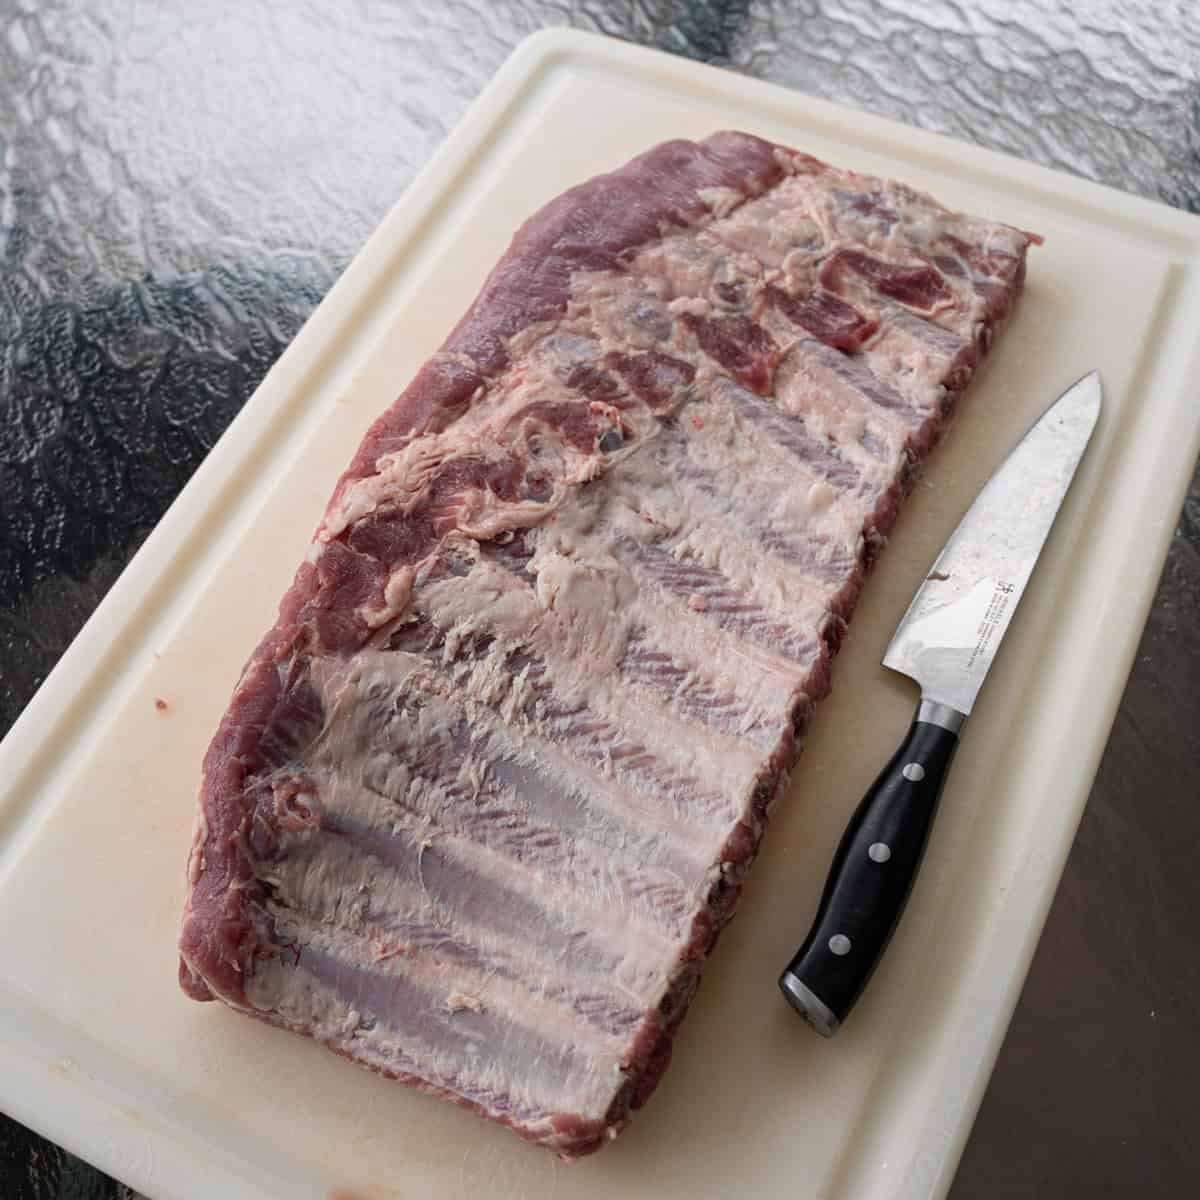
Flip the rib bone-side up and slide a finger under the silver skin membrane. I prefer to use a paper towel to grip and peel it off clean. Be careful to avoid making a mess, as the membrane will rip if you're not. I tend to either start at one end and slowly pull the membrane up from a corner until I can get a good enough grip with a paper towel to remove it, or I'll start from the middle of the rib and slowly loosen the membrane on each side that way. Once you've got a good handle on it, doing this becomes second nature. I don't always think it's necessary (especially when I'm making hot and fast ribs or party-style ribs like these). Still, I believe it's beneficial to smoke a classic session at 250 degrees f, as it helps the smoke and seasoning penetrate the meat more effectively.
Season Simply

A light sprinkle of salt and pepper, or your favorite BBQ rub, is all you need. I've mentioned it before, but my personal favorite is Killer Hog's "The BBQ Rub" for pork. (Heath Riles's Pecan Rub is listed above — I used it for this particular cook because I had it at the lake. I'm also a big fan of this one.) Truthfully, I prefer using the rub more for its aesthetics than for the flavor itself, because most of the time, the flavor typically comes from the smoke and the sauce (if used). That being said, it can help develop a better smoke ring (if you're into that kind of thing), depending on what seasonings you use.
Bring to Room Temperature
Lastly, let the ribs sit out for 30–40 minutes once seasoned before cooking. Ribs straight from the fridge can cook unevenly.
Once the Prep Work is Done, Here's How to Cook The Ribs
Step 1: Preheat and Place Ribs

Fire up your pellet smoker (or your desired smoker) to 250°F. Once preheated, place the ribs bone-side down (i.e., meat-side up) directly on the grates.
Step 2: Let the Bark Build
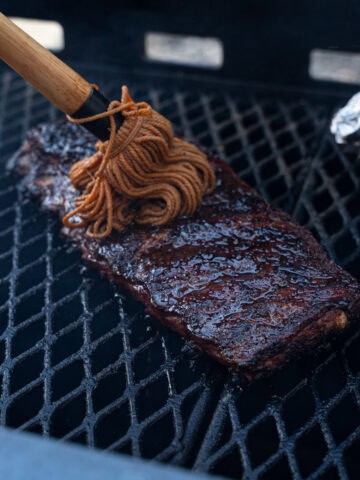
Let ribs smoke undisturbed for 2 to 2 ½ hours. Seriously, don't even look at them. You want to keep those grilling temperatures as consistent as possible, and anytime you open up the lid, you're disturbing that process. After that time, use a spray bottle with a mixture of apple juice and water (or apple cider vinegar) every 45 minutes to keep the meat moist and build flavor. You don't have to, but I find it helpful. Once you can rub your finger over the ribs and no residue comes off, meaning the bark has formed nicely, you can proceed to the next step.
Step 3: Wrap or Ride it Out
At around the 3-hour mark, you have a choice:
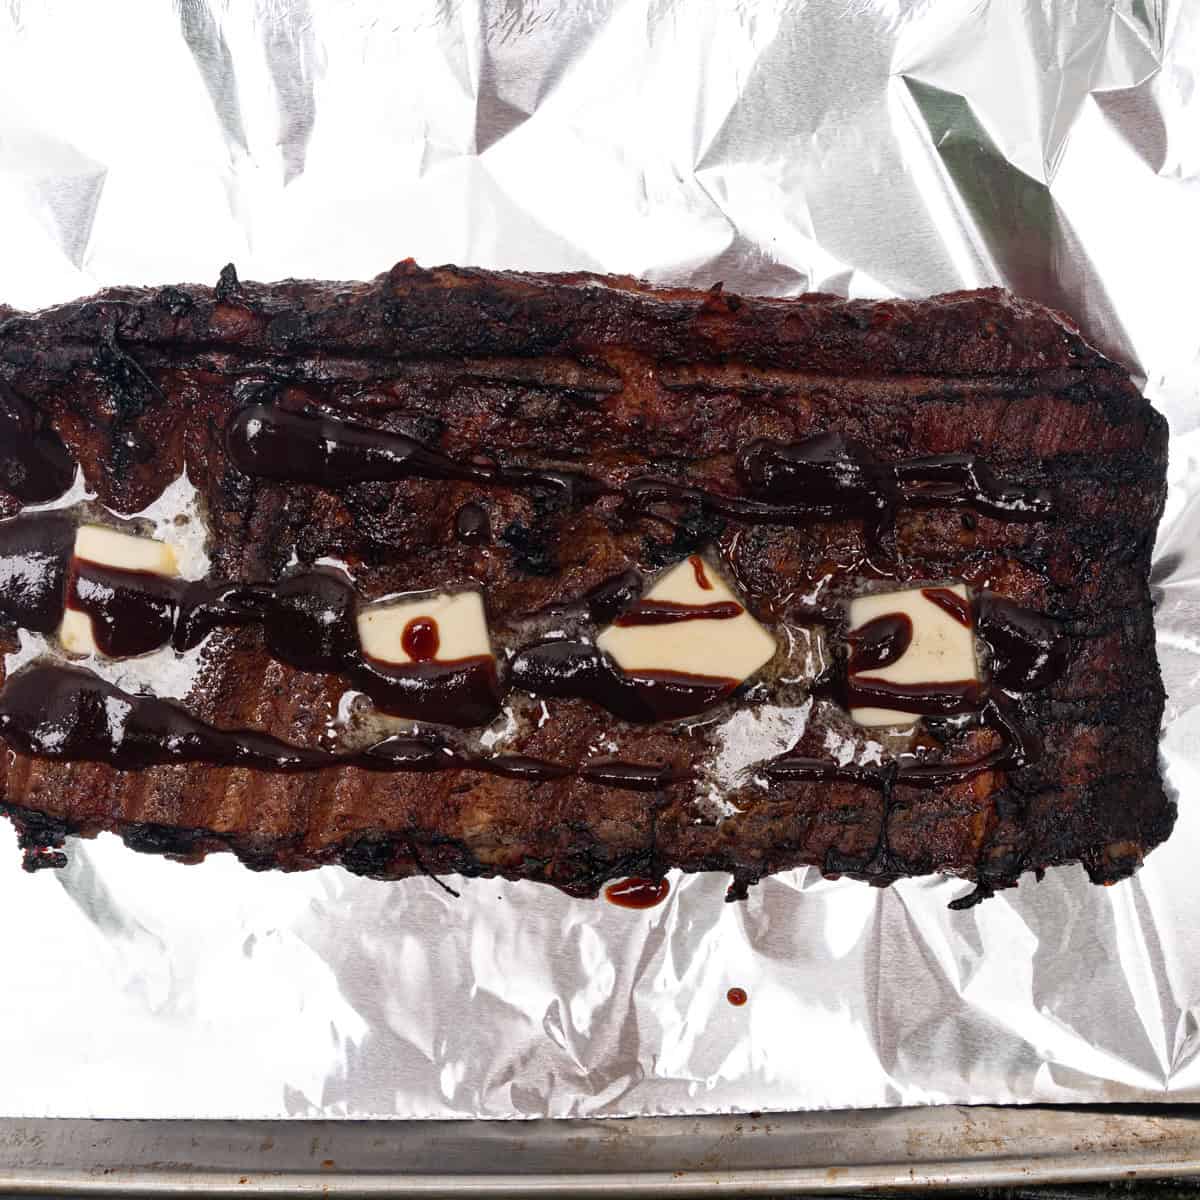
- Foil wrap (optional) – This is a great way to tenderize the meat quickly. Wrap ribs tightly in heavy-duty aluminum foil with a flavor enhancer of your choice for ~60 minutes. I tend to use butter and BBQ sauce, but I've also added fruit juice, honey, and brown sugar to the mix before. It all depends on how sweet you want the ribs to be. I will note that if you use this method, once you unwrap the ribs, I like to reapply the rub to both sides and let them sit on the grill for ~15 minutes for the bark to reform before moving forward.
- Unwrapped method – For a better bark, leave them on the grill and keep spritzing. You'll hit about 5.5–6 hours total this way if shooting for fall-off-the-bone ribs.
Step 4: Check Internal Temp & Finish
Use your instant-read thermometer to check the internal temperature of the ribs. You're aiming for ~200–205°F. You can also do the bend test: pick up a rack with tongs—if it bends easily and is floppy, they're ready. One more thing to note. I'll add a final brush of my favorite BBQ sauce to my ribs about 20 minutes before they finish so the sauce can stick.
Step 5: Rest and Slice
Pull the ribs and let them rest for at least 15 minutes, tented with foil. Then, slice between bones with a sharp knife and serve.
Tips for Good Ribs Every Time
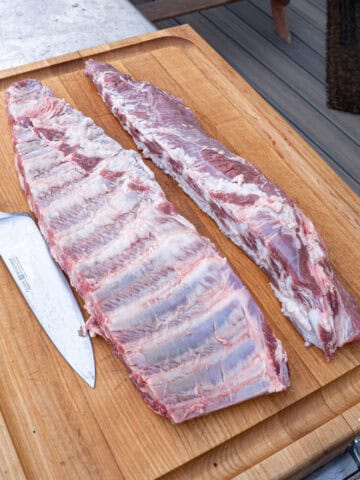
- Trim the ends – The last rib or two often burns. Cut them off in the prep process for more evenly cooked ribs.
- Meat side up – Always smoke with the meat side facing up for optimal bark. If the ribs are wrapped, it's fine for them to be placed meat side down; however, whenever the ribs are exposed, the presentation side should face up.
- Foil wrap? I know many people who go unwrapped throughout the entire cooking process -- and I've had some before myself that are delicious -- but I feel that the best way to make ribs includes wrapping them. You'll get a more tender end product, and if you follow the steps I outlined above, you'll have no issue regaining any bark lost during the wrapping phase.
- Don't skip resting – Like brisket, ribs need a few minutes off the heat to settle and stay juicy.
Sauce or No Sauce?
I know traditionalists will tell you that you don't need barbecue sauce for good ribs, and the smoke should be the only flavor you need. Here's the thing, though: while that can hold if you're using an offset where you're burning logs the whole time, it's not the case for the majority of the population. The simple fact is that most of your commercial smokers won't provide the deep, smoky flavor that a traditional offset smoker can. Plus, I'd still prefer my ribs sauced, even if they were cooked that way. If you choose to sauce up your ribs, here are a few great options that I love:
- Cherry Molasses BBQ Sauce
- Maple Bourbon BBQ Sauce
- Apple Habanero Glaze
- Apple Cinnamon Glaze
- Korean-Style BBQ Sauce
There are many ways to approach this, but I've tested each option and found them to be delicious.
Recommended Tools
- Pellet grill or smoker with solid temp control
- Heavy-duty aluminum foil for wrapping (if using the 3-2-1 method)
- Spray bottle for your spritzer of choice
- Cutting board for slicing
- Instant-read thermometer for checking the temperature
- Paper towels for removing the membrane
- Sharp knife for cutting the ribs
- Measuring cups & prep bowls for gathering your ingredients
Storing & Reheating Leftover Ribs
Once the ribs are cooked and cooled, you'll want to store them properly. Wrap any leftover ribs tightly in aluminum foil or place them in an airtight container to prevent them from drying out. In the fridge, they'll last for 3 to 4 days. If you plan to save them for longer, toss them in the freezer—they'll hold up well for up to three months. For freezing, I recommend wrapping them first in plastic wrap, then foil, and placing them in a freezer-safe bag. Or, as I always like to mention, use a vacuum sealer before storing perishable food products in the freezer, as it's truly the best way to preserve any perishable food product.
When it's time to reheat, the oven method is your best bet. Wrap the ribs in foil and place them in a 300°F oven until they're warmed through. This keeps the moisture in and prevents the meat from drying out. If you want to crisp up the bark again, open the foil during the last 5 to 10 minutes of cooking. Avoid microwaving if you can—it heats unevenly and tends to make the bark rubbery.
Recipe

Smoked Ribs at 250 Degrees
Equipment
- Pellet grill or smoker
- Heavy-duty aluminum foil
- Spray bottle
- cutting board
- instant read thermometer
- Paper towel
- Sharp knife
- Measuring cups & prep bowls
Ingredients
- 2-3 lbs. st. louis-style ribs
- BBQ seasoning
- 4 T unsalted butter
- BBQ Sauce of Choice
Instructions
For the Ribs:
- Preheat the grill or smoker to 250°F. Meanwhile, trim the ribs of any excess fat and remove the last two bones on both ends. Next, remove the membrane and season both sides liberally.
- Once the grill is preheated, add the ribs and smoke them untouched for ~2 ½ -3 hours. At this point, rub a finger over the ribs. If the rub has set and does not come off, remove the ribs from the grill. If not, give the ribs a spritz of water (or your desired lubricant) and let the ribs smoke for another 30 minutes and check again to ensure the rub has set.
- Once this occurs, Place the ribs on a piece of heavy-duty aluminum foil, meat side down, and wrap tightly with the butter and a liberal amount of the BBQ sauce. Return the ribs to the grill (still meat side down).
- After ~45 minutes, check back in on the ribs. Once the bones start to show, they should be tender enough to continue. You can also pick them up with tongs to check their tenderness. If they have a nice bend to them when you pick them up – they’re good to go. If they’re still stiff, wrap them up and continue cooking for another 20 minutes before checking back in.
- Once the ribs are tender, season both sides liberally with your BBQ rub and let them cook for another 15 minutes, meat side up, to reset the bark. Finally, brush the prepared sauce onto the ribs and let the ribs continue to cook until the glaze has set. Once this occurs, remove the ribs from the grill.
To Finish:
- Slather your ribs one more time with the sauce (if desired), slice, and serve. Enjoy!
Notes
- Rub Set Check: Rub should not smudge when touched; if it does, spritz and give it more time to set.
- Wrapping: Wrap meat side down with butter and BBQ sauce in heavy-duty foil once the rub has set. This locks in moisture and builds tenderness.
Leave a Reply