By now, you’ve probably heard of Nashville hot chicken sandwiches—maybe you’ve even tried one. They’ve become so popular that even major fast food chains have jumped on board. My first taste of one came right after college, when I was still working at a bar and stretching out the last bit of that college lifestyle. A new spot opened just down the street from my apartment, and I gave it a shot. It was fried, juicy, and packed with a heat I hadn’t really experienced before—spicy, but also rich and layered. From that point on, it became something I always looked for on a menu.
But since I love to grill, I wanted to take that same flavor profile to the grill—both for a healthier alternative and because that smoky char adds another unique layer I love. Over the last few years, I’ve tested this Nashville hot chicken recipe several times, tweaking it until it hit the right balance of heat, flavor, and juiciness. Now, whenever I make it, I end up eating the leftovers for days—it's just that good.
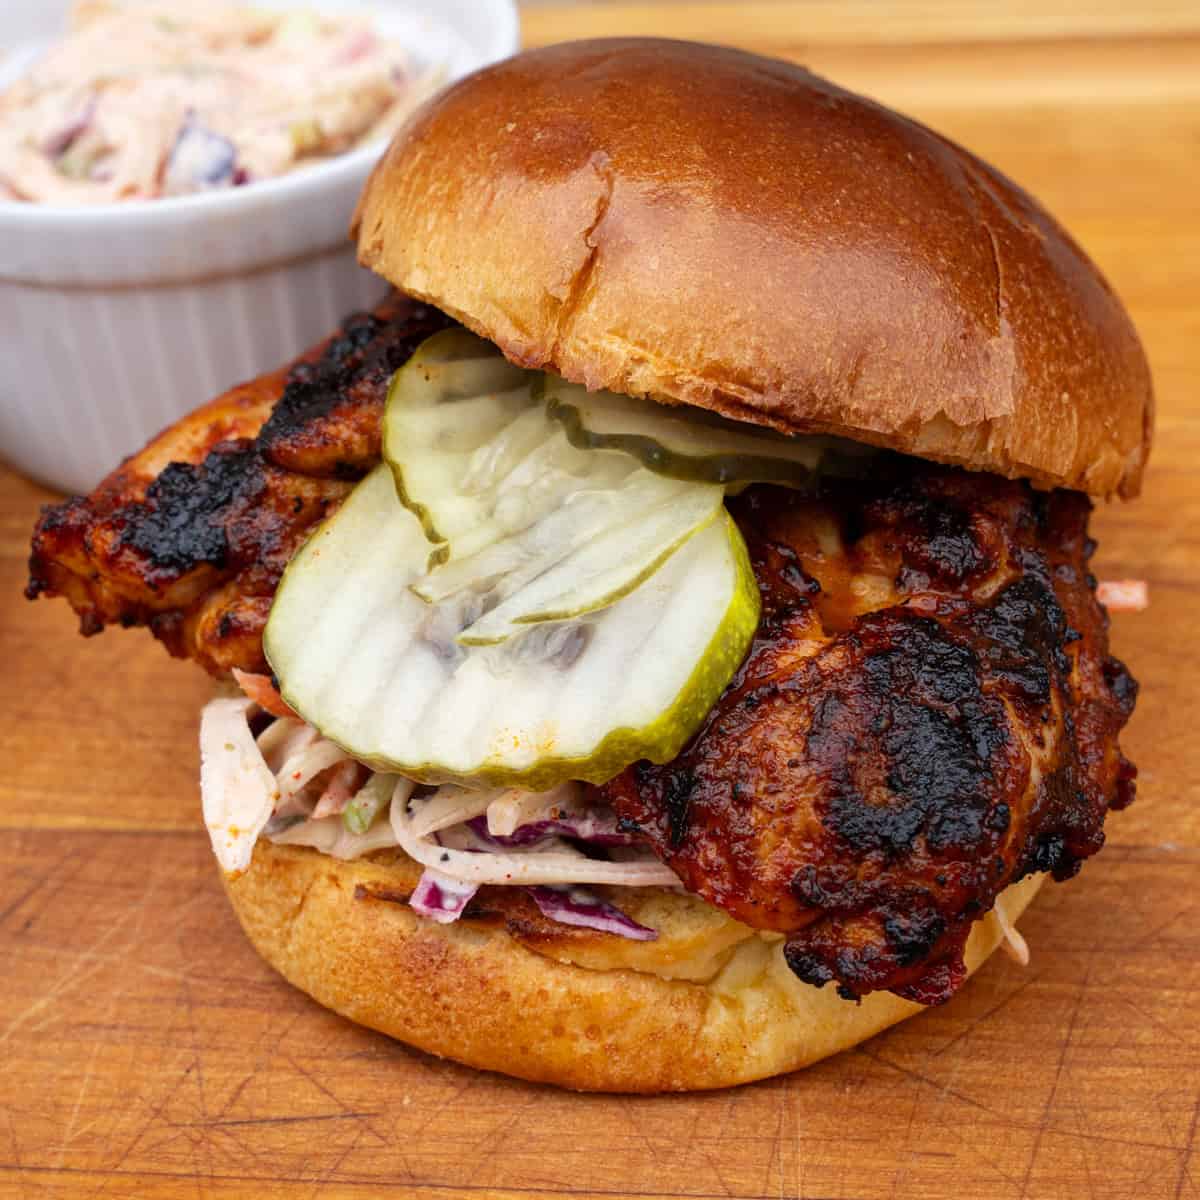
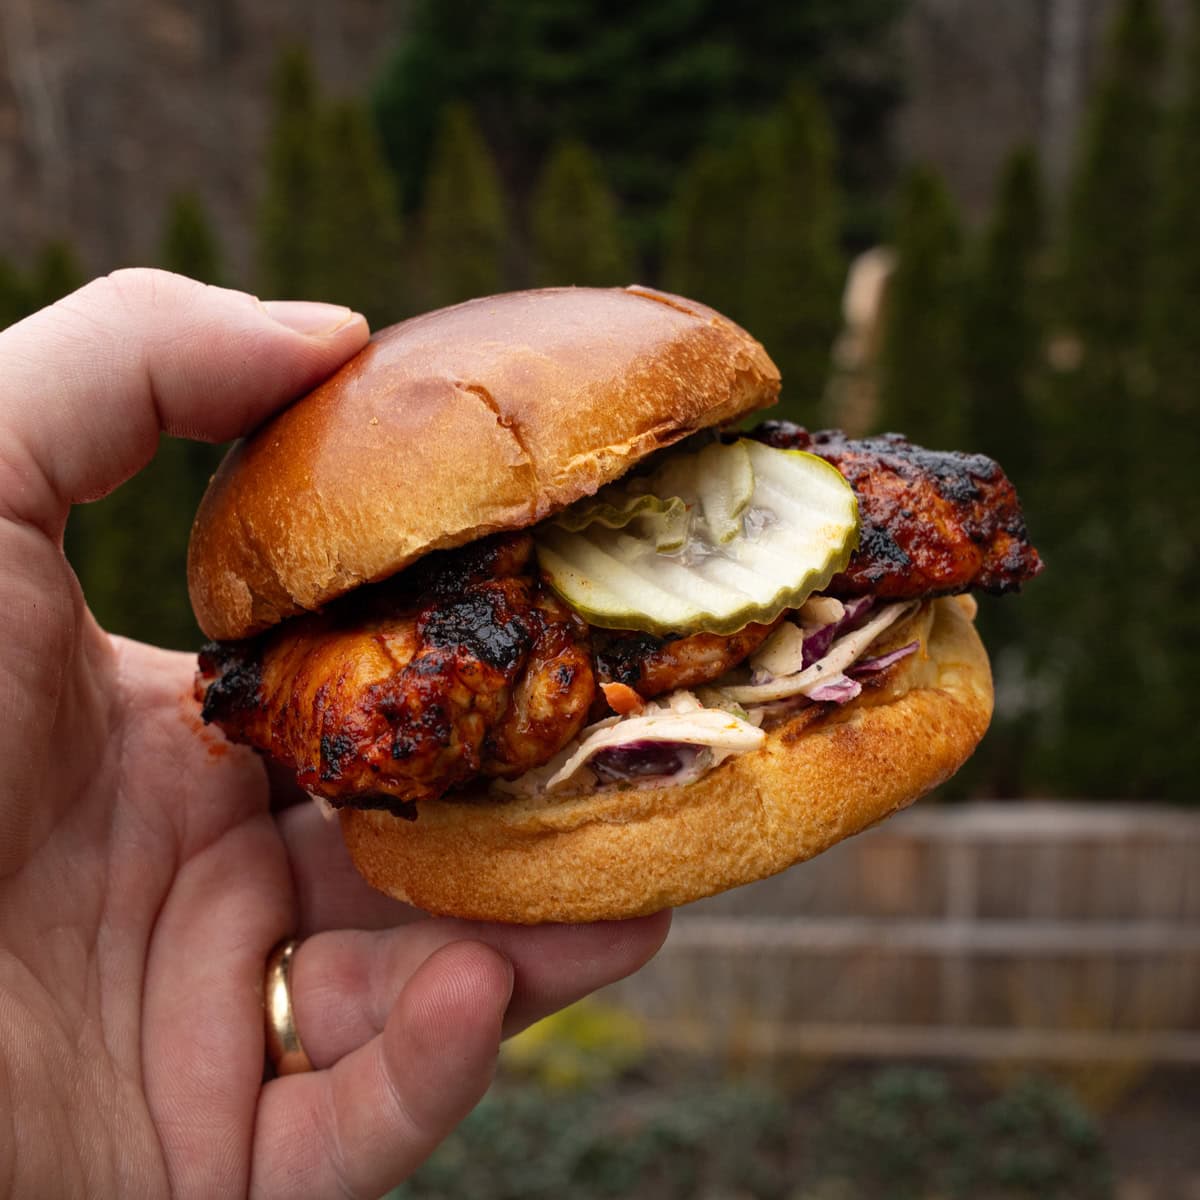
This grilled Nashville hot chicken sandwich delivers everything you love about the original: great flavor, smoky heat, juicy chicken, and that signature spiced oil. But instead of being deep-fried, it’s grilled for a lighter, backyard-friendly version that still brings a ton of flavor.
In the sections that follow, I outline the history of Nashville hot chicken, detail the ingredients required, provide step-by-step instructions, and suggest potential variations to help you achieve the best results.
Jump to:
What Is Nashville Hot Chicken?
Nashville hot chicken is a legendary Tennessee dish known for its fiery cayenne-spiced oil. Traditionally, it’s deep-fried, then brushed with a paste made from hot oil, cayenne pepper, paprika, garlic, and a few other secret ingredients, which creates a perfect harmony of salt, fat, acid, and heat. The salt enhances the chicken's flavor, while the fat gives it a rich mouthfeel. The acid from the tangy pickle brine adds a zing, and the heat from cayenne builds a slow-burning spice. All these contribute to its spicy, smoky, and slightly sweet profile, with a crunchy exterior that really sets it apart.
My grilled version borrows the same spicy flavor profile but with a few minor tweaks to the original. I use hot sauce as the acid in my basting sauce, but I use pickle juice as part of the binder to still give it that signature flavor. Plus, I add in a decent amount of butter for another layer of fat to help flavor the chicken. You’ll still get that classic Nashville hot sauce flavor, just with a lighter, grill-friendly twist.
Where Did Nashville Hot Chicken Come From?
Nashville hot chicken originated at Prince’s Hot Chicken Shack, an iconic institution in Nashville. According to local legend, the dish was created by Black culinary innovators as an act of revenge—made intentionally spicy to punish a cheating lover. But to everyone’s surprise, he loved it. What began as a prank became the foundation of a beloved Southern dish. Since then, Nashville hot chicken has exploded in popularity across the U.S., with restaurants, fast-casual chains, and food trucks offering their own spin on this spicy staple.
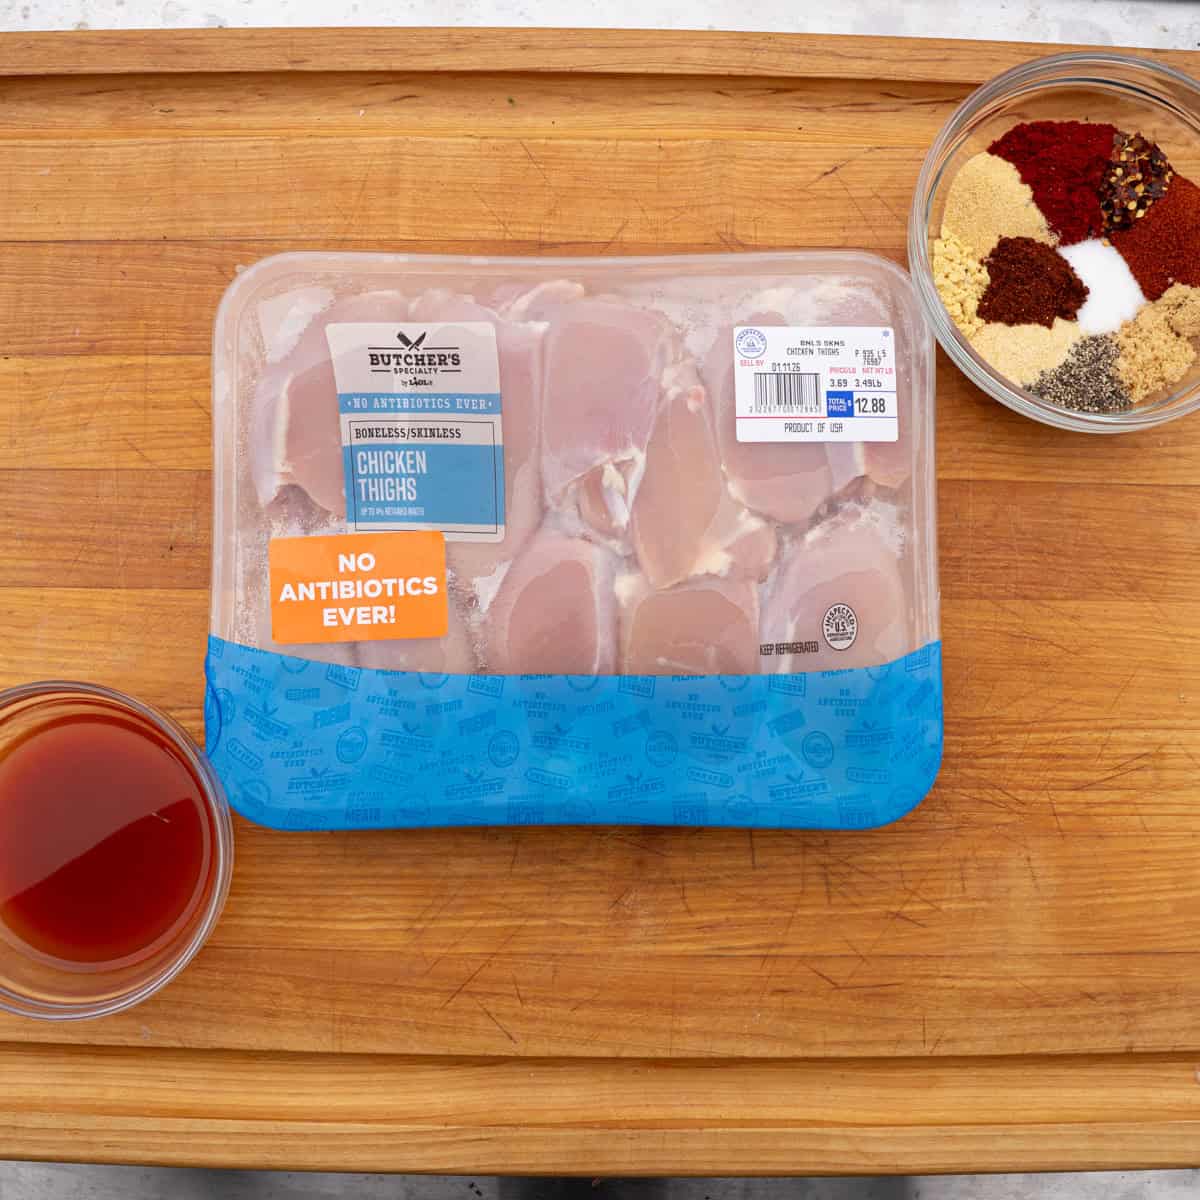
Ingredients You’ll Need
For the Marinade:
- Chicken thighs (boneless, skinless)
- Buttermilk
- Hot sauce
- Garlic powder, onion powder, smoked paprika
- Salt and black pepper
Why it works: If you have the time, marinating chicken in buttermilk is well worth the investment. The reason is that buttermilk tenderizes the chicken while adding tang. The lactic acid in the buttermilk gently breaks down the proteins in the chicken, resulting in even juicier chicken thighs.
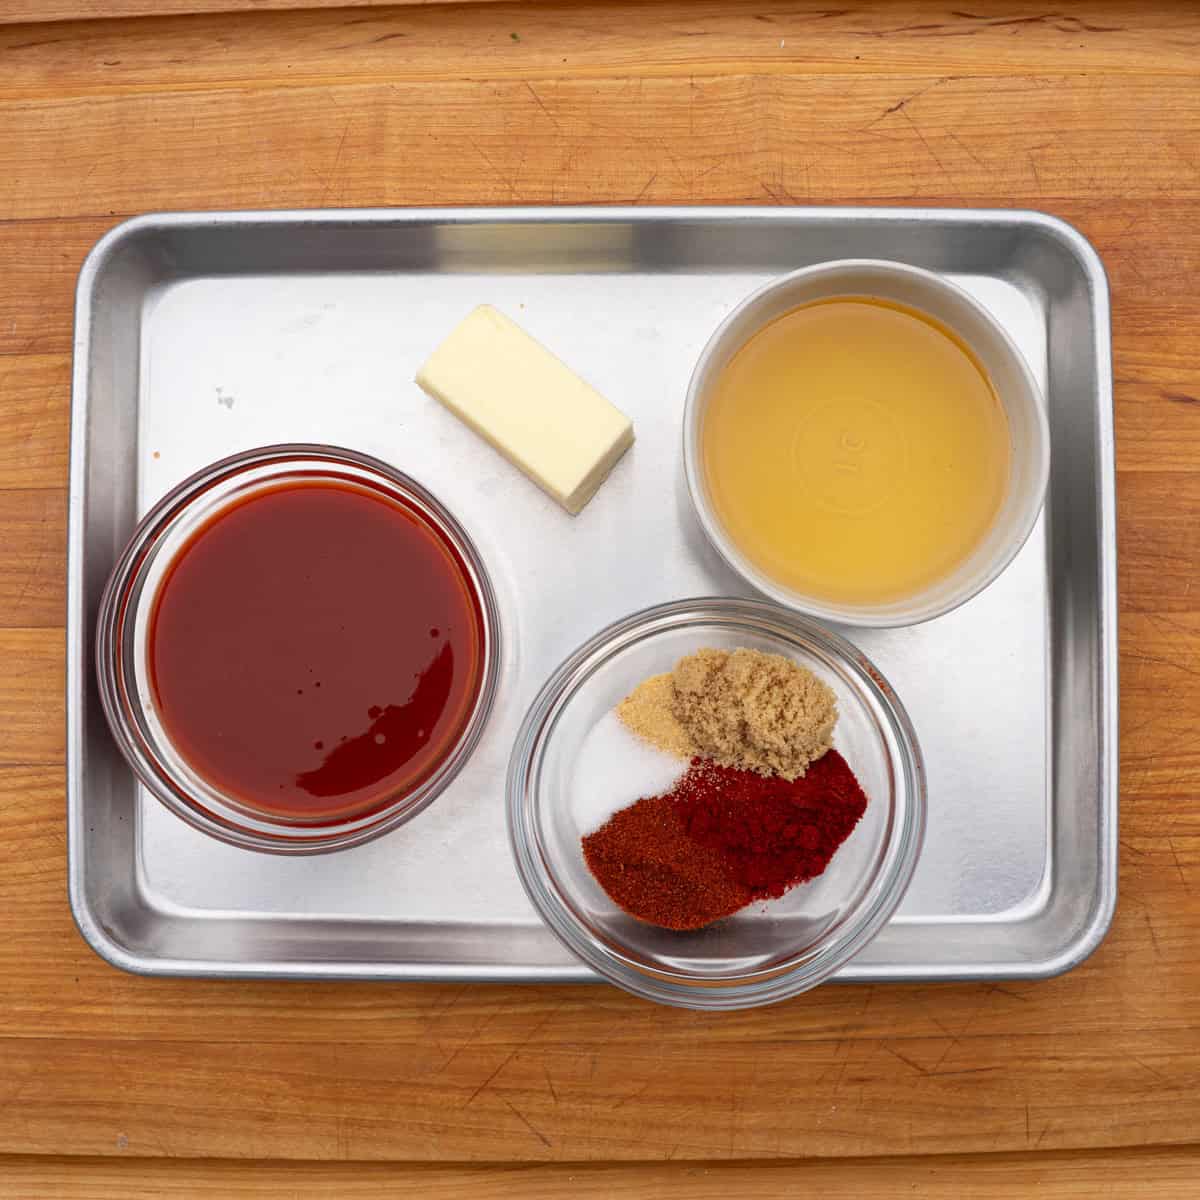
For the Nashville Hot Oil:
- Neutral oil (like canola or peanut)
- Butter
- Hot Sauce
- Cayenne pepper
- Brown sugar
- Garlic powder
- Smoked paprika
Why it works: I brush this spicy oil on the grilled chicken when it’s just about done cooking, so it has time to tack up to the chicken on the grill. I like to apply it twice to make sure there are layers of that signature Nashville heat. Don’t forget the brown sugar! It adds a subtle amount of balance to the basting sauce that you’ll appreciate when you taste the sandwich.
For the Sandwich:
- Toasted hamburger buns
- Pickle slices
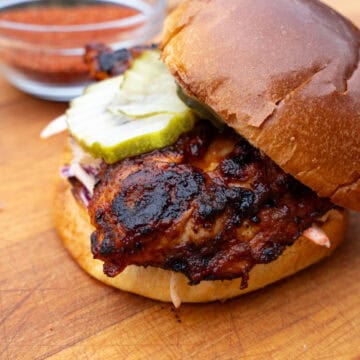
- Coleslaw — you can catch my recipe here. It goes great with this sandwich!
Why it works: These additions are really what balance out this sandwich. The Memphis-style coleslaw balances the heat, while the pickles add crunch and brightness.
How to Make Grilled Nashville Hot Chicken
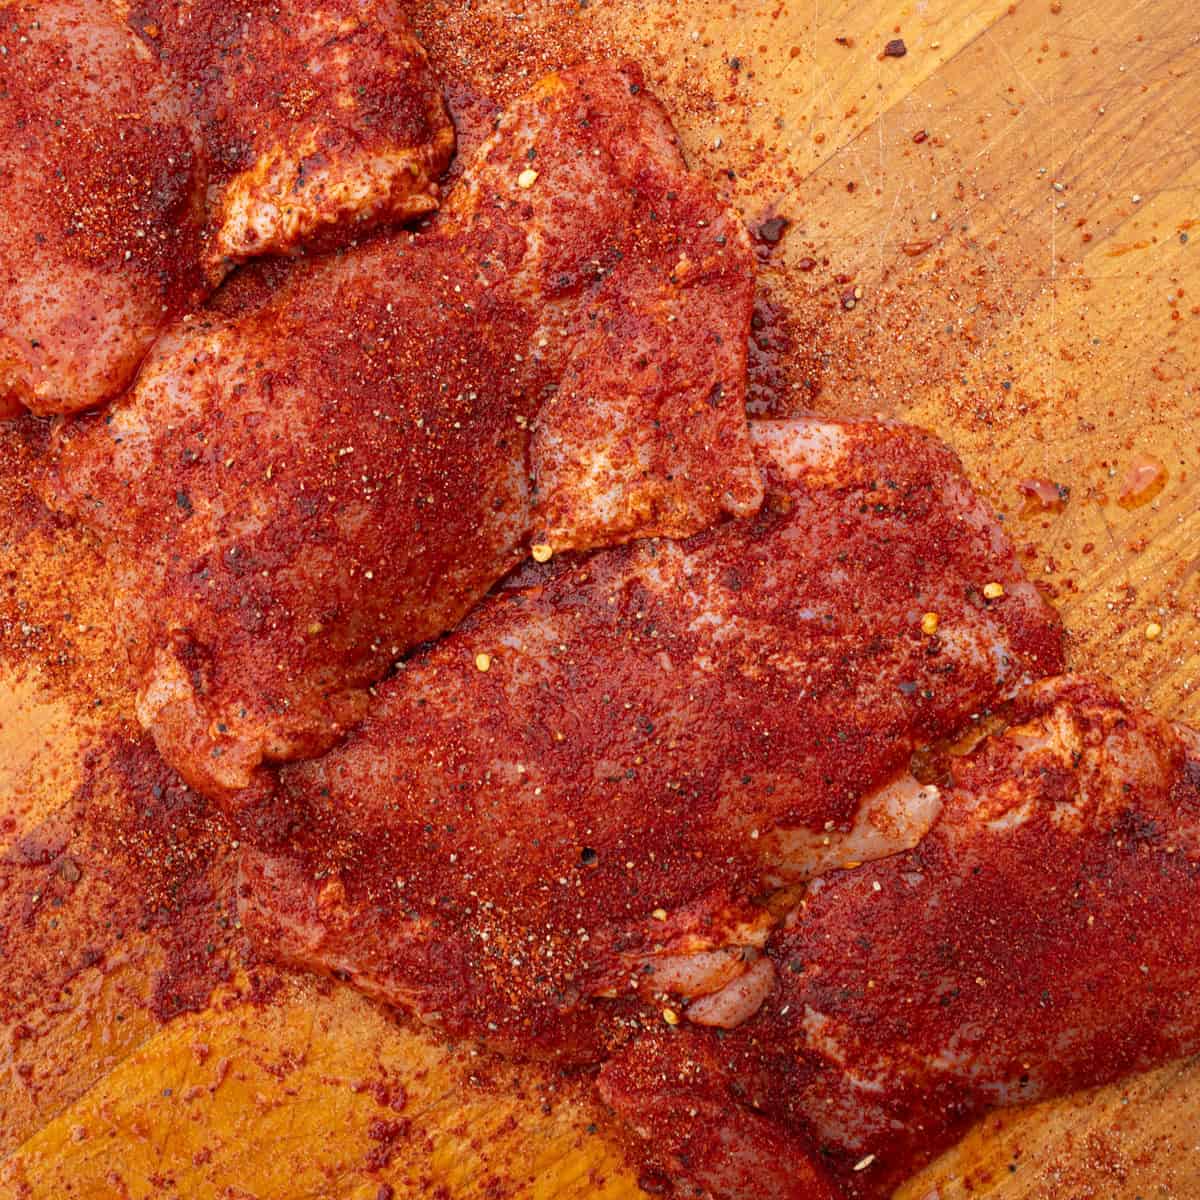
Step 1: Marinate the Chicken
Start by whisking together buttermilk, hot sauce, garlic powder, onion powder, paprika, salt, and pepper. Add chicken thighs and toss to coat. If you're short on time, try a quick 30-minute marinade to get that flavor infusion fast. Chicken thighs don’t take as long to marinate as larger cuts because they’re so thin, but in a perfect world, I’d tell you to try to marinate them for at least 2 hours. Once you’ve done that, you can cover and refrigerate for up to overnight if you want for a deeper flavor. If you have a busy schedule like mine and like to plan your weekly meals ahead of time, this helps you get set up for the next meal, which I find helpful. If you don’t have the time, though, you can skip this step altogether, and the chicken will still turn out delicious. This enhances it further.
Step 2: Make the Spicy Oil
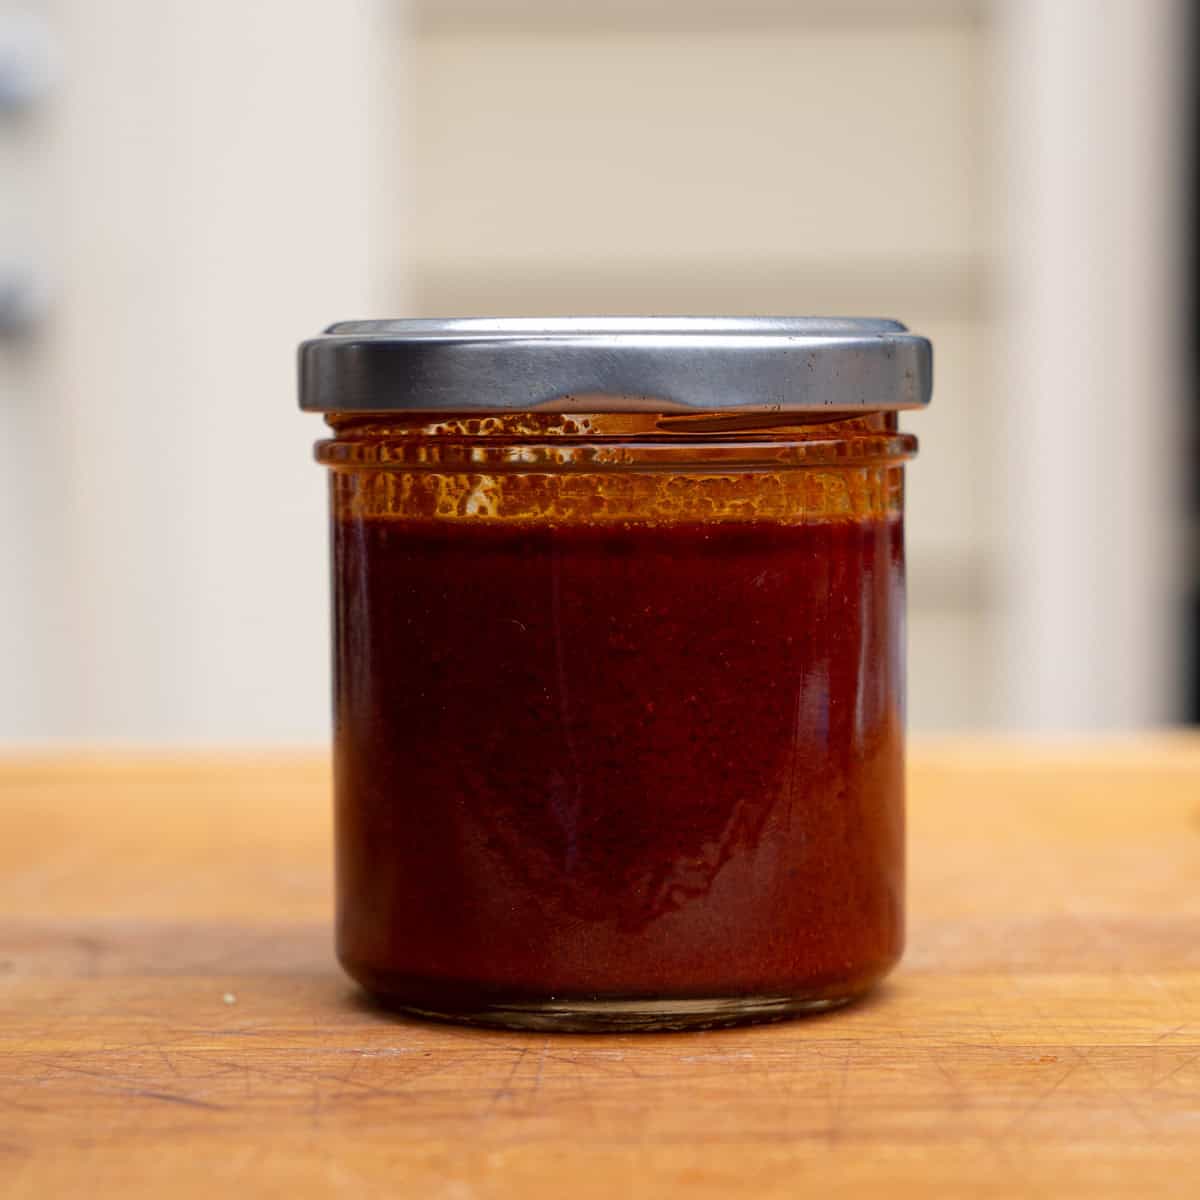
In a small saucepan over medium heat, add your butter. Once melted, pour in the oil. Stir in cayenne pepper, brown sugar, garlic powder, smoked paprika, and hot sauce. I like to let this simmer for about 10 minutes to allow the mixture to condense so it sticks to the chicken better on the grill. Once the thickness is where you like it, turn off the heat and set the sauce aside. If you feel the mixture needs a quick blend in a blender to incorporate everything thoroughly, you can do so at this point, though I don’t think it’s always necessary. This spicy oil can also be prepared a day ahead and refrigerated to save time on the day of grilling, if you’d like.
Note: You can adjust the spice level here by using less cayenne or hot sauce for a milder flavor—or doubling it if you really want to get crazy.
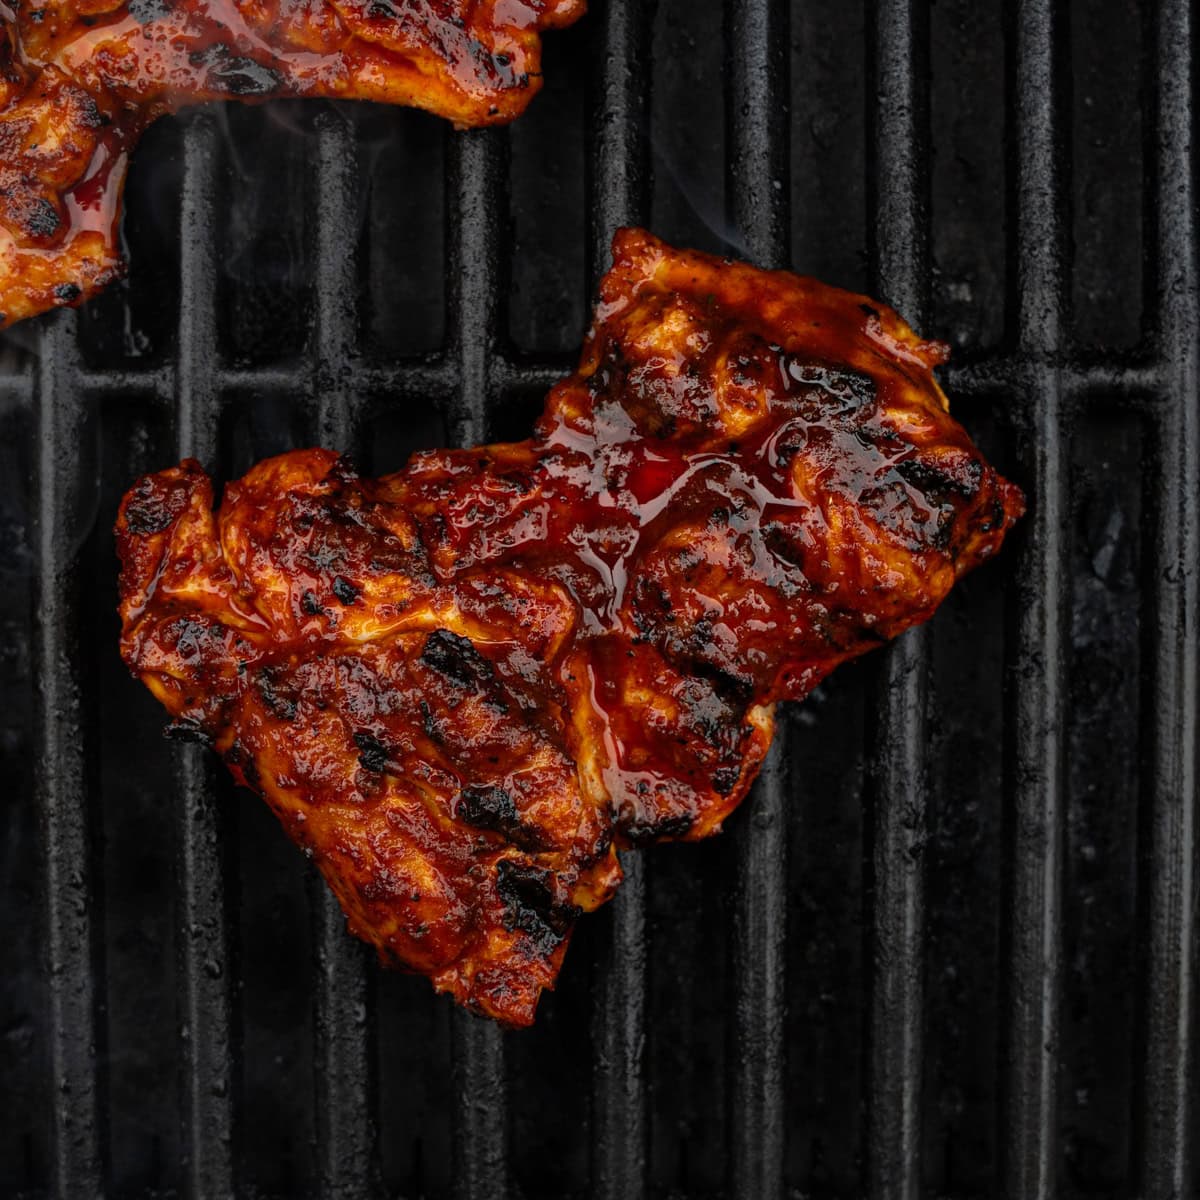
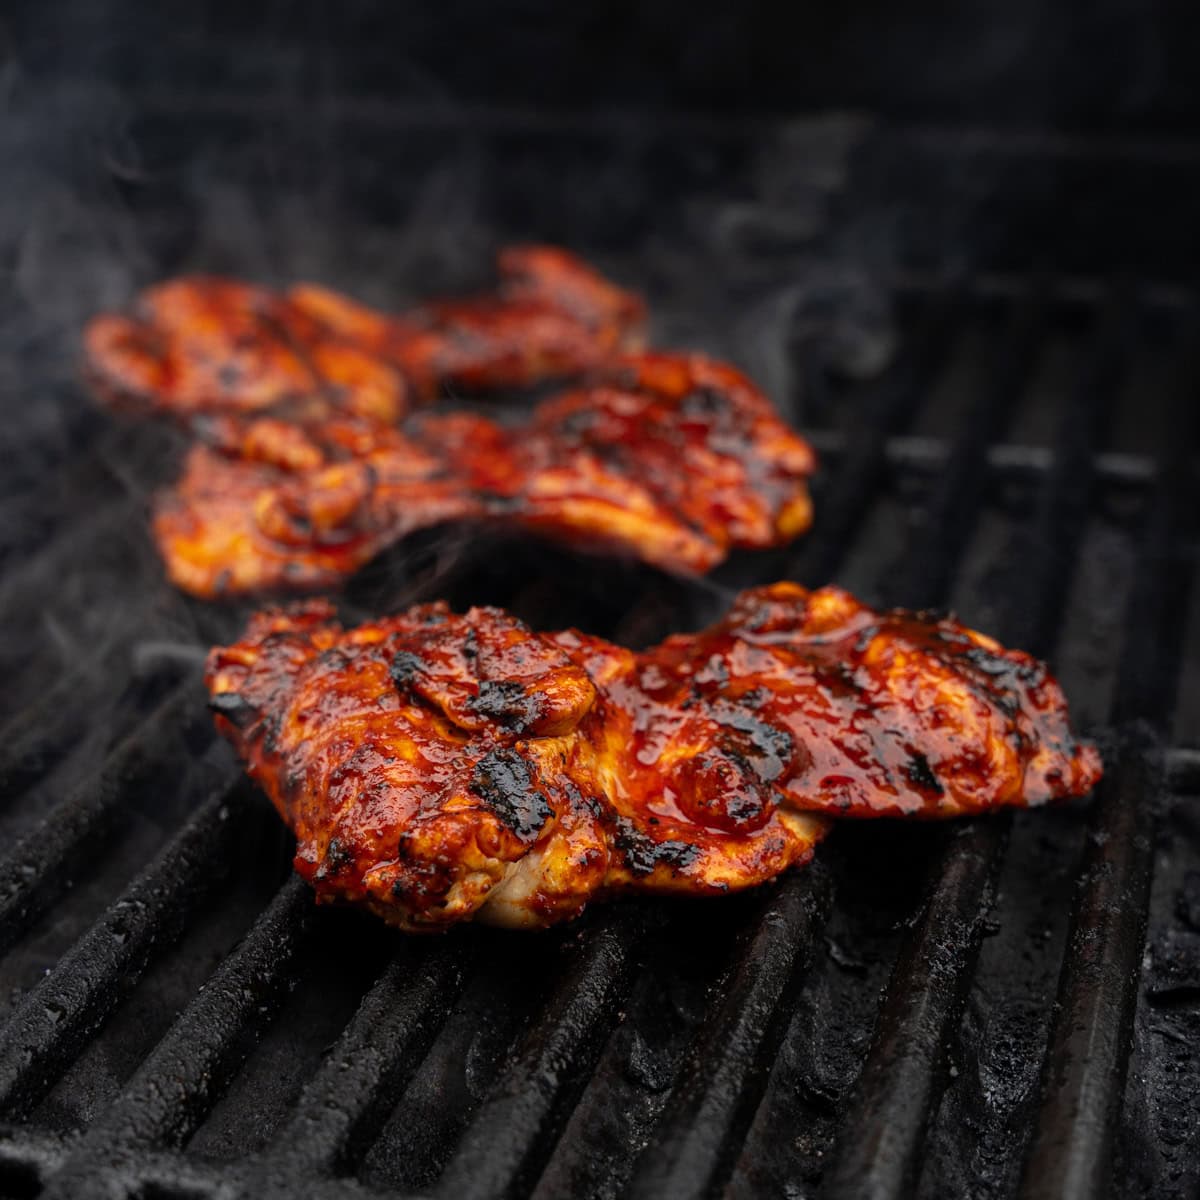
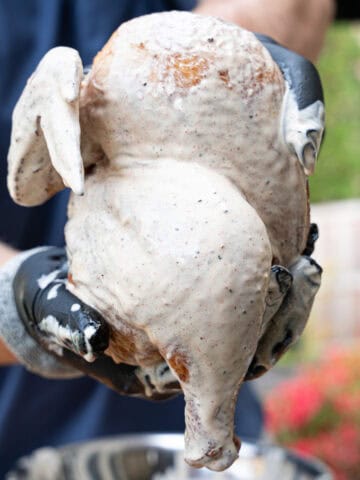
Step 3: Grill the Chicken & Brush on the Oil
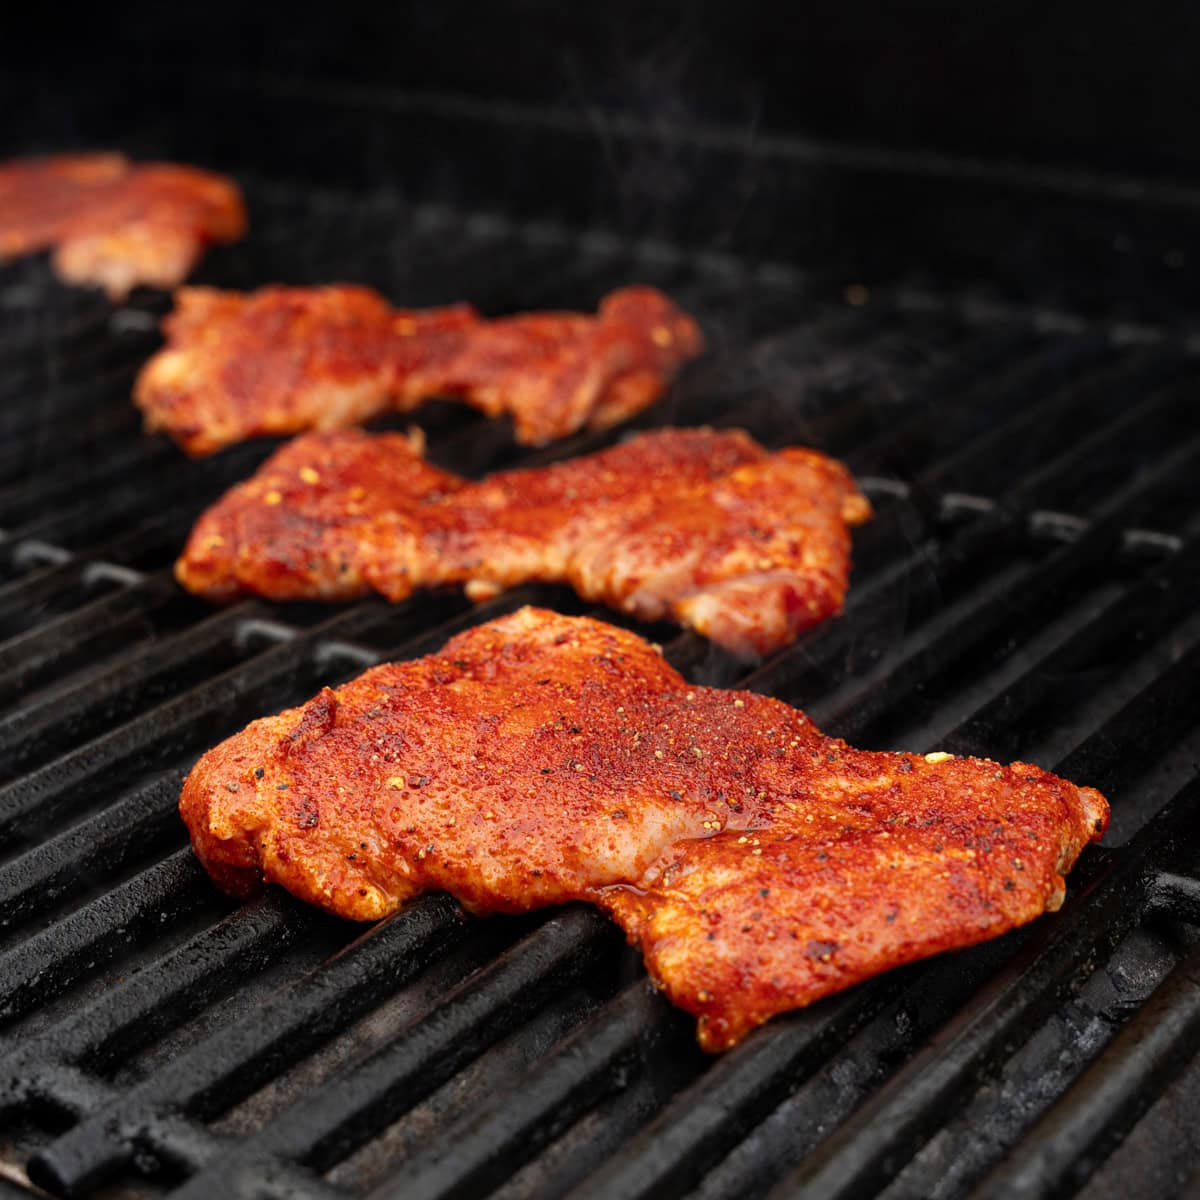
Preheat your grill to medium-high, approximately 400–425°F. If you don't have a thermometer, you can gauge the heat with the 2-second hand hover test: hover your hand about 3 inches above the grill grates; if you can only hold it there for 2 seconds due to the heat, your grill is ready. Oil the grates to prevent sticking — I tend to use Pam cooking spray, and it does the trick.
At this point, remove the chicken from the marinade and let the excess drip off. Grill thighs for 5–6 minutes per side, or until internal temp reaches 150°F. Once it gets there, you can start basting the chicken with the oil, making sure to cover all sides well. Chicken is safe to eat at 165°F, but I like to cook thighs until ~180°F so I can keep basting them with oil. Thighs are so much more forgiving than chicken breasts, and they will still come out very juicy. If you are using chicken breasts, though, I would recommend pulling them at the recommended 165°F mark.
Grill Tip
If you struggle with flare-ups on your grill, use indirect heat to finish cooking. A two-zone setup (hot side and cooler side) helps prevent burning while still getting a good sear. Plus, it’ll make it easier for that sauce to set on the chicken.
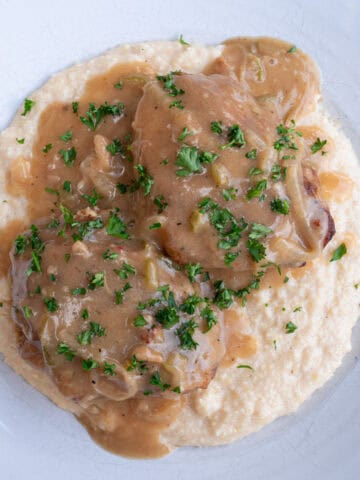
Step 4: Assemble the Sandwiches
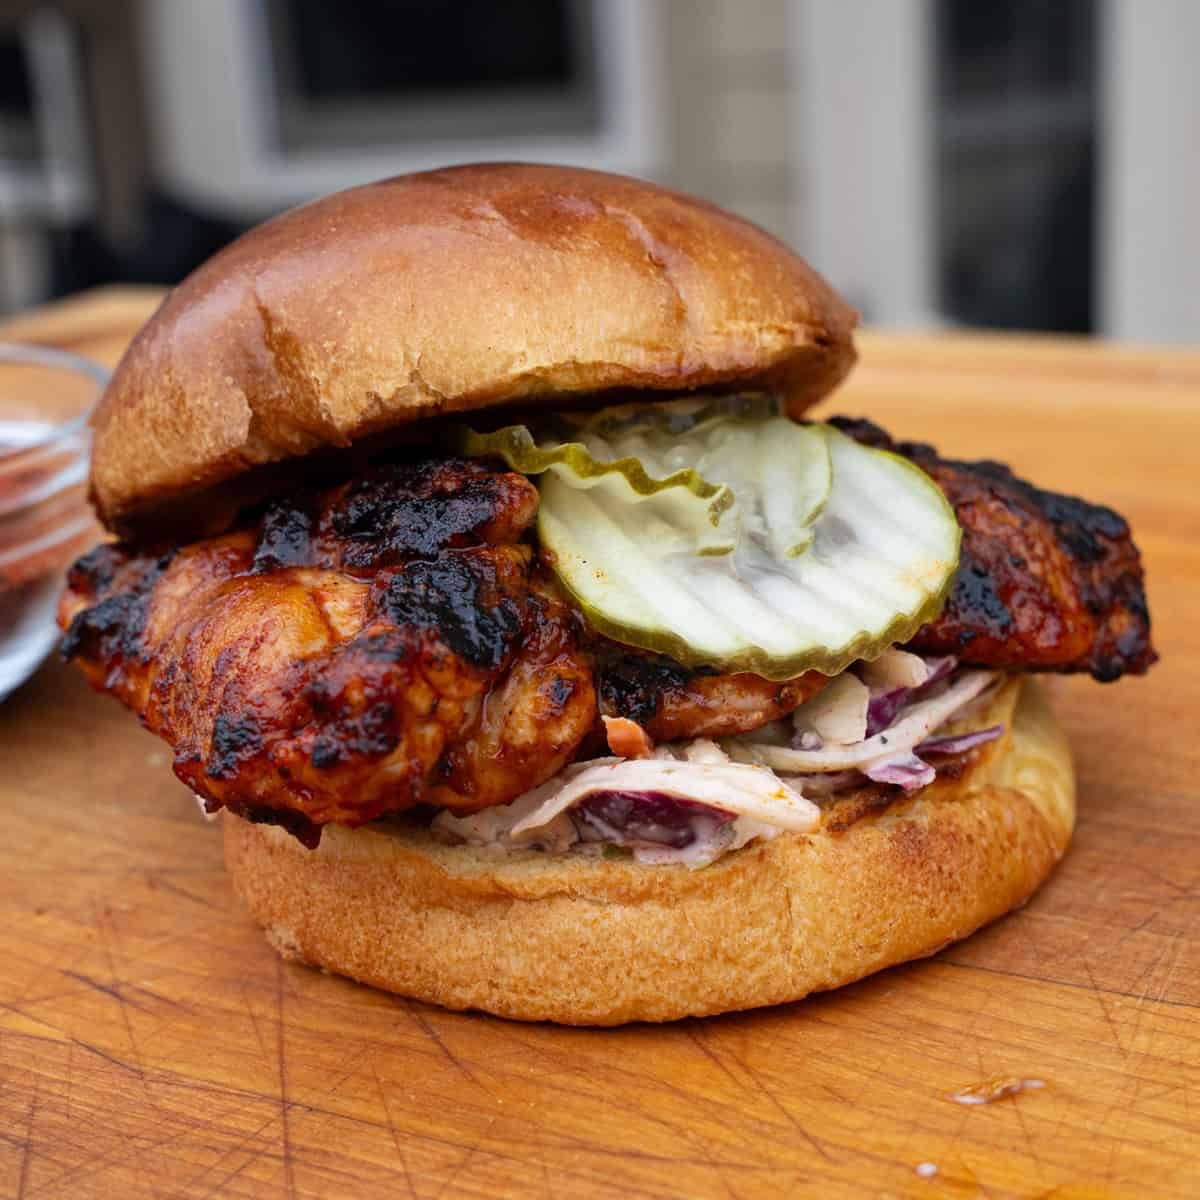
Toast your buns — I use hamburger buns for convenience, but you can get as fancy as you like. Layer each with a grilled chicken thigh, a few pickles, and my Memphis-style coleslaw, then serve. Enjoy!
Indoor Cooking Option
For those without an outdoor grill, don’t worry — you can adapt this recipe for indoor cooking! Use a grill pan on the stovetop, following the same cooking time and temperature. If you don’t have a grill pan, place the marinated chicken under a preheated oven broiler, keeping a close eye to prevent burning, and cook for 6–8 minutes per side until the chicken reaches the desired internal temperature, then baste the chicken with the oil. It turns out pretty dang good, too, for not being made on the grill.
Substitutions – Adjusting for Taste or Dietary Needs
If you need to switch things up:
- Chicken Options: Chicken breasts work too, but reduce grill time slightly. Thighs are juicier and more forgiving. I wouldn’t go the bone in route on either thighs or breasts because it’s just adding more work to your plate to trim them up.
- Dairy-Free Option: Use almond milk or another plant-based milk, with a splash of vinegar, in place of buttermilk to mimic buttermilk's tenderizing effect.
- Adjusting the Heat: If you’re not a big fan of spice, cut back on the cayenne in the spicy oil or swap in a milder chili powder. That being said, this one is always going to pack a good amount of spice, so if that’s not your thing, I’d probably try another recipe. On the flip side, if you really want to turn things up a notch, add extra cayenne, or even saute a fresh jalapeno or ghost pepper, depending on how hot you want it (just make sure to blend it up at the end to get a smoother consistency.
Variations
This spicy grilled chicken isn’t just great on sandwiches — I love utilizing it in a variety of ways for leftovers. Here are a couple of other ways I like to eat this meal:
- As Nashville Chicken Sliders: Ideal for game day or casual gatherings, I’ve served these at a few tailgates, and they’re usually the first thing to go.
- On a Salad: Fun fact — I love a good Caesar salad, and this chicken pairs surprisingly well with a dollop of creamy Caesar dressing.
- With Waffles: This one’s becoming a classic on its own, but man, is it good. The contrast of spicy chicken on a waffle with maple syrup is something you absolutely have to try! I haven’t got a recipe for this on the website yet, but here’s a good one to check out in the meantime.
- Taco-Style: Shred the grilled chicken and serve it in tortillas with pickled onions is another easy one we love. It’s basically a suped-up version of buffalo chicken tacos. Who doesn’t like that??
Equipment You’ll Need
- Grill
- Grill tongs
- Meat thermometer
- Small saucepan
- Basting brush or spoon
- Mixing bowls & measuring spoons
Storing & Reheating Leftovers
Store cooled chicken in an airtight container in the fridge for up to 3 days. If you put them in a freezer-safe bag and freeze them, they’ll keep even longer. To reheat and preserve the crust, warm it on a wire rack set over a baking sheet in a 350°F oven for 10–12 minutes. This method helps retain as much of the texture as possible by elevating the chicken above the pan. It’s not as good as eating it fresh, but it’s the closest you’re going to get. As always, you can use the microwave—but it’s not ideal because it softens the crust.
You can store the spicy oil separately and reheat it before brushing on the leftovers, if there are any.
Recipe
Grilled Nashville Hot Chicken Sandwich
Equipment
- grill
- Grill tongs
- Meat Thermometer
- Small Saucepan
- Basting brush or spoon
- Mixing bowls & measuring spoons
Ingredients
Ingredients for The Chicken
- 2-3 lbs. chicken thighs boneless & skinless
- ¼ C hot sauce + ¼ C pickle juice mixed
- ¼ C paprika
- 2 T cayenne pepper
- 2 T brown sugar
- 2 teaspoon black pepper
- 2 teaspoon salt
- 2 teaspoon garlic powder
- 2 teaspoon onion powder
- 1 teaspoon ground mustard
- 1 teaspoon chili powder
- 1 teaspoon red chili flakes
Ingredients for The Marinade:
- 2 cups buttermilk
- ¼ cup hot sauce
- 1 teaspoon garlic powder
- 1 teaspoon onion powder
- 1 teaspoon smoked paprika
- 1½ teaspoon kosher salt
- 1 teaspoon black pepper
Ingredients for the Nasville Hot Sauce
- 4-5 T butter unsalted
- 4 oz. canola oil
- 1 C hot sauce
- 1 ½ T red pepper
- 1 T paprika
- 1 T brown sugar
- ½ teaspoon garlic powder
- ½ teaspoon salt
Ingredients to Finish
- Hamburger buns toasted, as needed
- 1 C prepared coleslaw
- dill pickles as needed
Instructions
Instructions for the Marinade:
- In a large bowl or zip-top bag, whisk together the buttermilk, hot sauce, garlic powder, onion powder, smoked paprika, salt, and black pepper until well combined.
- Add the chicken thighs, making sure they are fully submerged in the marinade.
- Cover and refrigerate for at least 2 hours or overnight for best results.
- When ready to cook, remove the chicken from the marinade and let the excess drip off. Proceed with seasoning and grilling as directed in the main recipe.
For the Nashville Hot Sauce:
- Place a saucepan over medium-high heat and add the butter. Once the butter has melted, add the oil and all remaining ingredients, stirring as needed. Once the mixture begins to simmer, reduce the heat to low and continue cooking until the sauce is well combined, about 10 minutes.
For the Chicken:
- Preheat the grill to 400 degrees. Meanwhile, pat the chicken thighs dry and trim off any excess fat. Brush the chicken thighs with the pickle juice + hot sauce mix. Then, combine the paprika and the next nine seasonings. Coat the chicken with the prepared rub until covered on all sides. Repeat this step until all thighs have been seasoned.
- Once the grill has preheated, add the chicken and cook, flipping every four to five minutes. Once the chicken registers ~150 degrees, begin liberally applying the sauce using a pastry brush or mop until all the thighs are thoroughly coated. Continue to cook until the internal temperature registers ~180 degrees and the sauce has tacked on. Once this occurs, set the chicken thighs aside and shut off the grill.
To Finish:
- Place a dallop of prepared coleslaw on a hamburger bun followed by the grilled chicken thigh. Top it off with three to four pickles and add the top of the bun. Repeat this process as needed, then serve & enjoy!
Notes
- Marinate Ahead: For maximum flavor and tenderness, marinate the chicken overnight.
- Grill Tip: Use a two-zone setup if flare-ups occur—sear on direct heat, finish on the cooler side.
- Serving Ideas: Great as full sandwiches or sliders for parties. Leftovers also work well in wraps or salads.
- Make It Dairy-Free: Swap the buttermilk with plant milk + vinegar (1 cup milk + 1 tablespoon vinegar) for a similar tenderizing effect.

Leave a Reply