Blackened scallops have always been one of my favorite things to make. I don't cook them as often as I probably should — they're not cheap, and finding really good jumbo scallops isn't always easy. But every time I do, I'm reminded why they're worth it. They're simple, straightforward, and when they're cooked properly, they beat most seafood dishes out there.
I like to finish them with a Cajun cream sauce made with butter, garlic paste, reduced chicken stock, heavy cream, Parmesan, and fresh lemon. It's rich but balanced — enough to complement the scallops without overpowering them. And the whole process comes together in under 25 minutes. Keep reading, and I'll walk you through exactly how to cook blackened scallops the right way.
Jump to:
What Are Blackened Scallops?
Blackened scallops are sea scallops coated in a generous layer of blackening or Creole seasoning, then seared over high heat until a deep, dark crust forms while the center stays tender and buttery. That crust develops from two things happening at the same time: the Maillard reaction — where the scallops brown and build complex flavor — and the spices toasting and lightly charring against the hot cooking surface. That's what gives them their signature dark color and smoky edge.
A lot of people assume "blackened" means burnt, but it doesn't. When you combine high heat, melted fat, properly dried scallops, and the patience to let them sear undisturbed, you get a firm, flavorful crust on the outside and a perfectly tender interior. That contrast is what makes blackened scallops stand out from the rest.
Blackened vs. Pan-Seared Scallops
Not all seared scallops are blackened.
- Pan-seared scallops rely mostly on natural browning and caramelization. These are more typically what you find at a restaurant (and how most people tend to make them).
- Blackened scallops depend not only on natural browning but also on a spice crust formed by blackening seasoning. This is more common in southern regions, and this is how I learned (and prefer) to make them.
Are Blackened Scallops Spicy?
Technically, blackened scallops can be spicy — but the heat level is completely adjustable, and most aren't overly hot. In my experience, store-bought blends like Tony Chachere's or Spiceology's Black Magic bring more flavor than heat. They have some warmth, but nothing overwhelming. Both my wife and kids aren't overly fond of spicy meals, and they don't even notice spiciness when I use these seasonings.
The real difference comes when you're making blackening seasoning at home. Traditional Creole blends usually include paprika, cayenne, garlic, thyme, and oregano. Cayenne is what drives the heat, so the amount you use determines how spicy the final dish will be. If you prefer a milder profile, scale it back. If you want more kick, bump it up—or even stir in a spoonful of horseradish for a sharper, more noticeable heat.
Ingredients
This recipe serves 2 as an entrée or 4 as a starter, depending on how you plan to serve it. Here's what you'll need:
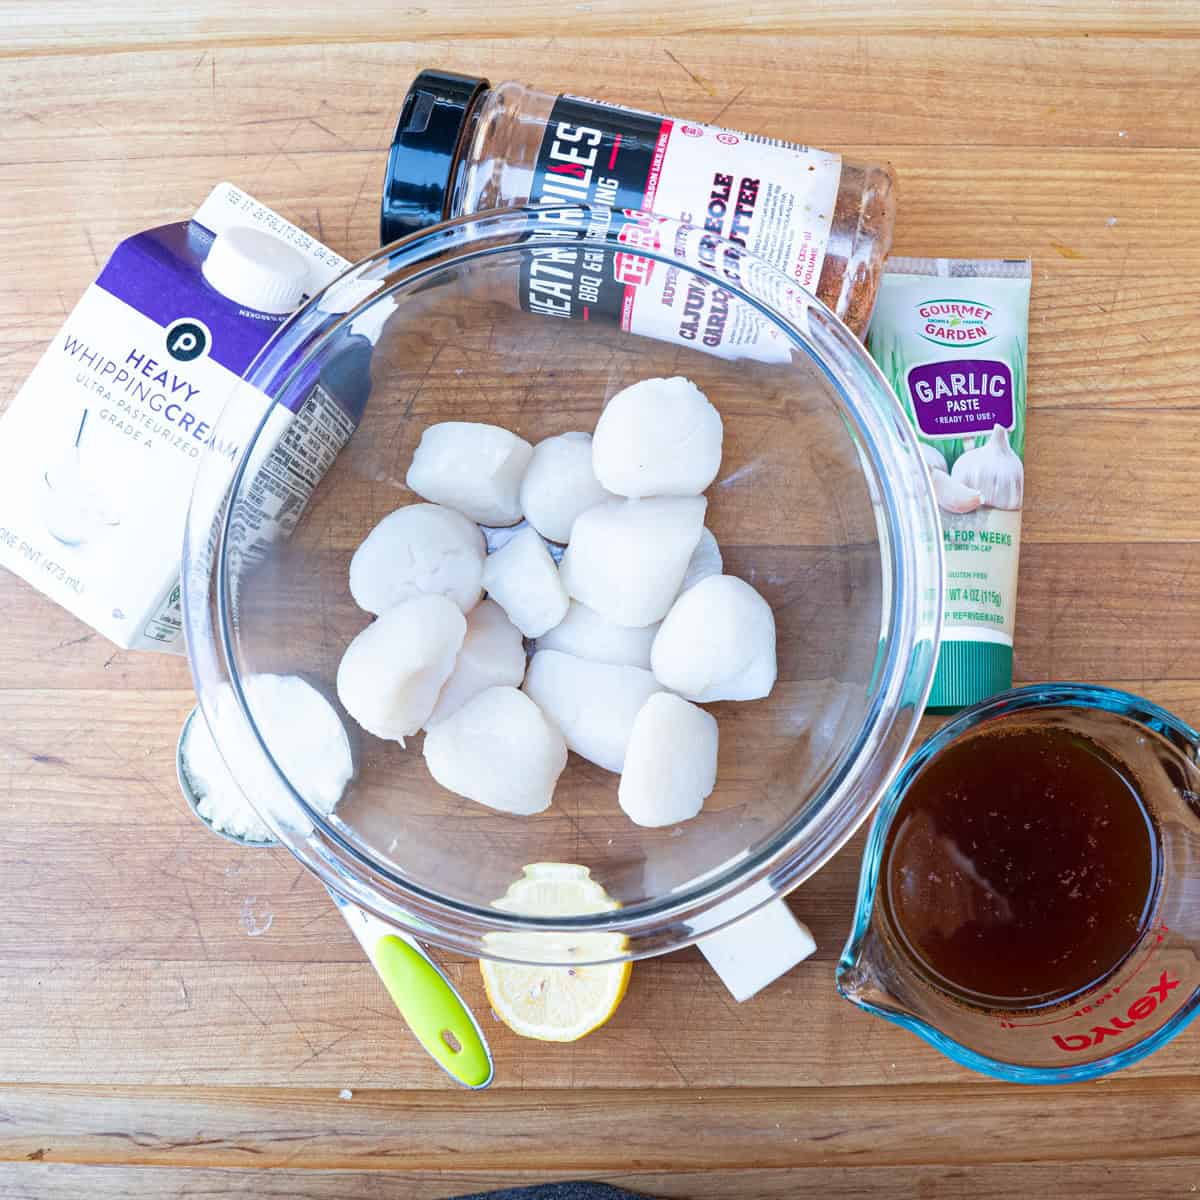
- jumbo sea scallops (preferably dry-packed; available at most seafood markets or high-quality grocery stores. If using frozen, make sure to thaw thoroughly and pat dry before cooking.)
- Creole seasoning (for coating + sauce). Ready-made varieties like Tony Chachere's or Heath Rile's Cajun Creole Garlic Butter Seasoning are what I tend to gravitate towards
- Oil Spray (if cooking on a griddle, as I do for this recipe)
- Unsalted butter
- Garlic paste
- Chicken stock
- Heavy cream (or your preferred non-dairy substitute for a dairy-free option)
- Grated parmesan
- Lemon, juiced
- Salt
- Chives, for garnish
How to Cook Blackened Scallops
Step 1: Dry the Scallops
If your scallops are wet-packed (as they often are when frozen), they'll steam rather than sear. Pat the scallops dry with paper towels, pressing firmly until no moisture transfers to the paper towels. The goal is to remove all surface wetness—any remaining moisture will prevent a good crust from forming.
Dry-packed sea scallops will always give you better results.
Step 2: Season Heavily
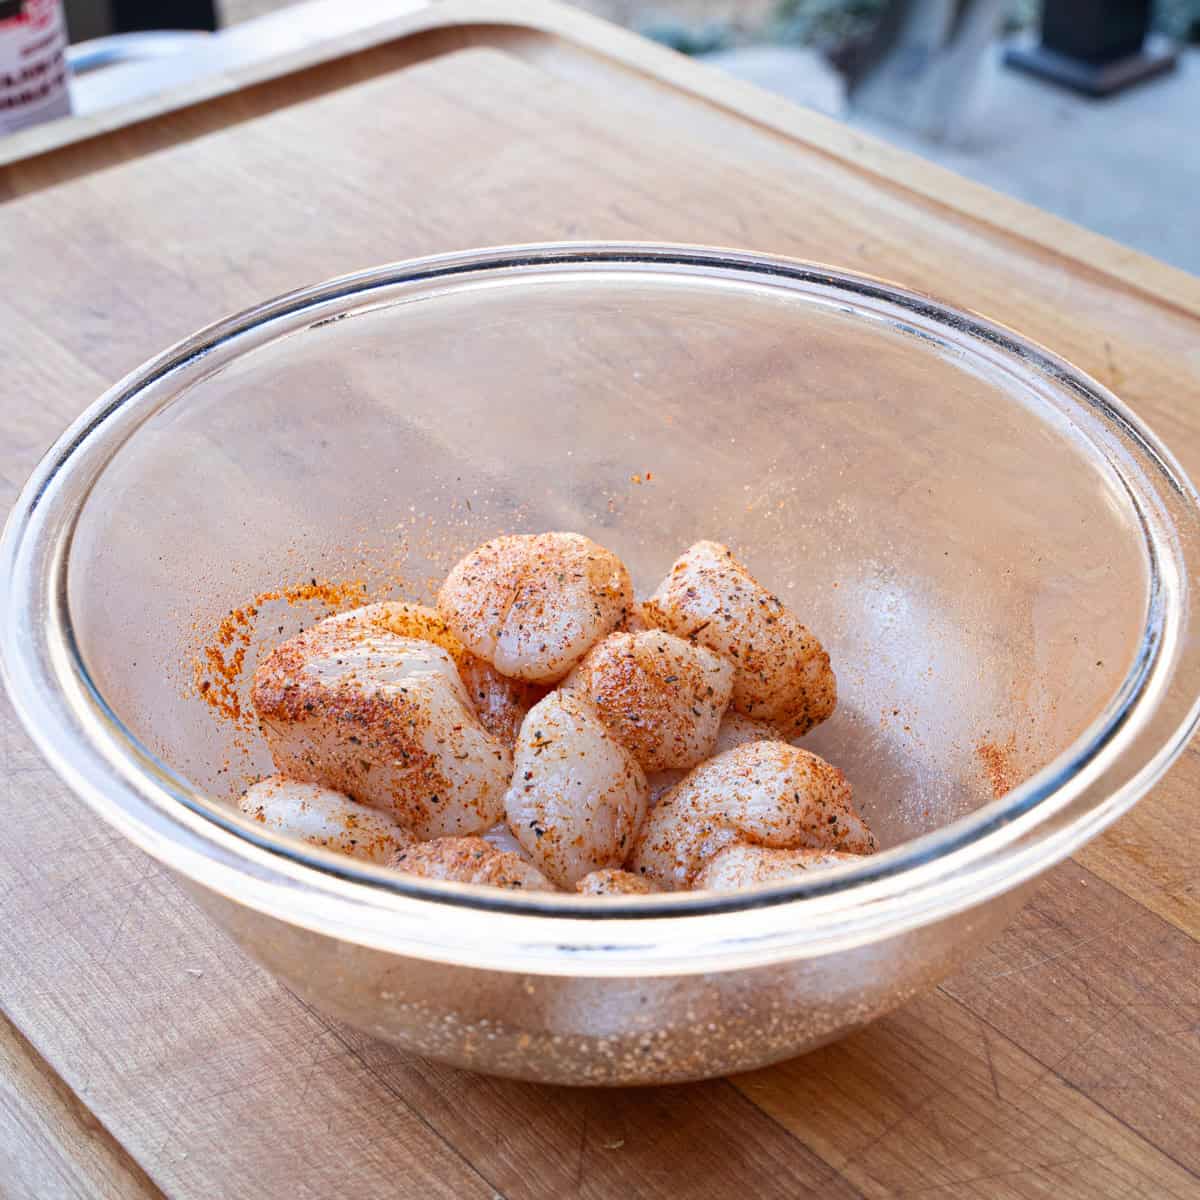
Next, either spray the scallops with oil (I'm using Pam here) or use a high-heat oil like grapeseed or avocado to add fat to their surface. Then coat fully in Creole or blackening seasoning until they are visibly coated.
Note: Make sure to do this step right before the scallops go on the griddle or pan. Unlike with other proteins, adding a high-salt seasoning too early can damage the scallops' integrity (i.e., texture).
Step 3: Preheat Your Surface Properly
Whether you're using a cast-iron skillet, a stainless-steel skillet, or a griddle, the process remains the same. It needs to be fully preheated. Medium-high to high heat is what I find to be perfect, so the pan is sufficiently hot to sear the scallops without scorching the seasoning.
The pan is good when you see a faint wisp of smoke rising, the surface looks shimmery, and the oil moves easily across the bottom. Add oil or butter right before the scallops hit the surface.
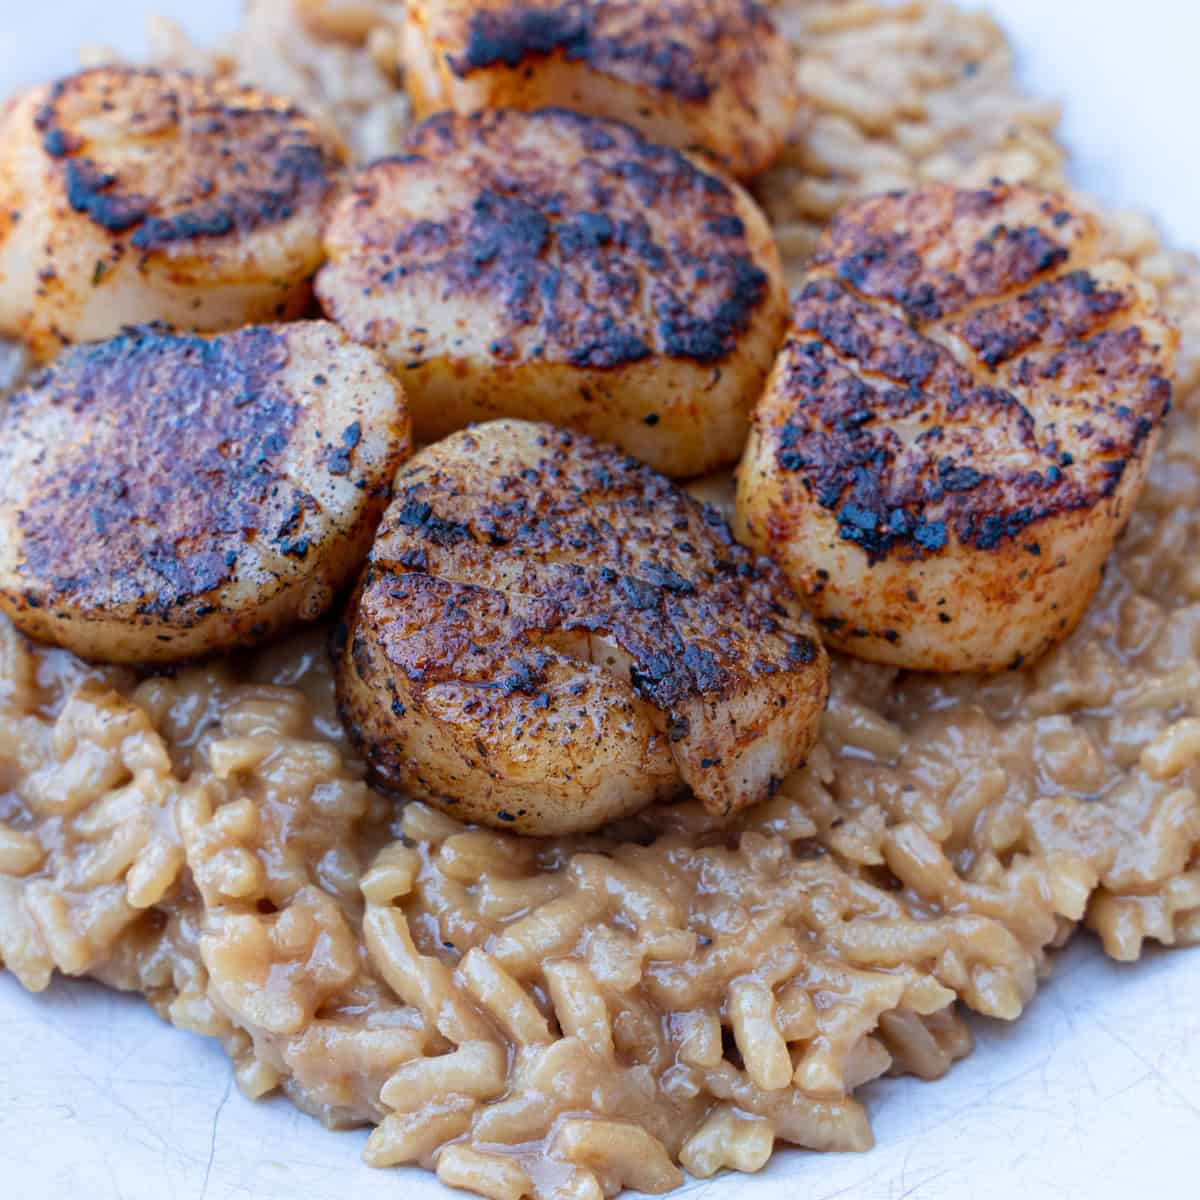
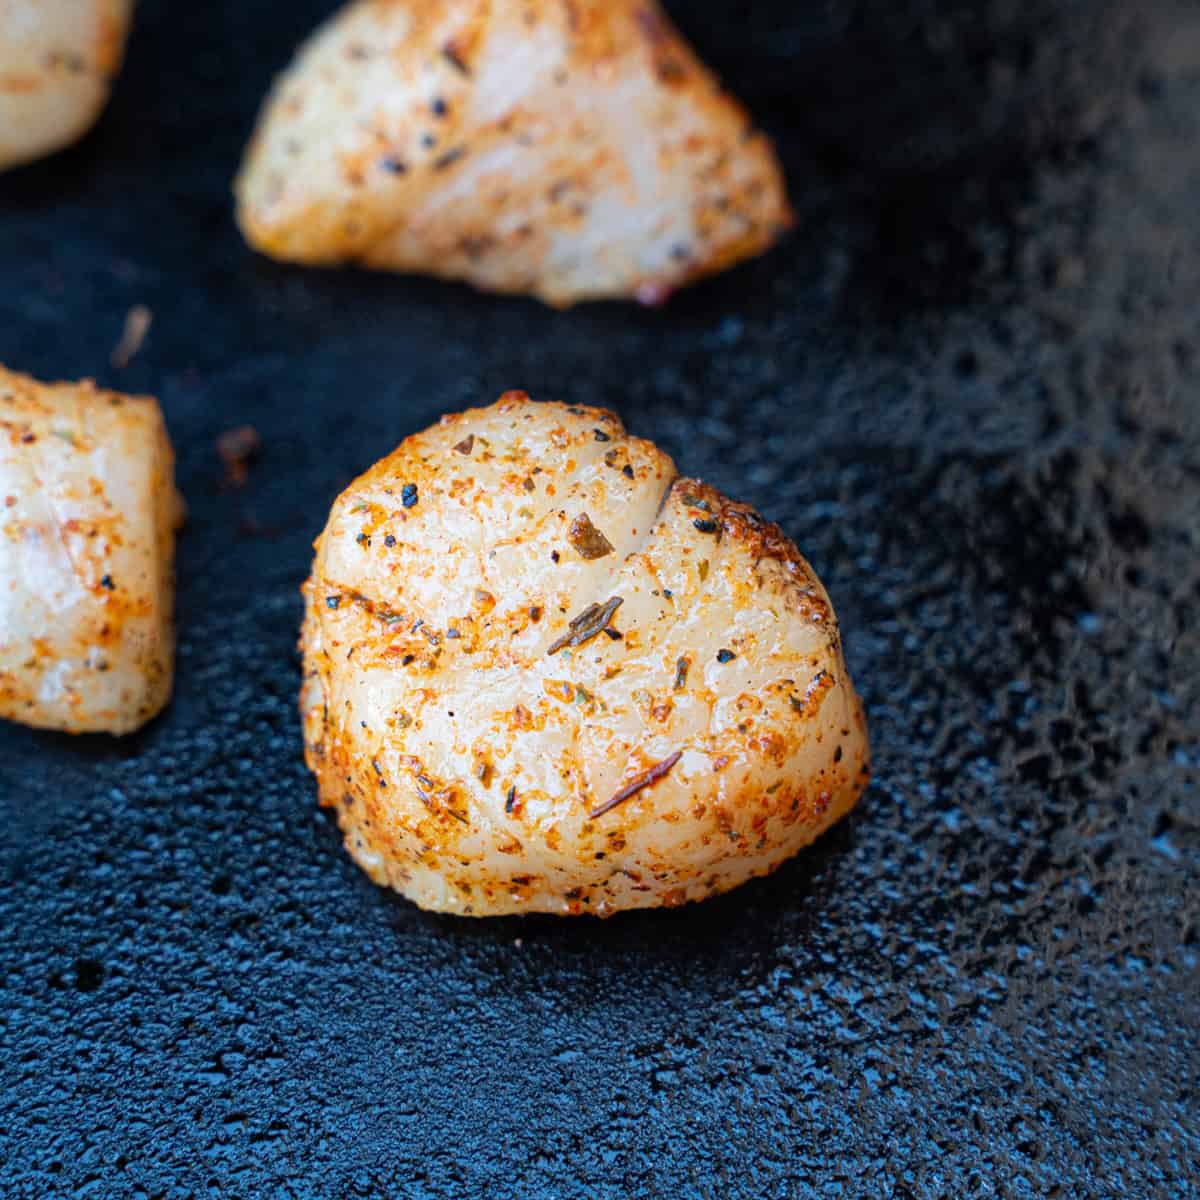
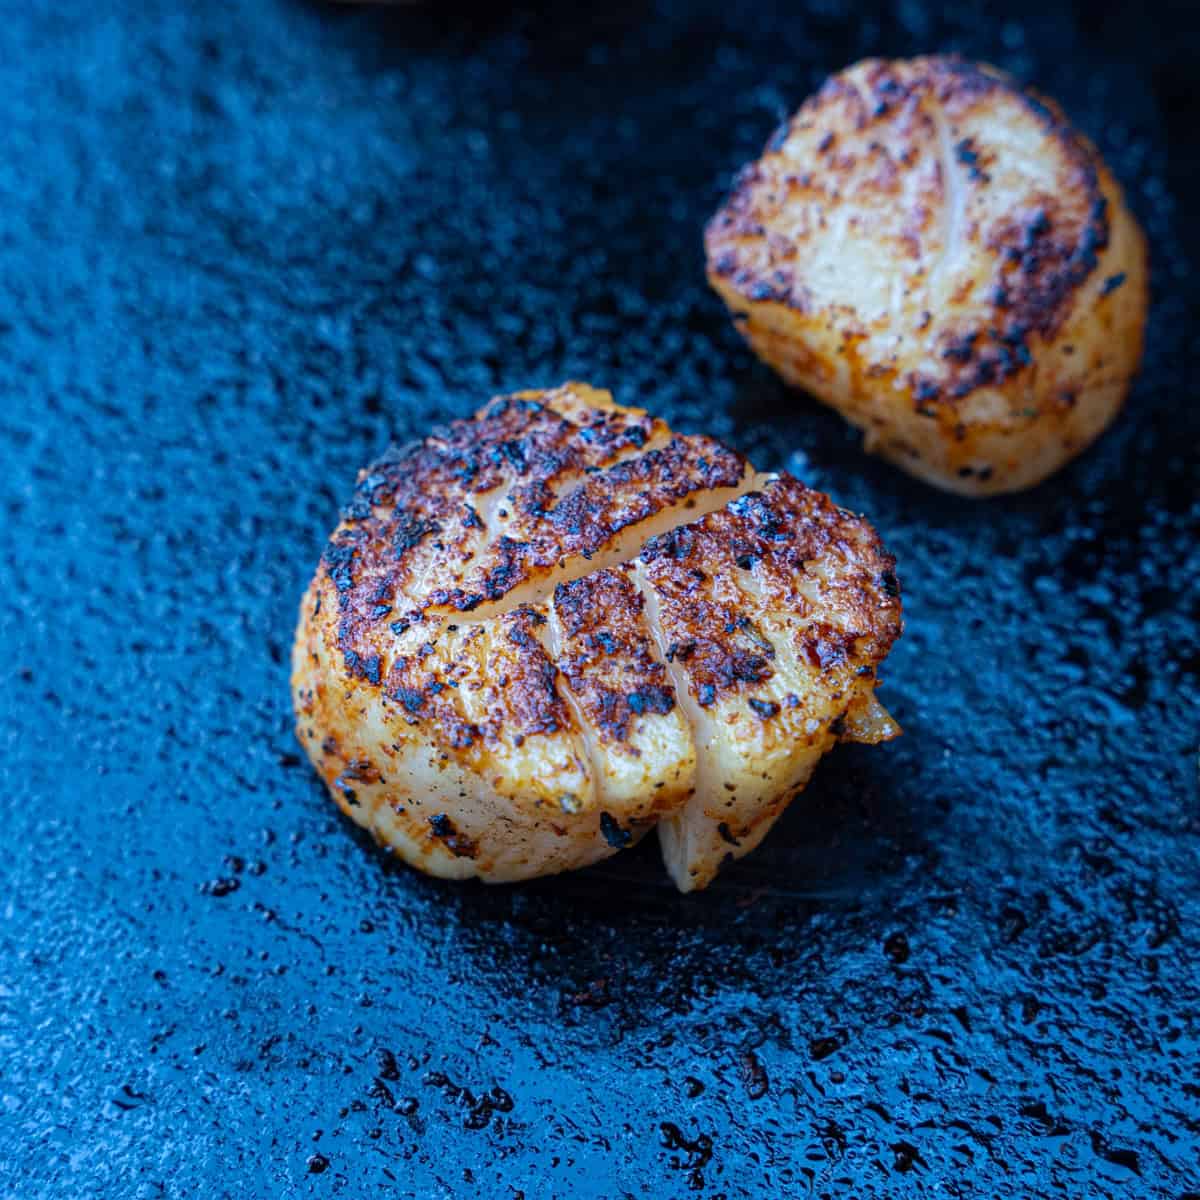
Step 4: Sear Without Moving
Once the scallops hit the pan, leave them undisturbed. This is one of the most important parts of the process. Moving them too early interferes with crust development and prevents proper browning.
I typically cook them for 2–3 minutes per side before checking. When they're ready to flip, they'll release easily from the cooking surface without resistance.
You're looking for:
- A deep brown-to-black crust
- Light caramelization around the edges
- A center that's just opaque
The ideal internal temperature is 115–120°F. If you don't have a thermometer, gently press the center of the scallop. It should feel slightly springy—not soft or firm. Remove them at that point and let the carryover heat finish the cooking.
How to Get a Perfect Blackened Crust Every Time
In my experience, these are the factors that make or break blackened scallops.
Control the Heat
The cooking surface needs to be properly preheated before the scallops ever touch it. Too low, and they won't brown. Too hot, with not enough fat, and the seasoning can scorch before a crust develops. You're looking for high, steady heat paired with butter or oil so the spices toast while the scallops build color.
Note: Keep in mind, though, temperature control starts before they hit the pan. Avoid cooking scallops straight from the refrigerator. Let them sit out for 10–15 minutes to lose some of that chill. Cold scallops drop the surface temperature of your pan immediately, hindering browning and crust formation.
Avoid Overcrowding (and Excess Moisture)
Scallops need space. When they're packed too closely together, they release moisture faster than it can evaporate. That trapped moisture lowers the surface temperature, causing steaming rather than searing. If necessary, cook in batches — they only take a few minutes per side, so it's worth doing properly.
This also starts with thoroughly drying them. If you skip this step, they'll steam instead of blacken. Blot them dry with paper towels until no visible surface moisture remains. A dry scallop is the foundation of a proper crust.
Flip Once
Flip the scallops only once. Repeatedly turning them disturbs the crust and prevents either side from fully developing. When they're ready, they'll release readily from the surface with minimal resistance.
Watch the Time
Anything beyond about three minutes per side risks overcooking. Scallops are delicate, plus precision matters. Properly cooked, they should be tender and moist — not firm or rubbery.
Blackened scallops don't require complicated technique, but they do reward attention to detail. Heat, dryness, spacing, and timing are what separate a good sear from a great one.
Make the Cajun Cream Sauce
I almost always make the sauce while the scallops are cooking. It comes together quickly and doesn't require constant attention, making it easy to manage both at once.
Start by melting the butter in a saucepan over medium-low heat. Once it's melted, stir in the garlic paste and Creole seasoning. Let that cook for about 30 seconds — just until it smells fragrant.
Next, pour in the chicken stock and simmer for about 5 minutes. This step matters. Reducing the stock builds depth before the cream ever goes in, and it keeps the sauce from tasting flat.
After it's reduced slightly, add the heavy cream and cook for another 5 minutes or so, until it thickens. If you want to add a little freshness, stir in some chopped herbs at the end. I usually reach for chives since I tend to have them on hand, but parsley works just as well.
Take the pan off the heat and stir in the parmesan until it melts smoothly into the sauce. Finish with a squeeze of lemon and a pinch of salt, adjusting to taste.
Note: That stock reduction step is what gives this blackened scallops recipe more structure than most cream sauces. And if you have any left over, it works just as well over steak, grilled vegetables, or even spooned over rice the next day.
What to Serve with Blackened Scallops
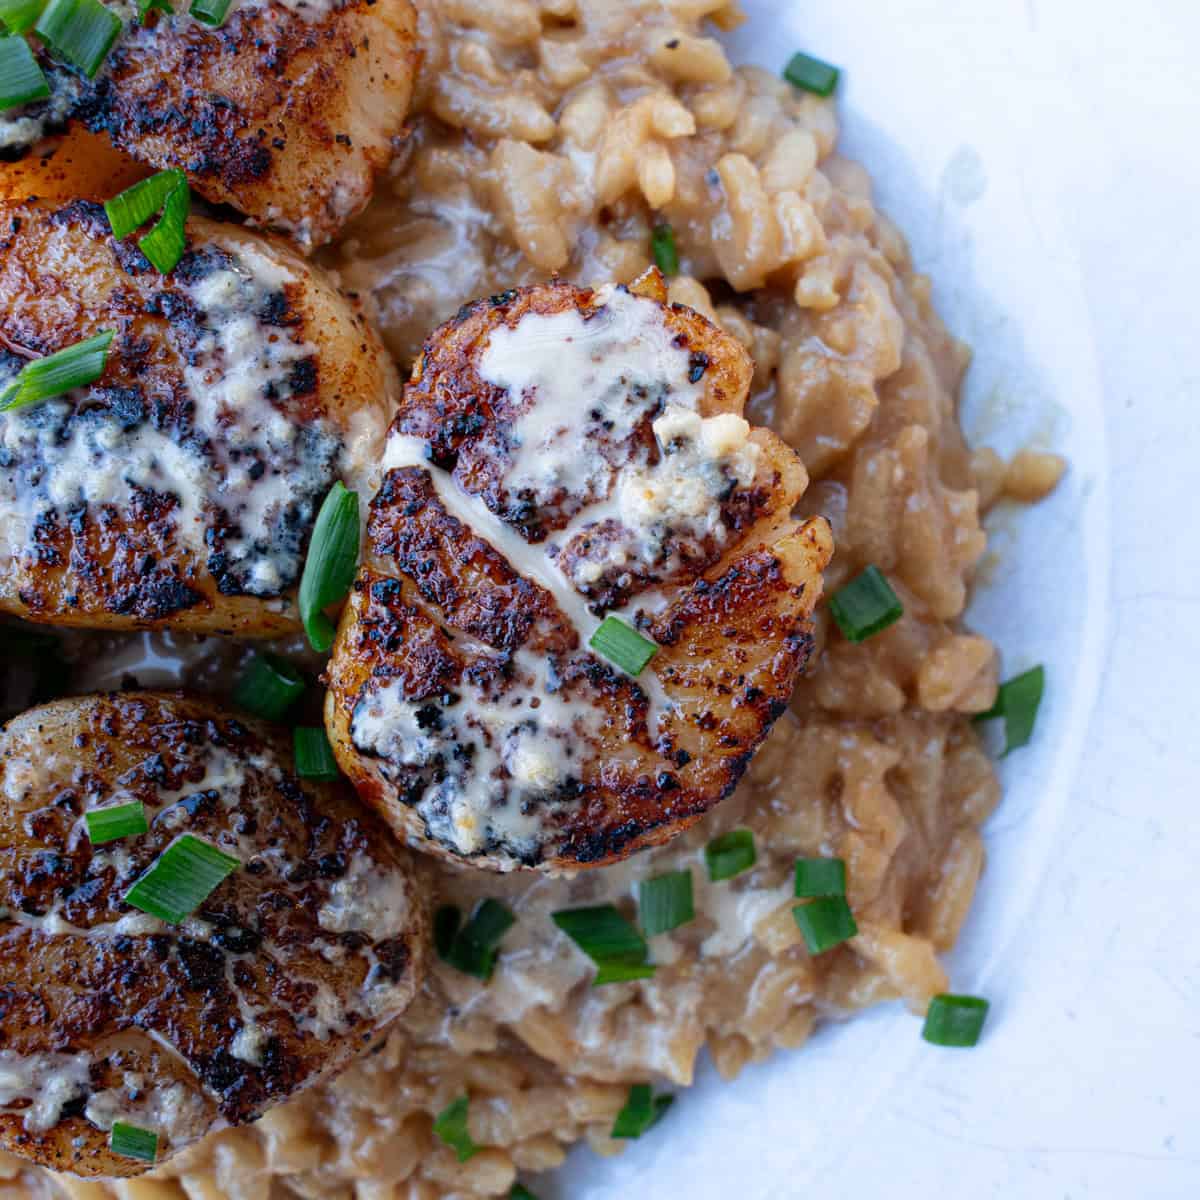
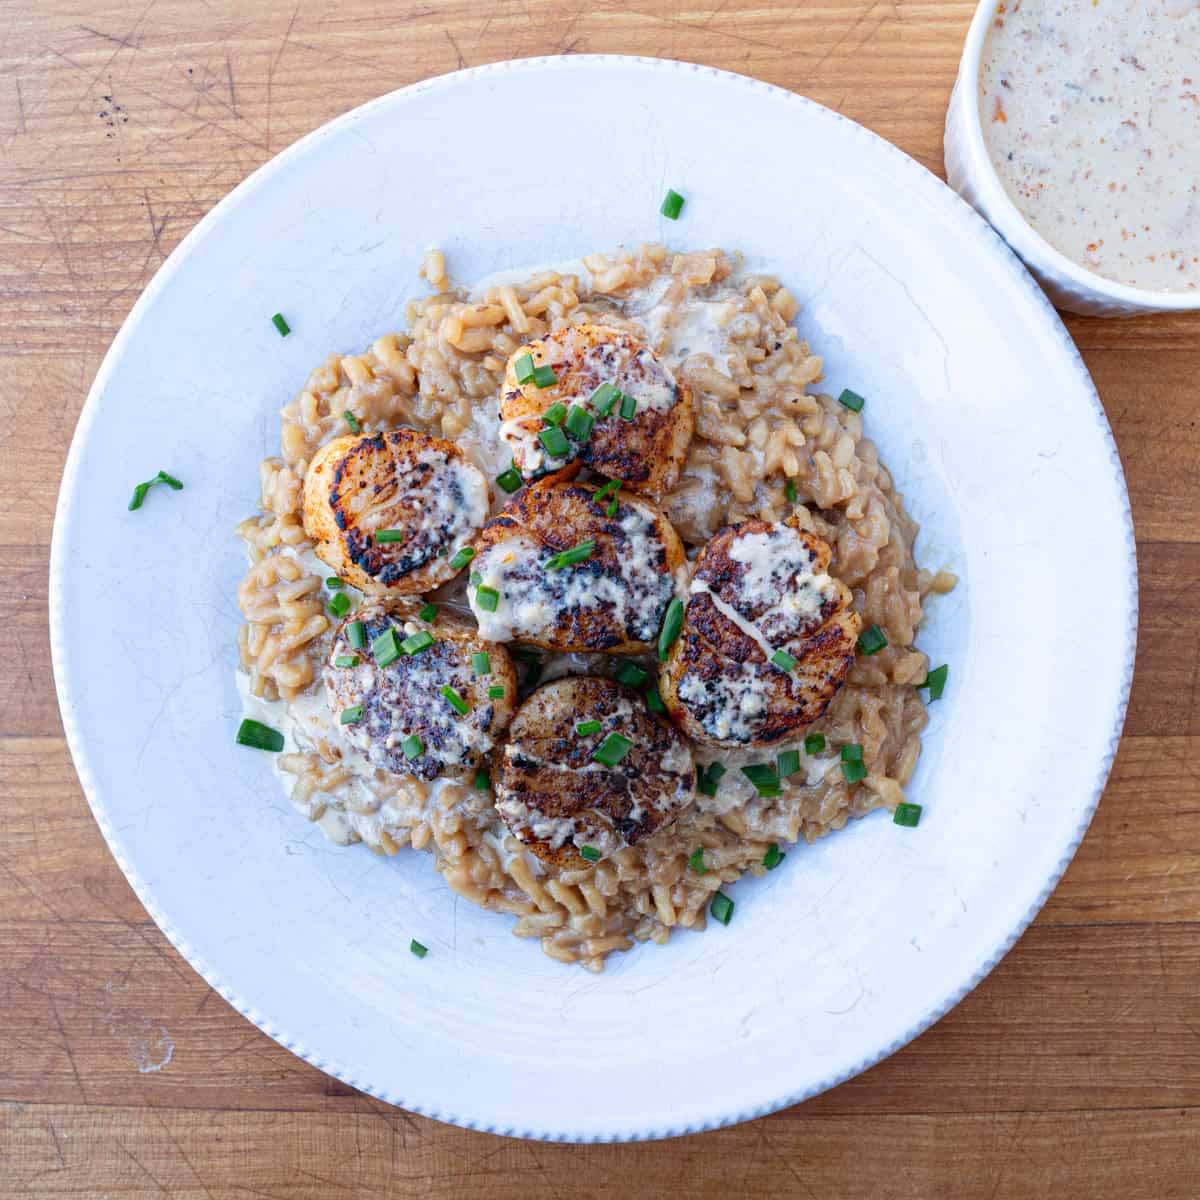
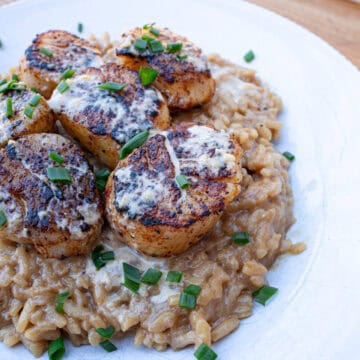
I like to serve these blackened scallops over risotto, partly because that's my wife's favorite, but also because the creamier side goes really well with the scallops and sauce.
I also love serving these with grits or mashed potatoes for the same reason, though you can use rice if you prefer.
Storage & Reheating
Scallops are always best the day you cook them, because that's when they have the best texture. That said, if you do have leftovers, store the scallops in an airtight container for 3 to 10 days, but I prefer to keep the Cajun cream sauce separate if possible. The sauce will hold in the fridge for about three days without any issues.
When reheating, handle it gently. Warm the scallops in a skillet over low heat just until heated through. For the sauce, reheat slowly in a pan and add a splash of cream if it needs loosening. Stir it well and let it come back together.
Recipe
Blackened Scallops with Cajun Cream Sauce
Equipment
- Griddle or stovetop
- saucepan
- Wooden Spoon
- tongs
- Measuring cups & prep bowls
- instant read thermometer
Ingredients
- 12 oz. jumbo scallops
- Creole seasoning as needed
- Olive oil or spray as needed
- 2 T butter unsalted
- 2 T garlic paste
- ½ C chicken stock
- 1 C heavy cream
- ¼ C parmesan cheese grated
- ½ lemon juiced
- Salt as needed
- Chives to garnish
Instructions
- Make the Sauce: Preheat the griddle to medium-high to high heat. Once the griddle surface begins to heat up, add a saucepan. Melt the butter. Next, add 2 teaspoon Creole seasoning and the garlic paste, stirring just until fragrant and the ingredients are combined (about 30 seconds). Next, pour in the stock and simmer for ~5 minutes, until slightly reduced. Once that happens, pour in the heavy cream to thicken. After ~5 minutes, remove the saucepan from the griddle and stir in the parmesan cheese until melted. Add a squeeze of lemon and season with salt. Adjust to taste, then set aside until ready to use.
- Take out the scallops, spray with oil, and season with creole seasoning until adequately covered. Place the scallops on the grill once preheated and cook for 2-3 minutes per side, or until nicely browned but not burned. Then, remove the scallops from the griddle.
- Finally, add the scallops over risotto or rice and cover in the cream sauce. Garnish with chives if desired. Serve & enjoy!
Notes
- Heat Matters: Your cooking surface must be fully preheated before adding scallops.
High, steady heat with enough oil or butter ensures proper blackening without burning the spices. - Don’t Crowd the Pan: Give scallops space. Overcrowding traps steam and prevents browning.
- Make-Ahead Option: The Cajun cream sauce can be made up to 3 days ahead and stored separately.
Leave a Reply