
I don’t usually share recipes that are made in the oven or on the stovetop, but sometimes, that’s just what the moment calls for. This meatball sub is absolutely one of those times.
When I put this one together, I had busy parents in mind. I was rushing to finish dinner, and our oldest was attending a sports event. I already had the meatballs ready, but I didn’t want just a basic sauce, so I put together something better.
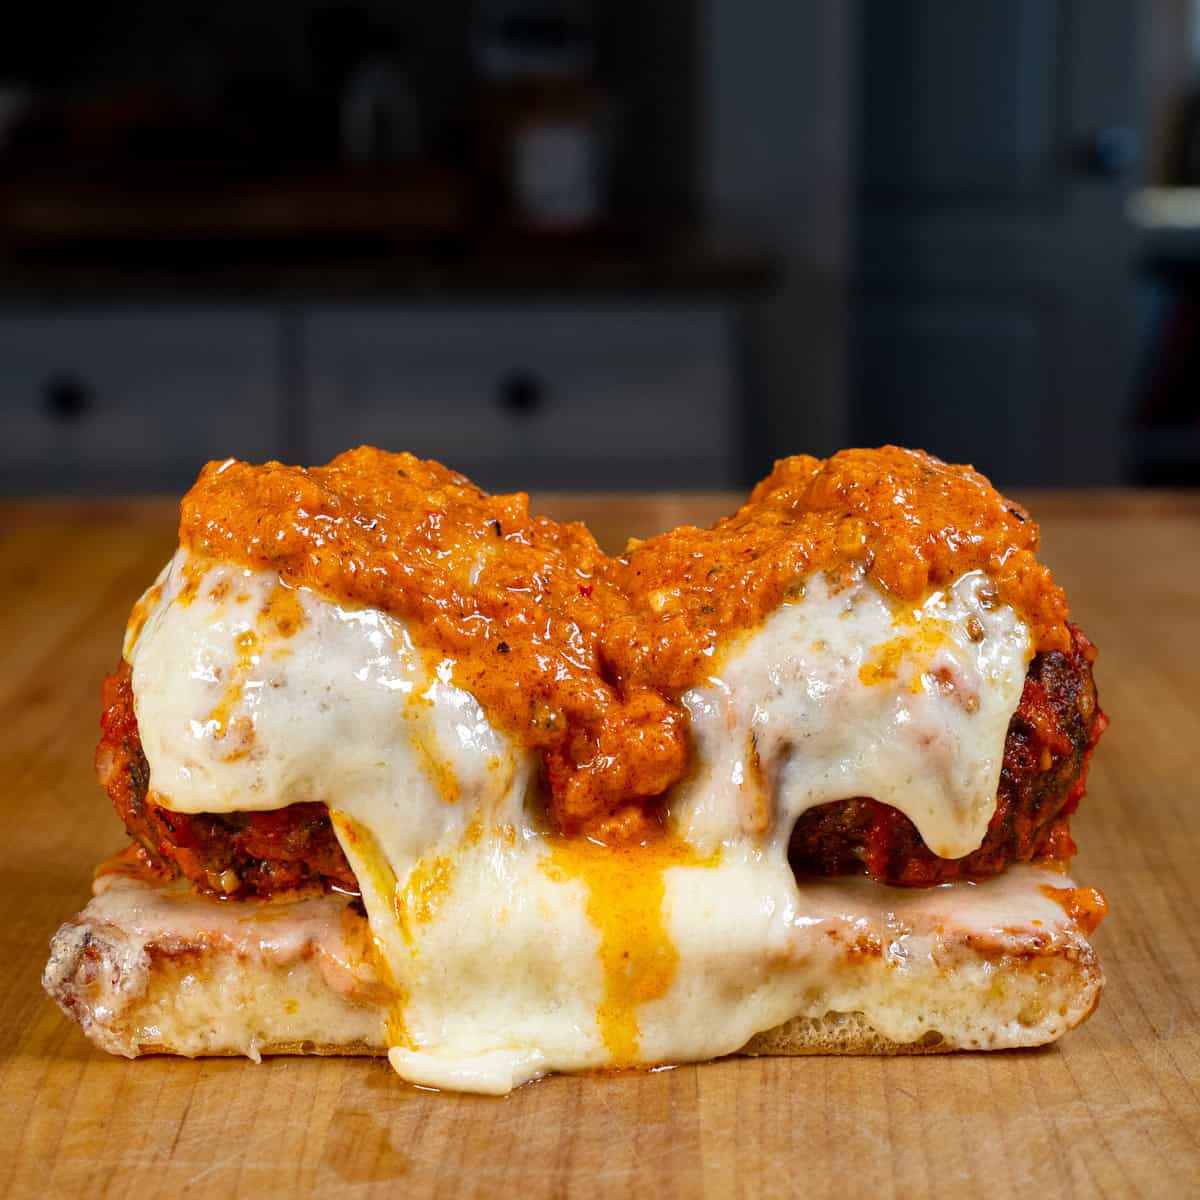
A good meatball sub has simple layers: solid beef meatballs, a good marinara sauce, melted cheese, and sturdy bread to serve it on. But when it cools, it’s a balancing act. The sauce wants to soak through, the cheese firms up, and the meatballs can dry out if you’re not careful.
That’s why knowing how to reheat it right matters as much as building it right. Get it wrong, and it falls apart. Get it right, and it’s just as good—or even better-- the next day. In this post, I'll walk you through how to make my favorite meatball recipe and easy homemade meatball subs. Plus, I'll walk you through proper storage tips and reheating methods so you can enjoy this sub again and again.
Jump to:
How to Store and Reheat a Meatball Sub
Nobody sets out to make a soggy sandwich—but unless you store and reheat your leftover meatball sub the right way, that’s exactly what you’ll get. A meatball sub is a delicate balance of sauce, bread, and cheese—all of which behave very differently in the fridge. If you treat them wrong, you’ll have mushy bread, dried-out meatballs, or chewy cheese. Not ideal.
So let’s break down exactly how to store and reheat a meatball sub so that you can make sure your sub is as good on day three of leftovers as it is on day one:
If you’re prepping ahead or know you won’t eat the whole batch, the best way to set yourself up for success in the future is to store the components separately. This gives you more control and keeps each element tasting fresh. The most important thing to remember is to store leftover meatballs and sauce in an air-tight container once they’ve cooled to room temperature. This is important because if you place them in a hot container, they'll lose a lot of their texture and become soggy. New bread and cheese can be pulled individually when ready to make the next sub.
If your sub is assembled, wrap it in aluminum foil (not plastic—plastic traps moisture). Then, refrigerate it in a zip-loc bag or an airtight container for up to 3 days. For longer storage, double-wrap in plastic and foil and freeze. Don't forget to store it in a freezer bag (or lightly vacuum seal if possible). Always label with the date so you know when you need to eat it by.
Now, reheating the sub is where things can get tricky if you don't go about it correctly. Many people will reassemble the sandwich (or grab a pre-assembled one) and toss it in the microwave. If you're okay with that and accept that the sandwich will be on the soggier side, that's fine. But if you want a sub just as good as the first time you make it, there's a better way to go about it. Your best bet will always be reheating in an air fryer or oven.
To do this, preheat your oven to 350°F. That's a good temperature because it's not so hot that the outside will cook without the meatballs reheating, and not so cool that you'll be waiting forever for the sandwich to warm up. Keep the sub in foil and place it on a baking sheet (if using plastic, make sure any is removed at this stage). Bake for 12–15 minutes, then unwrap for the final 4–5 minutes so the hoagie roll crisps up and the cheese bubbles. Going this route brings everything back to life, so the sandwich tastes just as good as the first time you made it. Just make sure to check the meatballs, as they will take the longest to warm up and come back to a state where they are safe to eat.
If you're in a pinch, the microwave can work, but you'll need to wrap the sub in a damp paper towel and microwave on medium power for 1–2 minutes. You’ll get decent results, especially if you follow up with a quick toast in a skillet or air fryer. If not, you will likely end up with a sub on the soggy side of things. Now that you know how to reheat your meatball sub, I will walk you through my easy recipe for making a meatball sub from scratch!
Ingredients You’ll Need
This easy meatball sub recipe is built for convenience but still loaded with flavor, even after sitting in the fridge for a couple of days. If you've got a favorite sauce you like to make, go for it. But this recipe was made with speed in mind for weeknights when you want to get dinner on the table in a hurry.
- Ground beef: Go for 80/20 for the most flavor and best ability to hold up without crumbling. It renders enough fat to build flavor without getting greasy.
- Olive oil: For searing the meatballs to a golden brown crust.
- Marinara sauce or tomato sauce: Tangy and provides just enough acidity to cut through the richness of the meat and cheese. I love to use Carbone's products if I'm not using my wife's sauce from scratch. I went with the arrabiata version for this because I prefer the spice, but you can go with the roasted garlic option if you prefer less heat. She approves, so I think it's a good option!
- Heavy cream, Shallots, Garlic, and Italian seasoning: I used these simple ingredients to level up the sauce for an even creamier, more flavorful profile. You can stick with the original pre-made sauce if you prefer, but these additions sure do improve the sandwich.
- Parmesan cheese: Blended into the meat mixture and added on top for that sharp, nutty depth.
- Provolone cheese: classic for meatball sandwiches. It melts beautifully and complements the tangy sauce with a mild flavor. You could substitute with mozzarella as well, another classic.
- Bread crumbs & egg: Essential binders that keep the meatballs tender and juicy.
- Hoagie rolls or Focaccia Bread: Hoagie rolls are traditional—this type of bread is built to soak up sauce without collapsing. However, I also like focaccia because it is a sturdy version with a unique flavor. That said, use what you have on hand or are most comfortable with.
- Fresh parsley or basil (optional): For a touch of brightness and color.
Instructions
Step 1: Make the Meatball Mixture
Start by preheating the oven to 400 degrees. Meanwhile, in a large mixing bowl, combine the ground beef, grated parmesan, breadcrumbs, egg, minced garlic, and herbs. Season with salt and black pepper. Use your hands or a fork to mix gently—just until everything holds together. Overmixing will toughen the meatballs.
Step 2: Form the Meatballs
You can make the meatballs into any size you like, but I've found that I prefer rolling the mixture into 1.5-inch balls—about golf-ball size. Try to keep them even for consistent cooking. Place them on a wire rack on a baking sheet and bake them until the internal temperature of the meatball registers 155 degrees, before removing them.
Step 3: Sear the Meatballs
Heat olive oil in a skillet over medium heat. Add the shallots and saute until tender, then add the garlic and cook until fragrant. Then add the meatballs and sear until browned on all sides.
Step 4: Simmer in Sauce
Once browned, pour in your sauce plus heavy cream (and a little more Italian seasoning if you'd like) and let the meatballs simmer for 10–15 minutes until cooked through and the sauce is slightly reduced.
Step 5: Assemble the Sub
Preheat your oven to 375°F. Slice your sub rolls open (don’t cut all the way through) and place them on a baking sheet. Using focaccia bread instead of hoagie rolls, like I did, is also a great way to make start your base for a different, delicious approach! Spoon a little sauce on the bottom, then add 3–4 meatballs in each roll. Top with extra sauce and two slices of provolone cheese.
Step 6: Bake Until Bubbling
Wrap each sub loosely in aluminum foil to prevent drying out. Bake on a sheet pan for 10–12 minutes until the cheese is melted and the bread is toasted around the edges. Once done, pull it out and shred fresh parmesan over it to finish!

Substitutions
If you need to adjust for personal taste or dietary needs, you could try the options below:
- If you want a lighter version, lean ground turkey or chicken can be substituted for beef. To help with moisture, add a splash of olive oil or an extra egg.
- Gluten-free hoagie rolls are easy to find and work well if you toast them slightly before assembly.
- Mozzarella, fontina, or even pepper jack can be substituted for provolone, depending on your flavor preference. Want more punch? Use smoked provolone or add a slice of sharp cheddar.
- For a dairy-free version, skip the cheese & cream entirely or try a meltable vegan mozzarella-style blend.
Variations
You can spin it in several ways once you’ve nailed the base recipe. Here are a few to try:
- BBQ meatball sub: Use your favorite smoky BBQ sauce instead of marinara. It's great with smoked Gouda. Just skip reducing the BBQ sauce in a pan, as most are high in sugar and will burn if you do so.
- Meatball sliders: Use dinner rolls instead of hoagie rolls and bake them in a foil pan—this is an excellent option for parties or game day spreads.
- Open-faced sub: Skip the top half of the roll and broil until everything is bubbling and browned. Less bread, more flavor.
Looking for more comfort food recipe ideas? Check out my Blackened Chicken w/ Alfredo sauce here!
Equipment That Helps
- Oven or air fryer: This is used to cook the meatballs and finish the subs.
- Cast iron or heavy-bottom skillet: For getting a good sear on your meatballs without overcooking.
- Baking sheet or sheet pan: Essential for baking and reheating subs evenly.
- Aluminum foil: Keeps the sandwich moist during reheating and locks in flavor during bake time.
- Plastic wrap: This is for use in addition to foil if freezing the subs.
- Wire rack: For cooking the meatballs in the oven for better airflow and more even cooking.
- Airtight containers: Ideal for storing meatballs and sauce separately to prevent soggy rolls and freezer burn.
- Meat thermometer: Used to check the temperature of the meatballs.
- Wooden Spoon: Gentle on cookware and perfect for stirring sauce.
- Prep Bowls and Measuring Spoons: These are for gathering and storing ingredients.
Recipe

Easy Meatball Sub
Equipment
- Oven or air fryer
- Cast iron or heavy-bottom skillet
- Baking sheet or sheet pan
- Aluminum Foil
- Plastic wrap
- Wire Rack
- airtight containers
- Meat Thermometer
- Wooden Spoon
- Prep Bowls and Measuring Spoons
Ingredients
- 2 lbs. ground beef
- ⅔ C breadcrumbs
- ½ C fresh parmesan grated
- 4 T Italian herb seasoning
- 1 T salt
- 2 eggs
- 2 shallots minced
- 2-3 garlic cloves minced
- 1 jar Carbones arrabbiata pasta sauce
- ½ C heavy cream
- Provolone as needed
- Focaccia Bread or hoagie rolls
- Olive oil as needed
Instructions
For the Meatballs:
- Preheat the grill or oven to 400 degrees.
- In a large bowl, combine the ground beef and next 5 ingredients (only use half of the Italian herb seasoning), mixing until well incorporated. Next, place the mixture into tiny meatballs on a wire rack.
- Once your grill or oven has preheated, add the meatballs and cook for 20-30 minutes, or until the meatballs register about 155 degrees.
- Transfer meatballs to a plate and set aside until ready to use.
For the Sauce:
- Place a large cast iron skillet over medium heat and add a drizzle of oil. Once the oil is hot, add the shallots and sauté until tender. Add the garlic and cook until fragrant. Pour in the pasta sauce, heavy cream, and the other half of the Italian herb seasoning and bring to a simmer.
- Add the meatballs in with the sauce and simmer until the sauce has thickened.
To Finish:
- Top a slice of focaccia bread with cheese, two meatballs, and more cheese. Bake at 375 degrees until the cheese has melted. Remove the sub and add the sauce and grated parmesan. Serve and enjoy!
Notes
- Make-ahead tip: You can prep the meatballs and sauce up to 2 days ahead. Store them separately and assemble when ready to eat.
- Freezer option: Fully cooked meatballs freeze great. Let them cool, then freeze in a sealed bag for up to 2 months.


Leave a Reply