
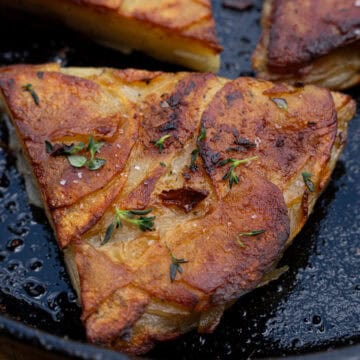
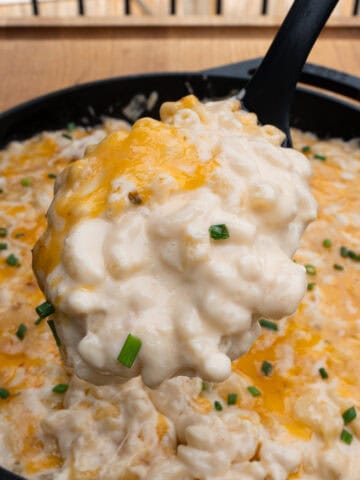
These are what I call my Best Ever Potatoes—my take on the classic French dish Pommes Anna. They are thinly sliced, buttery potato layers that I've lightly smoked and crisped in a cast-iron skillet until golden. If potatoes could be turned into a savory pie, this would be it. They look impressive, and they’re surprisingly make-ahead friendly. In fact, prepping them the day before is actually the best way to make the final cook easier. In this post, I’ll break down what Pommes Anna potatoes are and how to cook them from start to finish so you can enjoy them at home as much as I do.
Jump to:
Anna potatoes, also known as Pommes Anna, are thinly sliced potatoes layered with butter and slowly cooked until crispy outside and tender inside. This grilled version adds garlic herb butter and subtle smoky flavor from a cast-iron skillet on the pellet grill, plus tips for making them ahead, storing leftovers, and reheating them perfectly.
What Are Anna Potatoes, Exactly?
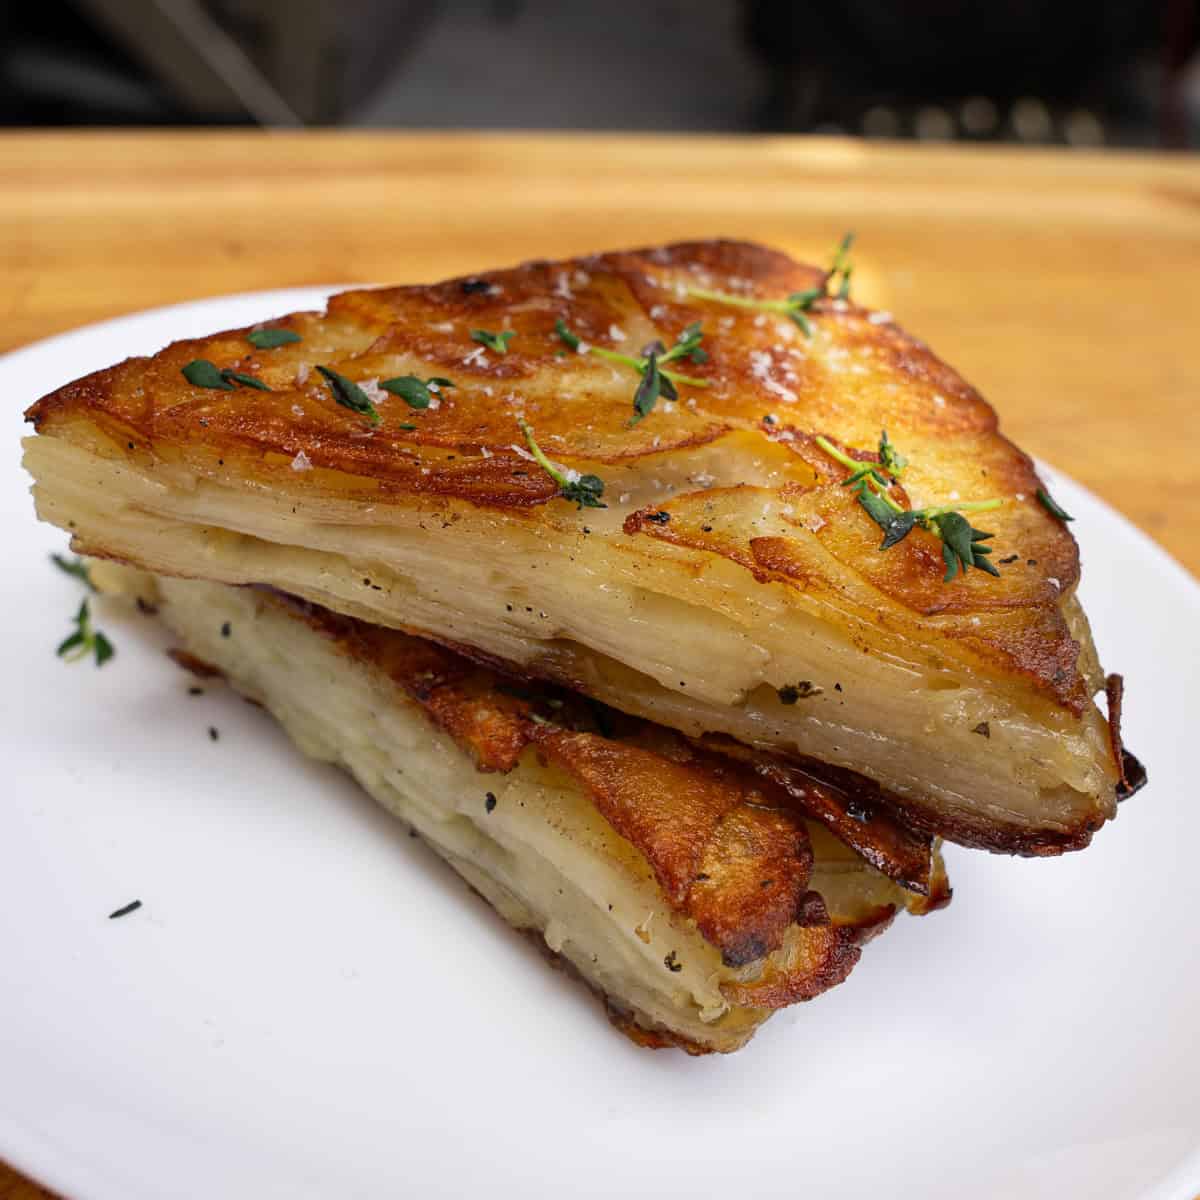
Pommes Anna—also known as Anna potatoes—is a classic French potato dish made by layering ultra-thin potato slices with plenty of butter before slowly cooking and pressing them into a crisped, golden potato cake. Traditionally, Pommes Anna is baked in a skillet or cast-iron pan until the inside turns buttery and tender while the outside develops that signature crispy crust. Once sliced, it almost looks like a savory potato pie with delicate layers stacked all the way through.
What makes Pommes Anna so special is the contrast in texture. You get crispy, deeply golden edges on the outside with rich, melt-in-your-mouth potatoes underneath. It’s simple in ingredients, but technique is everything. You can chalk it up to being a labor of love that is well worth the effort.
What Makes My Anna Potatoes Different?
This version takes that classic Pommes Anna method and pushes the flavor even further. Instead of just butter and potatoes, I layer every slice with a garlic and herb paste, then cook everything outdoors in a cast iron skillet on a pellet grill to pick up a subtle smoky flavor you simply can’t get in the oven.
The goal is to slowly cook the potatoes until completely tender while letting all that butter, garlic, herbs, and smoke work their way through every layer.
Can Pommes Anna Potatoes be made ahead?
Yes—Pommes Anna potatoes absolutely can, and quite frankly should, be made ahead. Once the potatoes are fully cooked, they need to be refrigerated overnight to solidify. If this is your first time making Pommes Anna, trust me—do not skip this step. That overnight rest is essential to making this dish without it falling apart.
Why It’s So Important to Chill Pommes Anna Overnight
As the potatoes chill, those buttery layers tighten and hold their shape, making them much easier to slice cleanly the next day into thick, pie-like portions. That’s the secret to getting those crispy, golden edges without the whole thing falling apart in the pan. By the next day, the potatoes are firm enough to sear until perfectly crisp on the outside while staying buttery-soft and tender in the center.
Ingredients
Russet Potatoes—Their high starch content makes them perfect for crispy edges and soft centers. You can also use Yukon Gold potatoes or other white potatoes.
Unsalted Butter – The base of the flavor and the crisp factor. I highly recommend melting it to evenly coat every layer.
Garlic Paste – Adds deep flavor without burning like raw garlic might. A little goes a long way. I really like using a paste in a dish like this, as it combines more easily with the butter and spreads evenly over every layer.
Italian Herb Paste—This gives the potatoes a herbaceous flavor throughout. I like this for the same reason as the garlic paste—lots of flavor, and I've found this form is the easiest way to spread onto the layers of potatoes.
Salt—Every layer needs a pinch to keep the dish seasoned from top to bottom. This is what will really help those flavors stand out.
Fresh Thyme (for garnish) – Completely optional, but adds visual appeal and a mild aroma.
How to Make Pomme Anna Potatoes
STEP 1: PREP THE POTATOES
Take out 4 russet potatoes and a cutting board (especially if using a knife instead of a mandolin). Peel off the skin. Then use a mandolin to thinly slice those peeled potatoes. I go with the thinnest setting, but you can adjust to your liking. Just remember: the thinner the slices, the more layers you get, which means more opportunities to add flavor. Place the chopped potatoes in a bucket of cold water for about 20 minutes. This removes excess starch and helps prevent oxidation from occurring quite as fast.
STEP 2: MAKE THE BUTTER MIXTURE
Melt 1 stick of unsalted butter and mix in 2 tablespoons of garlic and Italian herb paste. Stir until combined.
STEP 3: SET UP THE SKILLET
Brush a cast iron skillet with some of the butter mixture and lay it on a sheet of parchment paper to prevent sticking. This will also help the potatoes release later.
STEP 4: BUILD THE LAYERS
Pat your water-covered potatoes dry with a paper towel. Layer them in the skillet, starting from the outside edge and overlapping slightly. Once you have completed a layer, brush it with the butter mix and sprinkle it with salt. Repeat until all the potatoes are used—around 8–10 layers. This step takes some time, but doing it right is important to getting the desired result.
STEP 5: FIRST, COOK ON THE GRILL
Place another piece of parchment over the top, then press it down. You want to make sure those potatoes are settled. Next, place the skillet on your grill set to 375°F for about 1 hour, or until the potatoes are tender and the butter is bubbling. Make sure to use a toothpick to gauge the doneness. Note that the cooking time might vary based on how consistent the grill's temperature is and how many potatoes you use.
Once this happens, remove the skillet from the grill and place a plate or weight on top to keep the potatoes flat. I found our dinner plates were the perfect size for this, but use what you have on hand. Let the dish cool to room temperature, then refrigerate overnight in the skillet. This will make your life so much easier for the next step.
STEP 6: CRISP AND FINISH
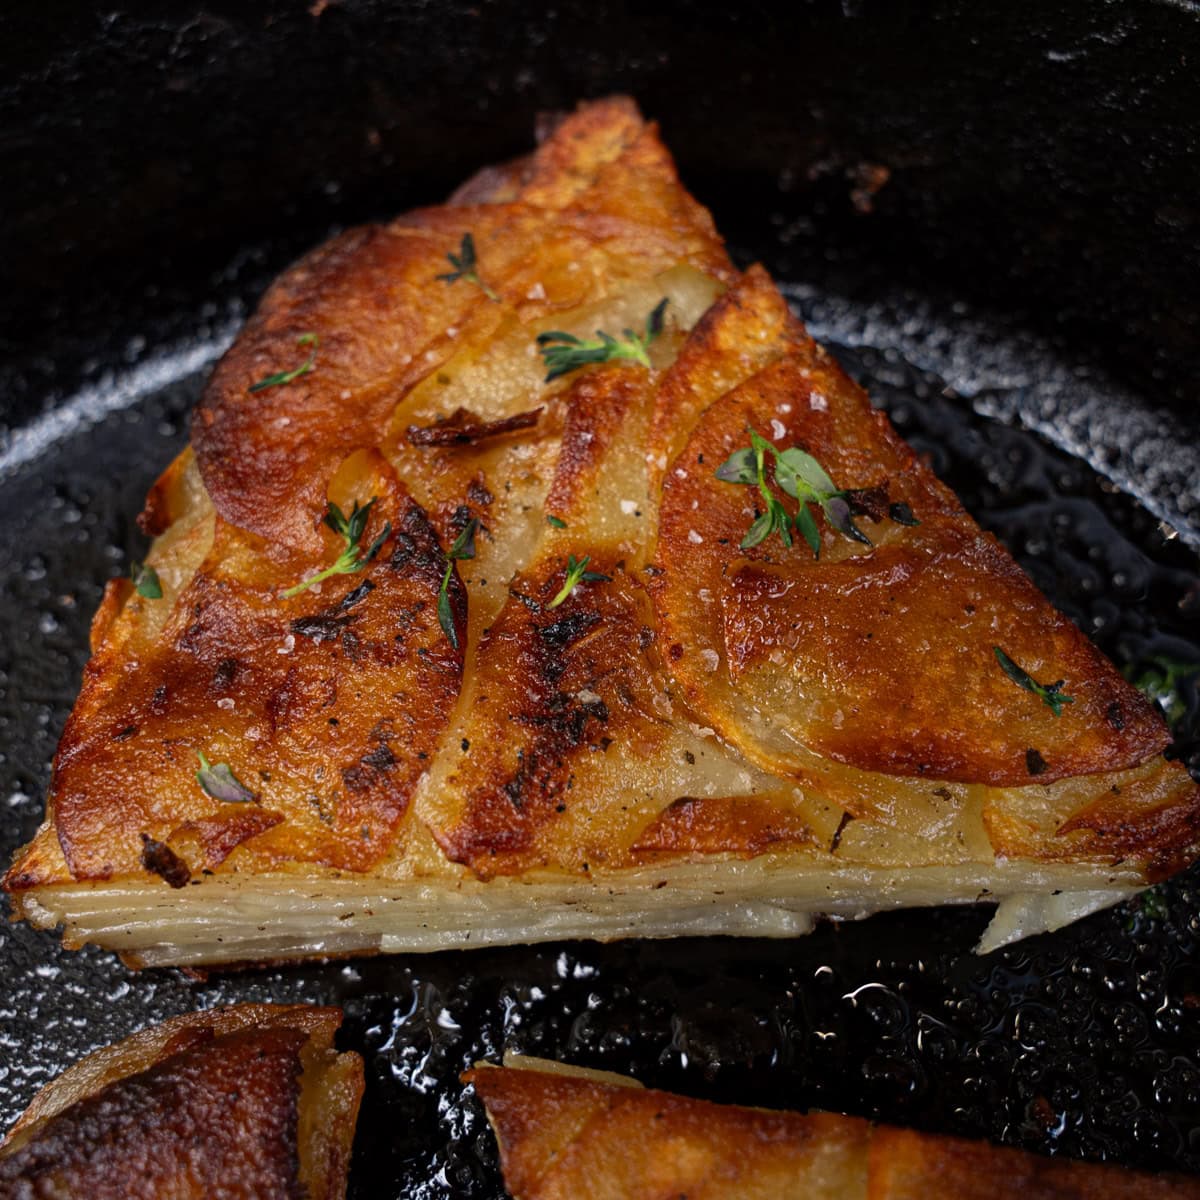
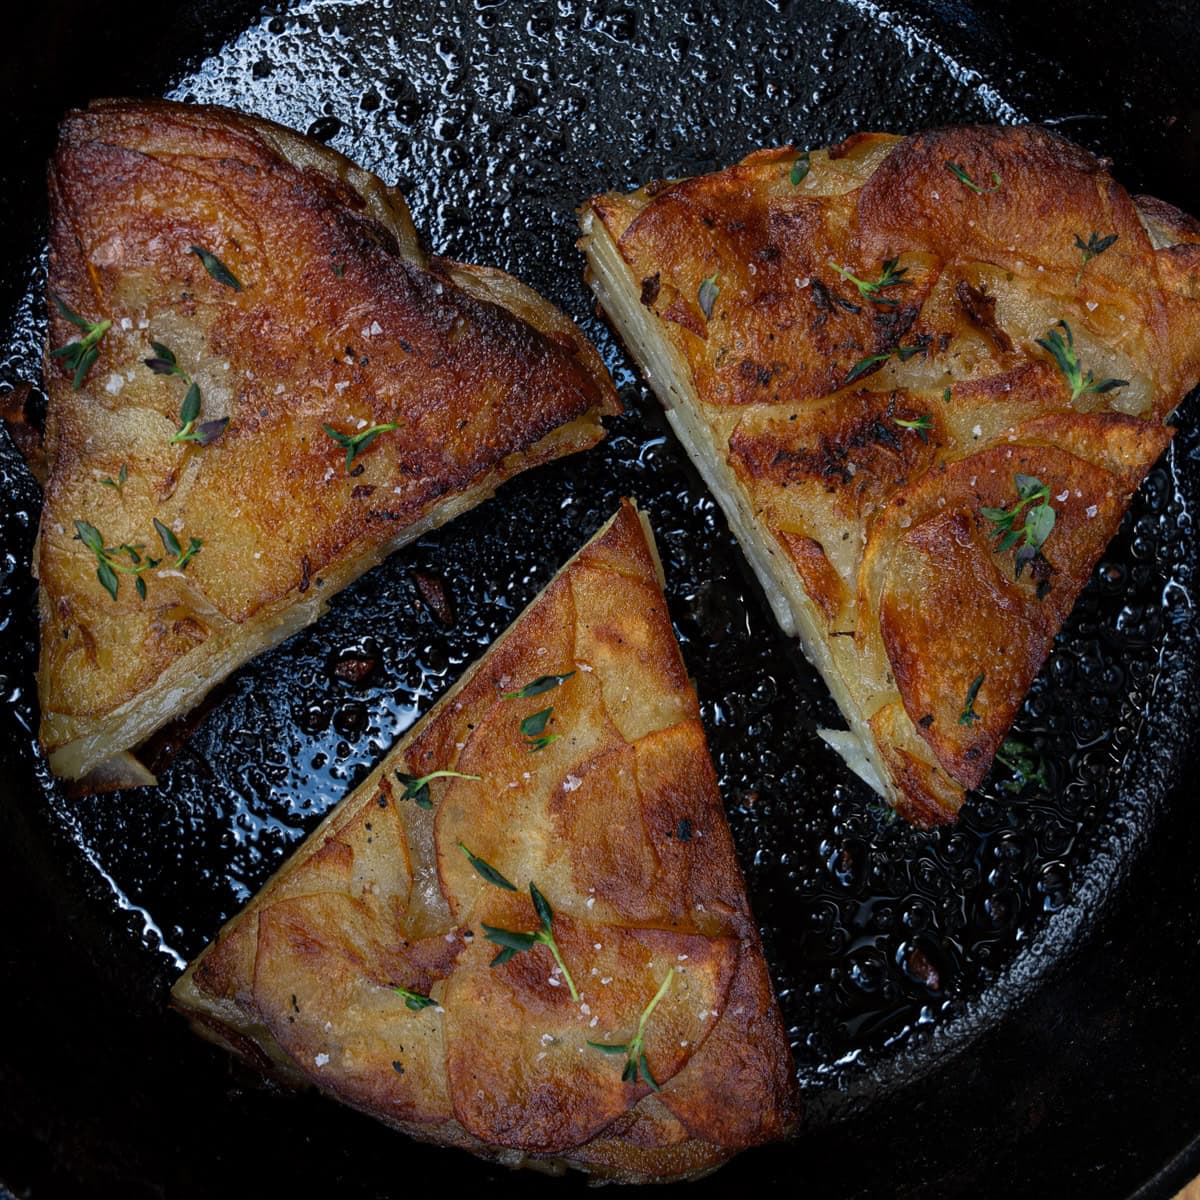
Preheat the grill (or stovetop) to 500°F. High temperatures are key here for a good sear. Lift the chilled potato round out using the parchment, and slice into 6–8 wedges (this should be a breeze if you let the potatoes chill overnight!). Add 3 wedges at a time back to the hot skillet and cook until both sides are golden brown, flipping as needed. Repeat this with the remaining wedges once all of them have been cooked, and top them with flaky salt and thyme before serving.
Substitutions
If you need to modify this dish to your personal taste or pantry, here are a few alternatives that will still yield flavorful results.
- Different Potato Varieties—Remember when I mentioned earlier that Yukon gold and white potatoes are two good substitutes for Russet potatoes? They have less starch and a creamier texture. They’re a good alternative if you prefer a more compact and waxy final texture, and they tend to oxidize more slowly than russets.
- Homemade garlic/herb paste—Skip the store-bought tubes and make your own by blending fresh garlic and herbs with olive oil. This gives you more control over the flavor and freshness. If you wanted an all-natural approach, you could use only fresh herbs and minced garlic cloves with the butter, which would be great. I just opted for the paste because of its smoother texture, which makes application easier. Feel free to adjust the herbs as needed. You could add a pinch of pepper, too, if you wanted a little heat.
These swaps don’t change the recipe's core but let you adjust for ingredients you already have or dietary needs you’re working around.
Variations
Want to customize this recipe? Try these ideas to tweak the filling, cooking method, or overall flavor profile.
- Spicy Version: Stir in chili paste or red pepper flakes into the butter for a spicy addition to these potatoes when pairing with grilled meats.
- Cheesy Layers: Add shredded Gruyère, parmesan, or aged cheddar between the layers before grilling. The good thing about this method is that the cheese melts into the potatoes, giving them a richer, almost gratin-like texture. This is absolutely delicious, in my opinion.
- Sweet Potato Swap: Use thinly sliced sweet potatoes for a sweet-savory version that’s great in the fall, or for a slightly more nutrient-dense option. Keep the garlic and herb mix light, or consider using brown butter with sage for a better flavor pairing with the sweet potatoes.
These versions follow the same core method but let you tweak the flavor based on your preferences.
Storing Leftovers
Leftover Pommes Anna potatoes can be stored in an airtight container in the refrigerator for up to 4 days. I’ve found the best way to store slices is in a single layer—or with parchment paper between layers—to help preserve the crispy texture and keep them from sticking together or becoming mushy.
CAN POMMES ANNA POTATOES BE FROZEN?
Yes, but with a slight tradeoff in texture. Pommes Anna potatoes can be frozen after they’ve been fully cooked and chilled. Wrap individual slices tightly in plastic wrap or parchment, then store them in a freezer-safe container or bag for up to 2 months.
HOW TO REHEAT POMMES ANNA POTATOES
When reheated, they’ll still taste incredible, but the crispy exterior may soften slightly compared to fresh-seared potatoes. For best results, thaw them overnight in the fridge before reheating in a skillet or oven.
Looking for something to pair with these potatoes? Here’s a few ideas!
Recipe
Best Ever Potatoes
Equipment
- Parchment Paper
- Cast Iron Skillet
- Mandolin or Sharp Knife
- cutting board
- Prep Bowls & Measuring Spoons
- Refrigerator
- Pastry Brush
- Airtight Container
- Grill and/or Oven
- Stovetop
- Spatula
- Toothpick
Ingredients
- 4 whole russet potatoes
- 1 stick (8T) unsalted butter melted
- 2 T garlic paste
- 2 T Italian herb paste
- Salt to taste
- Thyme to garnish
Instructions
- Preheat the grill to 375 degrees. Meanwhile, peel the potatoes before thinly slicing them with a mandolin (I went with the thinnest setting, but adjusted to preference). Place the sliced potatoes in a bucket with water for ~20 minutes.
- Mix the butter, garlic, and herb paste until well combined. Using a pastry brush, apply the butter mix to a cast iron skillet, then add a piece of parchment paper.
- Next, pour out the water the potatoes were soaking in and pat dry with a paper towel. Begin to layer the potatoes in the cast iron skillet, working your way from outside in until the cast iron skillet is completely covered. Brush the potatoes with the butter mix and add a pinch of salt. Repeat this step until all potato slices have been used, ~8-10 layers. Press a piece of parchment paper firmly on the potatoes, then add the skillet to the grill.
- Cook the potatoes on the grill until tender and the butter is bubbling, ~1 hour. At this point, remove the skillet from the grill. Place a plate over the potatoes (this will help prevent them from curling up). Allow the skillet to cool at room temperature, then refrigerate it overnight.
- When you're ready to cook the potatoes the next day, preheat the grill to 500 degrees or high setting (you could also do this final step on the stove). Take out the skillet and remove the potatoes using the parchment paper—the potatoes should resemble a pie at this point. Slice the potato into 6-8 pieces.
- Add the skillet pack to the grill with three potato slices. Allow the potatoes to cook until golden brown, flipping as needed. Repeat with the remaining potato slices.
- Once the potatoes are finished, garnish with flaky salt & thyme. Serve & enjoy!


Leave a Reply